Paper Cutting Kirigami Project Ideas spark playful precision and quiet focus, where paper cutting and kirigami folds turn flat sheets into stories. I keep a small tin of blades and bright cardstock on my desk, and on slow evenings I pull it out to try new kirigami projects.
Those little experiments often become gifts, cards, or tiny decorations that surprise friends.
One summer, a neighbor showed me a pop-up flower and I was hooked; Paper Cutting Kirigami Project Ideas kept tumbling through my head. With kirigami, a single slice changes everything, and paper cutting reveals hidden geometry.
The best part is sharing these kirigami projects after they bloom.
Pop-Up City Skyline Greeting Card Drama

A city skyline pop-up invites a play of silhouettes and light, turning a greeting into a small stage. Crisp black cardstock sets strong outlines while metallic foils hint at windows and moonlight.
A subtle gradient backdrop adds dusk or dawn, with vellum softening the glow. This project suits birthdays, new apartments, or graduation celebrations, and frames nicely in a shadow box after the event.
Style choices range from minimalist towers to whimsical rooftops and bridges. As a gift, it pairs well with a map pin or tiny sticker sheet.
Display closed for mystery, or open on a shelf to reveal its depth.
Steps
- Sketch a skyline with layered building tiers and bridge elements on folded cardstock.
- Score fold lines for each tier, then cut the window and roof contours.
- Add a contrasting backing sheet, attach side tabs, and reinforce hinge areas.
- Accent windows with foil or vellum and finish edges for a clean pop.
Layered Forest Shadow Box With Moonlight

A layered forest shadow box creates a tranquil scene where trees stagger in depth, and a paper moon casts gentle gradients. Thick watercolor paper gives sturdy layers, while swirls of sage, pine, and charcoal provide a woodland palette.
Specks of silver ink suggest stars, and a vellum sheet diffuses backlighting for evening ambiance. This piece sits well on a mantel or nightstand, bringing a calm hush to small spaces.
It works as a housewarming present, especially paired with a tiny battery tea light. Frames with deep profiles enhance the depth, and soft-edge cutouts create drifting fog between layers.
Steps
- Design multiple tree layers with staggered trunks and openings for depth.
- Score connecting tabs and cut layers from cardstock in varied greens and grays.
- Create a moon disc and star speckles on a backdrop sheet.
- Assemble layers inside a shadow box frame with spacers between each plane.
Floral Bloom Pop-Up Bouquet Card

A blooming paper bouquet opens with a flourish, petals unfurling to reveal contrasting centers and delicate leaves. Soft pastels lend romance while bold jewel tones bring drama, and pearlescent papers add a gentle sheen.
The structure folds flat for mailing, expanding into a small table arrangement upon opening. It suits anniversaries, birthdays, and thank-you notes, and can rest in a keepsake box afterward.
Printed patterns echo vintage wallpapers or modern botanicals. A ribbon belly band or wax seal adds ceremony.
With layered petals and subtle veining, this bouquet stands in for real flowers without wilting.
Steps
- Draft petal shapes and connecting hinges that collapse flat when closed.
- Cut petals and leaves in varied sizes; score center folds for curvature.
- Assemble flower cores and join layers to a spine that opens with the card.
- Add a contrasting backing and a belly band to keep it closed.
Geometric Star Lantern With Cut Panels

A geometric star lantern turns crisp facets and perforations into a gentle scatter of light. Heavyweight paper ensures clean edges, while metallic or iridescent finishes bounce reflections across nearby surfaces.
Cut patterns range from simple diamonds to complex tessellations. Warm white LEDs inside the hollow shape create a cozy glow for evening corners, party tables, or festive windows.
A suspended version hangs from a thin thread, while a tabletop version rests on a small base. Gifting works nicely with a tiny light included, wrapped in tissue.
Color themes span winter whites, indigo night, or sunrise gradients.
Steps
- Draft a net for a multi-point star with tabs and hinge lines.
- Cut perforations in each panel and score all fold lines.
- Form the star by joining edges, leaving an opening for an LED.
- Add a discreet hanger or base and test the internal lighting.
Ocean Wave Motion Pop-Up Postcard

This kinetic postcard captures rolling waves layered in crescents and foam crests, shifting slightly when opened. Deep teal, seafoam, and white form the palette, with translucent vellum suggesting spray.
A tiny sail or lighthouse anchors the scene, and embossed dots hint at bubbles. It suits coastal souvenirs, birthday mail, and travel memories.
Propped on a shelf, the motion draws the eye, adding a breezy tone to workspaces. As a gift, it tucks into a nautical-themed set with stamps and a map sticker.
Optional foil glints mimic sunlight flickering across the water.
Steps
- Sketch wave tiers with slotted hinges allowing slight movement.
- Cut layers from gradient blues and score pivot points.
- Assemble waves to a base card with sliding tabs for motion.
- Add a lighthouse or sail detail and reinforce hinges.
Mountain Panorama Tri-Fold Display Scene

A tri-fold panorama unfolds into peaks, valleys, and a distant sun, offering a desk-friendly landscape. Textured craft paper, denim blue cardstock, and pale mist tones build altitude and atmosphere.
Micro-cut tree lines and switchback trails add storytelling hints. The piece travels well as a greeting that doubles as decor in classrooms, dorms, or cubicles.
A matte or satin finish keeps glare down, and a thin strip of gold foil draws a sunrise line. Gift-ready when paired with a small stand or envelope, the panorama invites seasonal recolors from snowy ridges to autumn ranges.
Steps
- Plan three connected panels with staggered peak profiles and tabs.
- Score folds between panels and cut negative spaces for depth.
- Layer foreground trees and midground ridges onto the base.
- Add a sun disc or foil horizon and secure the backer.
Articulated Butterfly Wall Hanging Mobile

Paper butterflies with hinged wings shimmer in slight air currents, creating a living wall accent or window mobile. Iridescent, pearl, and translucent papers lend lifelike depth, while fine vein cuts bring delicacy.
Gradient inks or watercolor washes enrich the wingspan. Hung in clusters, the pieces cast playful shadows that shift through the day.
Ideal for nursery corners, creative studios, or seasonal refreshes, and giftable in a flat box with a coil of thread. A neutral palette reads elegant; bold tropical hues feel spirited.
Small beads or sequins at wing tips add sparkle without weight.
Steps
- Draw butterfly bodies with wing sections connected by tiny hinges.
- Cut top wings and underwings, scoring along hinge lines for movement.
- Layer wings onto bodies and pierce points for thread suspension.
- Arrange a balanced cluster on a hoop or dowel and hang.
Architectural Paper Bridge Desktop Model

A small bridge model celebrates structure through arches, trusses, or cables rendered in crisp card. Neutral grays and off-whites give an architectural studio vibe, while accent lines in red or mustard highlight tension paths.
Perforated deck textures and lattice guardrails add miniature realism. The piece rests on a simple base with a printed river or cobblestones, fitting nicely on a bookshelf beside design books or a pen holder.
As a present, it pairs with a tiny nameplate or date tag. A clean envelope or box keeps components pristine for display in an office or study.
Steps
- Draft a bridge profile with arch or cable elements and deck panels.
- Score fold points, cut structural members, and pierce perforations.
- Assemble the truss or arch to the deck and add guardrails.
- Mount the completed span onto a printed base.
Book Nook Tunnel Scene Insert
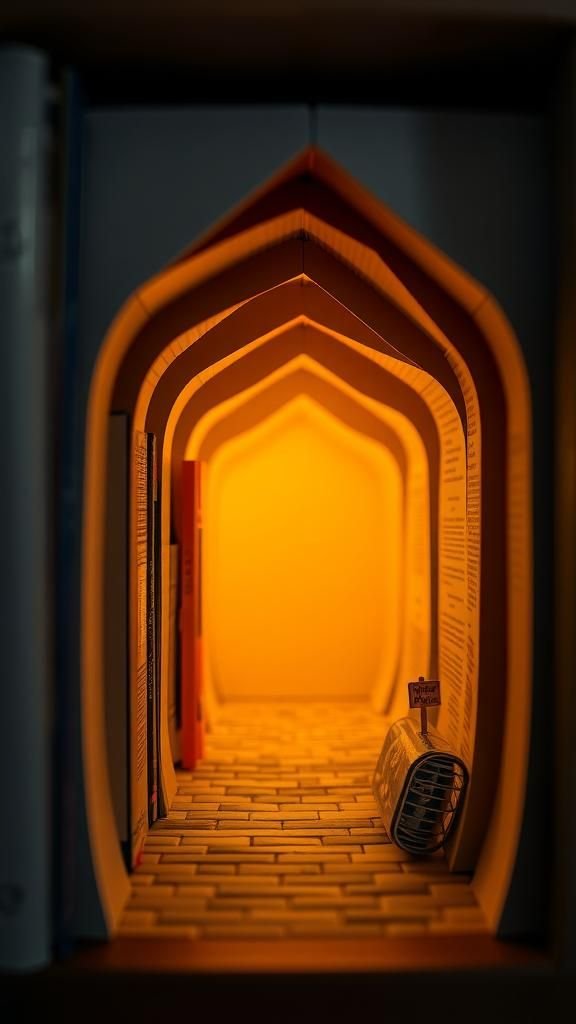
A tunnel insert slips between novels to reveal a miniature world down a corridor of layered archways. Cream and charcoal papers build contrast, while warm LEDs invite exploration.
Cut signage, cobblestones, or vines add texture, and a painted backdrop extends the horizon. It suits fantasy shelves, cozy reading corners, or a child’s room.
Gift it with a bookmark and a handwritten title plaque. Seasonal versions feature autumn leaves or snowy lanterns.
The slim profile fits standard shelves and stays light enough for easy rearrangement. The tunnel’s repeating arches create a satisfying rhythm along the shelf line.
Steps
- Design a sequence of arch frames with tabs for spacing.
- Cut detail layers for doors, signs, and floor textures.
- Stack frames with spacers to create a tunnel effect.
- Install a tiny LED strip behind a diffuser and close the back.
Zodiac Constellation Pop-Up Wheel Card

A rotating wheel reveals constellations popping through cut star windows, merging astronomy and whimsy. Midnight blue, silver, and white create a night-sky palette, while subtle iridescent dots suggest distant stars.
The inner wheel turns to align each sign with a pop-up emblem in the window. Perfect for birthdays or celestial themes, it displays on desks with a small stand.
Gift packaging could include a star chart sticker and a metallic envelope. The wheel’s motion feels satisfying, and crisp alignment marks on the back keep everything tidy.
The finished piece doubles as a calendar marker for star-gazing nights.
Steps
- Draw a circular wheel with windows and alignment marks.
- Cut the star windows and small pop-up emblem mechanisms.
- Stack the top plate over the wheel with a brad pivot.
- Add printed constellation dots and silver accents.
Art Deco Fan Pop-Up Greeting Design

Sweeping arcs and radiating bars open into an Art Deco fan, turning a simple greeting into a statement. Black, ivory, and gold provide cinematic glamour, while mirrored paper adds sparkle along the ribs.
The central medallion offers space for initials or a short phrase. Once opened, the fan stands upright like a small sculpture, perfect for mantel displays.
As a gift, it pairs with a slim gold envelope and a monogram sticker. The style suits weddings, milestone birthdays, and roaring twenties parties.
Geometric borders on the card frame the fan with crisp symmetry.
Steps
- Sketch radial ribs with hinge joints and a semicircle base.
- Cut the ribs and decorative panels, scoring fold lines.
- Join ribs at the pivot and attach the fan to the card base.
- Add gold accents and a central monogram medallion.
Lacework Tea Light Paper Wraps

Delicate lace-style wraps turn plain glass holders into sparkling accents for dining tables and cozy corners. Fine repeating motifs echo filigree metalwork, with vellum liners softening the glow.
Ivory, blush, and sage feel romantic; navy and copper lean modern. The wraps flatten for easy gifting and slip around a small LED tea light vessel.
They shine during weddings, dinner parties, or quiet reading nights. Pack a set of three with tissue paper and a ribbon for a thoughtful present.
Patterns can coordinate across sizes, creating a unified tablescape with gentle, patterned shadows.
Steps
- Design a repeating lace motif sized to fit a glass holder.
- Cut the pattern carefully, leaving connecting bridges.
- Form a cylinder and secure the overlap seam.
- Slide over a glass with an LED tea light inside.
Tessellated Kaleidoscope Coaster Tiles

Interlocking paper tiles create a kaleidoscope pattern that sits beneath clear acrylic coasters or frames as wall art. Bold contrasting colors like magenta, cyan, and black deliver striking geometry, while muted tones give a calmer look.
Repeating polygons, stars, or waves ride the line between math and ornament. Gift sets arrive in a banded stack with a color key.
On coffee tables, these tiles spark conversation and play nicely with modern decor. The arrangement evolves with new tiles swapped in, encouraging seasonal refreshes.
Foil slivers at intersections add sparkle without overpowering the design.
Steps
- Create a repeating tessellation template sized for coaster inserts.
- Cut interlocking shapes from multiple colors.
- Assemble patterns on backing squares for stability.
- Seal inside acrylic coaster blanks or small frames.
Hinged Snowflake Window Hanging Series

Snowflakes with hinge cuts unfold into airy forms that catch winter light. Pearl white, icy blue, and clear vellum deliver frosty elegance, while tiny foil dots evoke glinting ice.
Sets look graceful across windows or on a floating shelf. Packaged flat with a little tag, they make simple seasonal gifts for neighbors or teachers.
Each design keeps a distinct rhythm of arms and negative space. When sunlight passes through, shadows trace lacey patterns across walls.
Grouping multiple sizes creates a gentle cascade, welcoming colder months without heaviness.
Steps
- Draw radial patterns with inner hinges allowing three-dimensional opening.
- Cut out arms and negative spaces; score hinge lines.
- Open the flakes and secure a clear thread hanger.
- Arrange at different heights across a window.
Folding Lotus Table Centerpiece Sculpture

A lotus unfolds from flat planes into layered petals, forming a serene centerpiece for meditation corners or dining tables. Soft blush, ivory, and pale green create a botanical mood, while gold-tipped edges add ceremony.
Heavy cardstock supports the layered form, and watercolor paper brings subtle texture. The lotus sits beautifully on a mirror tile or dark wood tray, reflecting its geometry.
As a present, it slips into a gift box lined with tissue, ready for housewarmings or yoga studios. Multiple blossoms in varying sizes build a tranquil cluster that feels contemplative and calm.
Steps
- Plan petal segments with valley and mountain folds around a circular base.
- Cut layered petals and score fold lines for controlled curvature.
- Stack larger petals beneath smaller ones, offsetting for fullness.
- Add a discreet base ring to stabilize the sculpture.
Spiral Staircase Pop-Up Architectural Page

A spiral staircase rises from a flat page, each step casting a tiny shadow that suggests height and motion. Cool grays and cream echo drafting paper, while a hint of brass foil on the handrail adds luxury.
The form pairs well with sketchbooks, portfolios, and architectural displays. As a gift, it slides into a protective sleeve and travels safely for studio critiques or coffee table browsing.
The interplay of curved rail and straight risers draws attention to balance and repetition. It opens into a sculptural moment and folds away neatly for storage.
Steps
- Draft a spiral plan with central spine and step tabs.
- Cut risers, treads, and rail segments; score pivot points.
- Assemble the staircase onto the page with aligned tabs.
- Add a subtle foil handrail and reinforce the spine.
Dragon Scale Hinged Paper Mask Display

A stylized mask covered in hinged scales catches light with a dynamic shimmer. Iridescent greens, charcoal, and hints of copper create a legendary mood, while each scale lifts slightly for texture.
The base structure holds its form on a small stand, turning a tabletop into a mini gallery. As a present, it arrives on a display card with a title tag.
The pattern can lean fierce or elegant depending on eye cutouts and brow angles. Positioned near a plant or stone, the scales echo natural armor and bring fantasy energy to a room.
Steps
- Sketch a mask base with eye cutouts and attachment points.
- Cut layered scale pieces with tiny hinge tabs.
- Attach scales in overlapping rows to the base form.
- Mount the mask on a stand or display plaque.
Carousel Pop-Up Center Display Piece

A carousel lifts from a flat base, revealing horses and canopy panels in a ring of movement. Candy colors with stripes, or vintage creams with burgundy and gold, each tell a different fairground story.
Fine pole details and scalloped edges add charm. The piece anchors party tables, nursery shelves, or seasonal decor.
Gift-ready with a round box, it brings a smile without taking much space. Transparent window panels can simulate mirrors, and tiny flags add cheer along the roofline.
The circular layout creates pleasing symmetry from every viewing angle.
Steps
- Design a circular base with slotted positions for poles.
- Cut canopy, horse silhouettes, and support tabs.
- Assemble poles and horses, then attach the canopy ring.
- Add scallops, flags, and a central cap to finish.
Hexagonal Gift Box With Pop-Up Lid

A hexagonal box with a pop-up lid turns small tokens into an event. Solid colors with contrasting interiors feel modern, while patterned papers invite playfulness.
The lid lifts to reveal a surprise motif rising from inside, such as a star or heart. The form suits jewelry, sweets, and desk trinkets.
Coordinated sets stack neatly and look handsome on a shelf. For gifting, satin ribbon and a tiny tag complete the presentation.
Matte finishes keep fingerprints away, and a subtle deboss or foil monogram lends a refined touch.
Steps
- Create a hexagon net with side walls and base tabs.
- Cut and score the lid panels with a simple pop-up mechanism.
- Assemble the box body and fit the lid with the motif.
- Add lining paper and a ribbon closure if desired.
Animal Peekaboo Hinged Bookmark Set

Slim bookmarks hide animal faces that peek above pages through hinged cuts. Foxes, pandas, and owls appear when the hinge lifts slightly, adding humor to reading sessions.
Smooth cardstock with satin lamination resists wear, while bright inks keep characters lively. Sets of three or five make charming teacher gifts or party favors.
A neutral kraft sleeve with a window showcases the designs. The bookmarks slide into novels without bulk, and the peeked ears or whiskers become easy page finders.
Seasonal editions feature scarves or tiny blossoms for playful rotation through the year.
Steps
- Sketch bookmark shapes with small hinged sections for ears or faces.
- Cut character details and score the hinge lines.
- Layer color pieces to form faces and markings.
- Slip a test page to ensure the peek sits above the edge.
Mandala Window Suncatcher Rosettes

Mandala rosettes in translucent papers glow when sunlight streams through, casting colored patterns onto floors and walls. Layers of citrus, raspberry, and aqua build a joyful palette, while fine linework holds everything together.
A central gem-cut cutout adds sparkle without weight. These rosettes hang in kitchens, studios, or dorm windows, and they gift well with a suction hook included.
When grouped, the overlapping colors create new hues throughout the day. Edges stay crisp with smooth acetate backing, keeping the shapes floating and luminous.
Steps
- Design concentric mandala rings with connecting spokes.
- Cut layers from translucent papers and align registration marks.
- Adhere to a thin acetate circle for stability.
- Attach clear thread and hang near a sunny window.