Herb drying rack DIY ideas turn harvest moments into simple joy. A herb drying rack, herb air-drying rack, or kitchen herb dryer tucks neatly into daily life, keeping mint, thyme, and sage fragrant.
I started with a string above the sink, and soon every bundle deserved a better perch, so these herb drying rack DIY ideas grew with each season.
A small corner transformed once I made a herb drying rack that matched my jars and labels. Now the routine feels calm and aromatic, and friends always ask about my favorite herb drying rack hacks.
Rustic Ladder Herb Drying Rack For Kitchens

A petite wooden ladder brings farmhouse warmth to herb drying without crowding a space. Two short rails and narrow rungs welcome twine, tiny clips, and S-hooks, creating height for airflow around fragrant bundles.
Reclaimed pine or cedar feels inviting, while waxed or sun-bleached finishes fit cottage or boho rooms. Linen ribbon or brass tags add charm, and a sprig garland across the top softens the silhouette.
Perfect for seasonal harvests, it tucks above a countertop or pantry door. Wrapped with kraft paper and twine, it becomes a thoughtful housewarming gift for tea lovers and home cooks.
Steps
- Cut two side rails and several short rungs from scrap wood.
- Pre-drill and screw the rungs into the rails to form a mini ladder.
- Install ceiling hooks and suspend the ladder with rope or chain.
- Tie herb bundles with twine and hang from the rungs using clips or S-hooks.
Wall-Mounted Peg Rail Herb Drying Bar

A Shaker-style peg rail offers a clean line for airy drying while doubling as subtle wall decor. Smooth maple or ash with a light oil finish keeps attention on the vivid greens of oregano and mint.
Mixed metal hooks in brass, blackened steel, or copper introduce a glint that pairs well with stoneware and glass jars. Cotton twine and muslin tags help identify blends for tea or marinades.
The rail sits nicely above a backsplash or pantry shelf, staying practical yet graceful. Boxed with a spool of twine and kraft labels, it becomes a charming kitchen-ready present.
Steps
- Cut a hardwood backboard and evenly space holes for pegs.
- Glue pegs into the board and clamp until set.
- Anchor the rail to wall studs and add metal hooks.
- Tie herbs into small bundles and hang from the hooks to dry.
Hanging Embroidery Hoop Herb Drying Rings

Stacked embroidery hoops form a delicate circular tower that suits airy kitchens and studio windows. Natural bamboo or birch rings contrast with dark twine, while linen ribbons introduce a soft, textural note.
Small binder clips or miniature clothespins grip stems without crushing leaves. Staggered tiers keep bunches separate, encouraging even airflow.
Pale wood finishes blend with Scandinavian decor; charred edges give a moody accent for modern spaces. The piece stores flat between seasons and pairs beautifully with a small booklet of herbal blends.
Gift-ready when slipped into tissue with a tiny sprig tucked in.
Steps
- Nest two embroidery hoops to create sturdy rings and secure hardware.
- Tie three or four equal cords to the hoop and gather at a top ring.
- Repeat to create tiers, spacing hoops for airflow.
- Clip herb bundles around each ring and suspend near indirect light.
Copper Pipe Grid Herb Drying Frame

Slim copper tubing arranged as a grid introduces a modern, warm metallic note that flatters potted greens and marble counters. Cross joints and elbows create structure, while leather ties or jute cords bring softness.
Small S-hooks glide along the pipes so bunches can shift as needed. The patina evolves over time, lending character to basil and thyme displays.
It suits loft kitchens and sleek condos, and pairs well with amber glass jars. Presented with a set of labeled tins, it becomes a thoughtful gift for anyone who loves aromatic blends and tidy storage.
Steps
- Measure and cut copper pipe lengths for a rectangular frame with crossbars.
- Dry-fit elbows and tees, then secure joints with epoxy or solder.
- Add eye screws to ceiling joists and hang the frame with chain.
- Hook herb bundles along the crossbars with S-hooks for drying.
Macramé Ring Herb Drying Hanger With Tassels
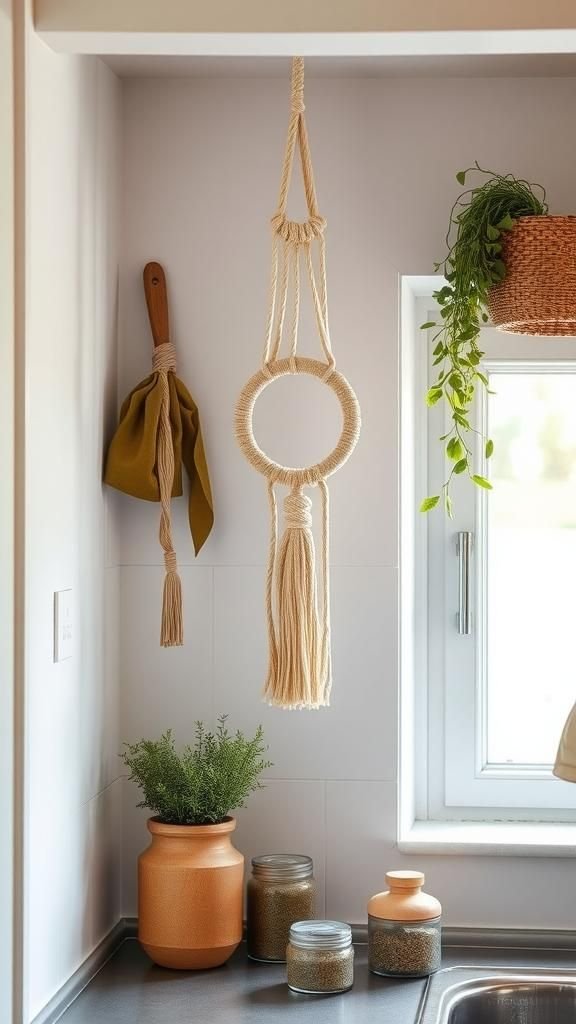
Soft cotton cords knotted around metal or wooden rings create a boho accent that also organizes fragrant stems. The pattern frames each cluster while tassels dance in a gentle breeze.
Off-white cords invite natural vibes, while dusty rose or sage green cords echo garden hues. Brass rings or black powder-coated rings change the mood from warm to sleek.
Lightweight clips and wooden beads add a playful finish. It stores flat in a drawer between seasons and pairs nicely with a small bundle of pre-cut twine.
Wrapped in tissue, it suits birthdays and host gifts.
Steps
- Cut equal lengths of macramé cord and tie lark’s head knots onto a ring.
- Knot a simple pattern to form hanging arms and a central cradle.
- Add a second ring below for an extra tier and secure with knots.
- Clip herb bundles to the lower ring and hang near air circulation.
Window Sill Tension Rod Herb Dryer

A low-profile tension rod across a window turns sunlight and air into a subtle drying zone. Slim rods in brushed nickel, black, or white vanish behind the greenery while small curtain clips keep stems spaced.
Sheer linen panels nearby add a breezy frame that whispers cottage charm. The setup favors delicate herbs that benefit from gentle circulation.
Spare rods store in a drawer when the season winds down. Packaged with mini clips and parchment envelopes for storage, the set feels like a clever, compact present for apartment dwellers or dorm cooks.
Steps
- Measure the inside width of the window frame.
- Extend a sturdy tension rod until it fits snugly in place.
- Add small curtain clips along the rod.
- Clip herb bundles and allow indirect light and airflow to do the rest.
Magnetic Strip Jar Herb Drying System
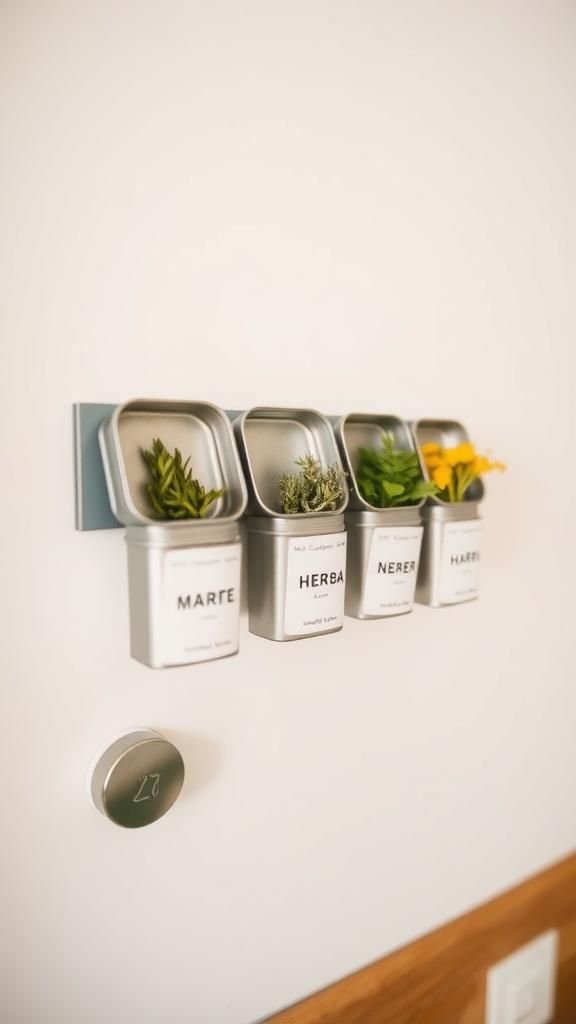
A magnetic knife strip becomes a tidy perch for lightweight spice tins with perforated lids, letting stems dry inside with airflow. Stainless or black strips read modern, while vintage-style tins lean nostalgic.
The row lines up above a backsplash, saving counter space and keeping blends labeled by lid markers. Vent holes invite circulation without dust, and clear lids reveal progress.
It pairs beautifully with a chalk marker and a stack of kraft labels. Wrapped with a tea towel and a ribbon, this compact system suits tiny kitchens and travelers who love herb-infused meals.
Steps
- Install a strong magnetic strip onto wall studs or anchors.
- Drill small vents into the lids of empty metal spice tins.
- Stick tins to the strip and label them.
- Place herb sprigs inside tins and leave lids slightly ajar for airflow.
Bamboo Sushi Mat Herb Drying Trays

Flat bamboo sushi mats transform into breathable trays that welcome loose leaves and small sprigs. The thin slats promote airflow, and a stack of mats on simple rails creates tiers without bulk.
Natural bamboo pairs with stone counters, earthenware bowls, and linen towels for a serene scene. Mat edges can be hemmed with cotton tape for a refined finish.
Perfect for peppermint, chamomile, or delicate oregano, the trays slide into a pantry shelf. Bundled with parchment sachets and a twine spool, the set feels thoughtful for tea enthusiasts and urban gardeners.
Steps
- Cut two narrow wooden rails to match mat width.
- Screw rails to a pair of side supports to form a rack.
- Lay bamboo mats across the rails, creating tiered shelves.
- Spread leaves in thin layers and rotate mats occasionally.
Chicken Wire Frame Herb Drying Screen

A wooden frame stretched with chicken wire creates a farmhouse-style screen that breathes from every angle. The galvanized mesh supports clothespins and twine while allowing air to wander through thyme, sage, and bay.
Weathered oak or pine with a wax finish keeps a soft, matte look, and an optional thin trim adds a gallery feel. The panel leans against a wall or hangs from small brackets above a sideboard.
Wrapped with a handful of mini pins and kraft envelopes, this piece makes a friendly gift for anyone who loves pantry projects and rustic accents.
Steps
- Build a rectangular wood frame with mitered corners.
- Staple chicken wire tightly across the back of the frame.
- Hang the frame on sturdy hooks or brackets.
- Clip herb bundles directly to the wire for drying.
Picture Frame Mesh Herb Drying Display
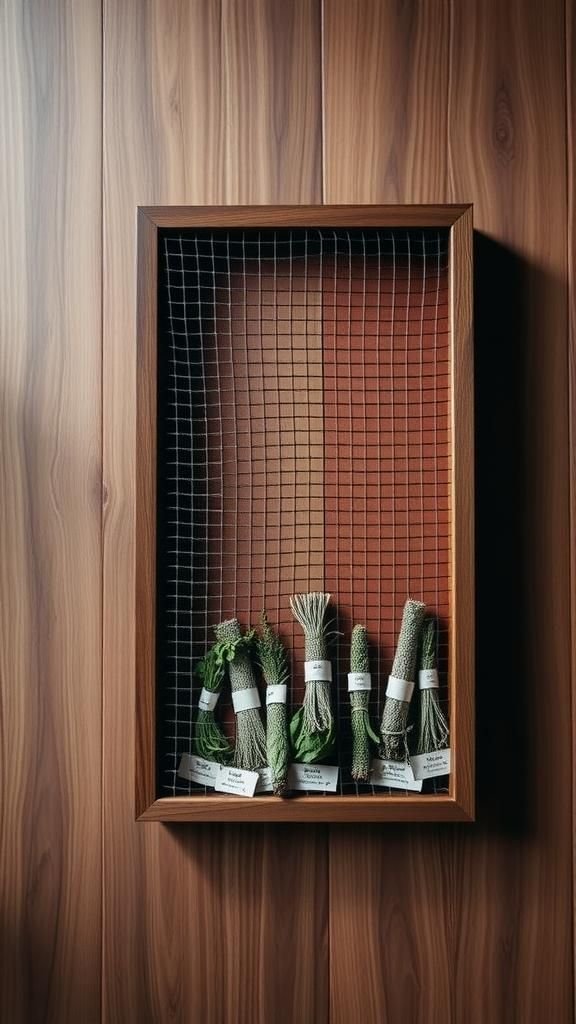
An upcycled picture frame gains new life with fine mesh stretched across the opening, bringing gallery vibes to a practical task. Dark walnut frames read classic, while pale ash suits minimal settings.
Brass push pins, twine loops, and tiny labels line the perimeter, creating an orderly grid for small bunches. The piece looks handsome above a console, making herb preservation feel decorative.
Clear glass gets removed to keep airflow steady. Presented with parchment packets and a date stamp, this design becomes a gift that turns everyday seasoning into something quietly beautiful.
Steps
- Remove the glass and backing from a sturdy frame.
- Staple fine wire mesh or window screen onto the back.
- Add small hooks or pins around the inner rim.
- Hang labeled herb bundles across the mesh surface.
Collapsible Umbrella-Style Hanging Herb Dryer

An umbrella clothes hanger inspires a clever tiered form that folds flat when not in service. A central hub supports slender arms with clips, creating a cascade for lightweight sprigs.
Powder-coated steel in matte black or white keeps the look neat; natural wood beads along the chain add warmth. Homes with tiny kitchens appreciate the compact profile above a sink or in a laundry nook.
Paired with a linen storage bag and date tags, it turns into a neat gift for balconies and city windows where space calls for graceful solutions.
Steps
- Disassemble a lightweight umbrella hanger to access the arms and hub.
- Replace flimsy clips with sturdier mini clamps.
- Install a ceiling hook and hang the hub by chain or cord.
- Clip herb bundles around the arms so they hang freely.
Vintage Sieve Stack Herb Drying Tower

Old metal or wooden sieves stack into a tiered tower with generous airflow from top and bottom. The round silhouette feels market-fresh beside stoneware crocks and checkered linens.
Aged zinc and brass rims gain a lovely patina, while linen or cotton liners keep bits from falling through. Each level holds a different variety, making blends easy to curate.
It tucks into a cool pantry corner and doubles as a conversation piece during gatherings. Gift-ready when paired with a wooden spoon and labeled jars, this tower feels storied and practical at once.
Steps
- Source sieves in graduated sizes and clean thoroughly.
- Stack them with dowels or spacers at three or four points.
- Secure the stack with threaded rod, nuts, and washers.
- Spread herbs across each sieve layer for drying.
Driftwood Branch Herb Drying Mobile

A smooth piece of driftwood becomes a natural armature for hanging stems, bringing beachy calm to a kitchen wall. The organic curve supports jute cords and tiny brass hooks that sparkle against the weathered grain.
Neutral cotton tags suit modern and coastal rooms alike. The pale, sun-kissed wood looks lovely above tile or alongside woven baskets.
Air swirls around the small bundles, keeping leaves in good shape. Packaged with extra cord and a postcard of the shoreline, this mobile makes a sweet seasonal gift for friends who love ocean tones and herbal teas.
Steps
- Clean and dry a sturdy driftwood branch.
- Screw small eye hooks along the underside at intervals.
- Knot jute cords through the eyes to create hanging points.
- Hang labeled herb bundles from the cords to dry.
Over-The-Range Pot Rack Herb Dryer

A pot rack above the range moonlights as an herb station, keeping steam out of the way while herbs enjoy the higher air. Black iron or brushed stainless bars carry an industrial mood that pairs with subway tile and butcher block.
Swivel hooks spread clusters apart, and a low-profile wire shelf holds small trays for loose leaves. Soft linen sachets and metal labels keep things tidy.
When not needed, the rack reverts to pans and ladles. Wrapped with recipe cards and a bundle of bay leaves, this idea suits home cooks who love organized tools.
Steps
- Install a sturdy pot rack anchored to ceiling joists.
- Add extra S-hooks dedicated to herbs.
- Hang bundles away from direct heat and steam paths.
- Place perforated trays on the rack shelf for loose leaves.
Tiered Cooling Rack Herb Drying Station

Baking cooling racks stack into airy shelves that support loose leaves and small bouquets. Chrome, black, or gold finishes shift the mood from bakery-bright to chic.
The open grid lets air pass from all sides, and parchment liners keep tiny petals contained. It sits neatly on a counter, pantry shelf, or inside a cabinet.
Matching the racks with glass canisters and black labels brings a tidy, uniform look. Boxed with a date stamp and muslin bags, this station becomes a thoughtful gift for bakers who also nurture windowsill gardens.
Steps
- Stack cooling racks with metal spacers or tall jar lids at the corners.
- Secure the stack with binder clips at each corner.
- Slide parchment liners on top if drying small leaves.
- Spread herbs evenly and rotate trays every day.
Paper Bag Vent-Hole Herb Drying Method

Simple kraft paper bags create a dim, dust-protected environment while allowing air through tiny vents. Stems slip inside and hang upside down, preventing sunlight from bleaching color.
A row of bags looks charming along a pantry rail, especially with handwritten labels and twine bows. The warm brown paper complements stoneware and linen, giving a cottage feel without clutter.
Bag tops fold around clips to maintain airflow. Presented with a set of labels and wooden clothespins, this setup fits renters, campers, or anyone who favors low-tech solutions with a mindful look.
Steps
- Punch small vent holes around each paper bag.
- Label the bags and place herb bundles inside, stems upward.
- Close the top loosely and secure with a clip.
- Hang the bags on a peg rail or tension rod to dry.
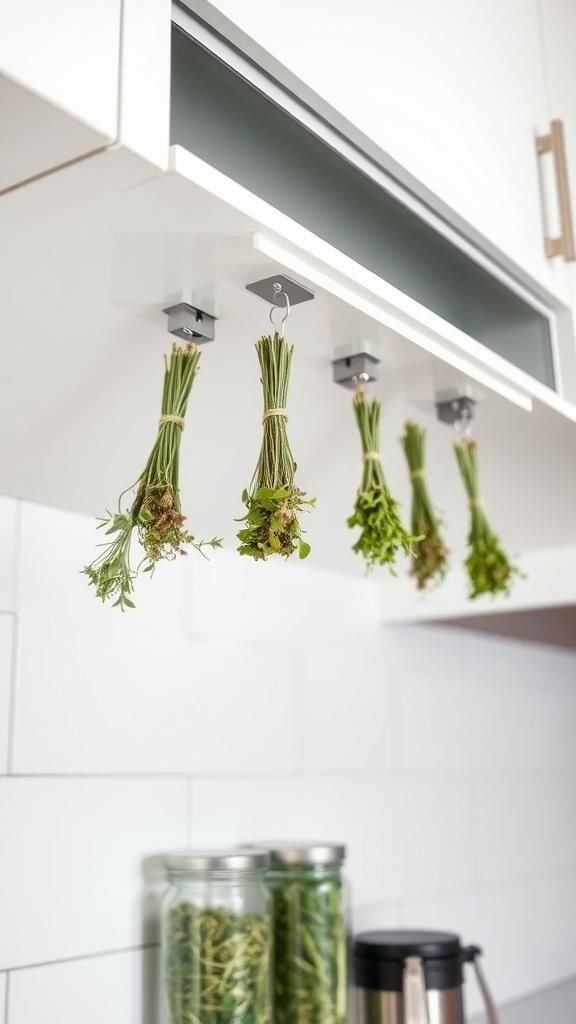
Closet Rod Herb Garment Hanger Rack

A spare closet rod or garment rack becomes an herb line that rolls where airflow is best. Wood rods bring warmth; chrome adds a studio look.
Velvet or wooden hangers cradle twine-tied bundles without slipping, and clip hangers create staggered spacing for even drying. A linen sheet beneath catches stray leaves.
The setup tucks into laundry rooms, porches, or garages out of direct sun. Gift it with a pack of sturdy hangers and kraft labels for a friendly, ready-to-go solution that adapts with the seasons and the size of each harvest.
Steps
- Assemble a garment rack or set a closet rod on brackets.
- Arrange hangers along the rod with adequate spacing.
- Tie herb bundles and hang from the hangers or clips.
- Wheel or position the rack in a breezy, shaded area.
Terracotta String-And-Peg Herb Drying Stand

A terracotta pot, a dowel, and radiating strings create a compact stand with earthy charm. The clay base brings warmth and weight, while the dowel rises like a tiny tree.
Strings descend from a top ring with wooden pegs that grip delicate stems. The look pairs well with olive wood utensils, linen napkins, and pale stone countertops.
Terracotta’s color ranges from blush to burnt orange, adding a Mediterranean mood. Boxed with extra pegs and cotton string, the stand becomes a thoughtful tabletop accent for balconies, sunrooms, or quiet kitchen corners.
Steps
- Drill a centered hole in a terracotta pot saucer.
- Epoxy a dowel into the hole and slide the pot over for stability.
- Add a top ring and tie strings down to form hanging lines.
- Clip bundles to the pegs spaced along each string.
Reclaimed Pallet Slat Herb Drying Shelf

Thin pallet slats become an open shelf with gaps that encourage air to move around leaves. The linear pattern suits modern rustic spaces, especially paired with black brackets and clear jars.
Beeswax or oil treatments bring out grain without glare. A row of hooks beneath holds small bouquets while the top hosts trays for loose leaves.
The piece blends with coffee station decor or pantry walls. Paired with kraft envelopes, date stickers, and a little wooden scoop, it makes a thoughtful present for gardeners who admire materials with a past life.
Steps
- Dismantle a clean pallet and select straight slats.
- Screw slats onto two cleats with even spacing to form a shelf.
- Mount the shelf on sturdy wall brackets.
- Hang herb bundles under the shelf and spread leaves on top.
Woven Basket Lid Herb Drying Array

Flat basket lids transform into textured trays that whisper farmhouse grace. Rattan or seagrass fibers breathe naturally, and their patterns cradle fragile petals.
A cluster of lids in different diameters forms a pleasing sunburst on a wall or rack. Natural straw, honey, or warm gray tones blend with linen, stone, and pottery.
Small parchment liners keep bits intact without hiding the weave. When the season ends, the lids stack slim in a cupboard.
Paired with a bundle of labels and a sprig of lavender, the set makes a sweet host or holiday gift.
Steps
- Clean and dry flat basket lids thoroughly.
- Mount small spacers on a wall or rack to hold the lids level.
- Rest the lids on the spacers to allow airflow beneath.
- Lay herbs in single layers across the woven surfaces.
Minimalist Acrylic Herb Drying Rail With Clips
Clear acrylic keeps focus on color and texture while offering a sleek line beneath cabinets or shelves. A slim rail with tiny stainless clips produces a floating effect as green bundles seem to hover.
The transparent look pairs with modern glass jars and monochrome palettes. A matte black logo tag or small etched labels give a subtle identity to each variety.
The rail wipes clean easily and disappears visually in bright kitchens. Gift-ready with a microfiber cloth and pre-cut twine, it suits design lovers who favor crisp, unobtrusive solutions.
Steps
- Cut a length of acrylic rod and polish the edges.
- Install low-profile brackets under a cabinet or shelf.
- Snap small stainless clips onto the rod.
- Tie herbs and hang from the clips with room for airflow.