I’ve always loved the quiet satisfaction of making something by hand for the people I care about, and Mother’s Day offers the perfect excuse to get crafty. Over the years I’ve kept a handful of favorite ideas that feel personal without being fussy, and making one of these Handmade Mother’s Day Gift Crafts has a way of turning ordinary afternoons into little celebrations.
There’s something comforting about choosing colors, textures, and scents with someone in mind.
This collection of Handmade Mother’s Day Gift Crafts gathers projects that invite cozy moments, small surprises, and keepsakes that linger on shelves and in memory.
Pressed flower frame for delicate keepsakes
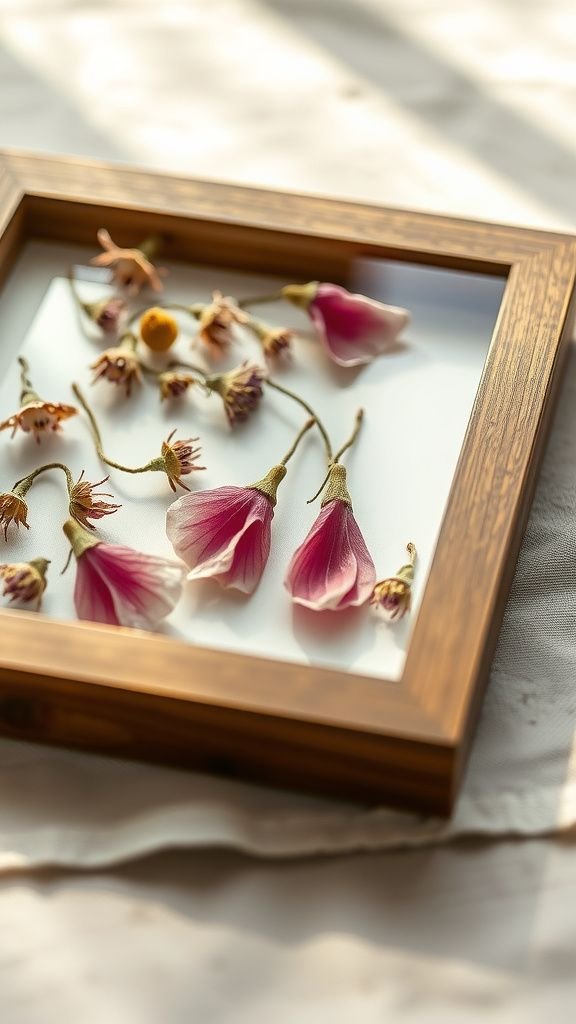
I love the hush of crushed petals between glass; the frame becomes a quiet shrine to a single day. The colors lose some brightness but gain a papery elegance, with veins and edges catching the light like tiny stained-glass windows.
The scent is faintly grassy, a reminder of lawns and walks. Each frame feels like a rescued fragment of a season, gentle and intimate on a mantel or bedside.
I often find myself smiling at the imperfect arrangement, which feels personal in a way a store-bought item rarely does.
Steps
- Select flat blossoms and lay them on absorbent paper until dry and crisp.
- Position dried flowers between two clean glass panes, arranging for visual balance.
- Fasten the glass panes inside a frame and secure the backing.
- Wipe the glass outside for clarity and add a small label to recall the date.
Hand-painted ceramic mug with rustic charm
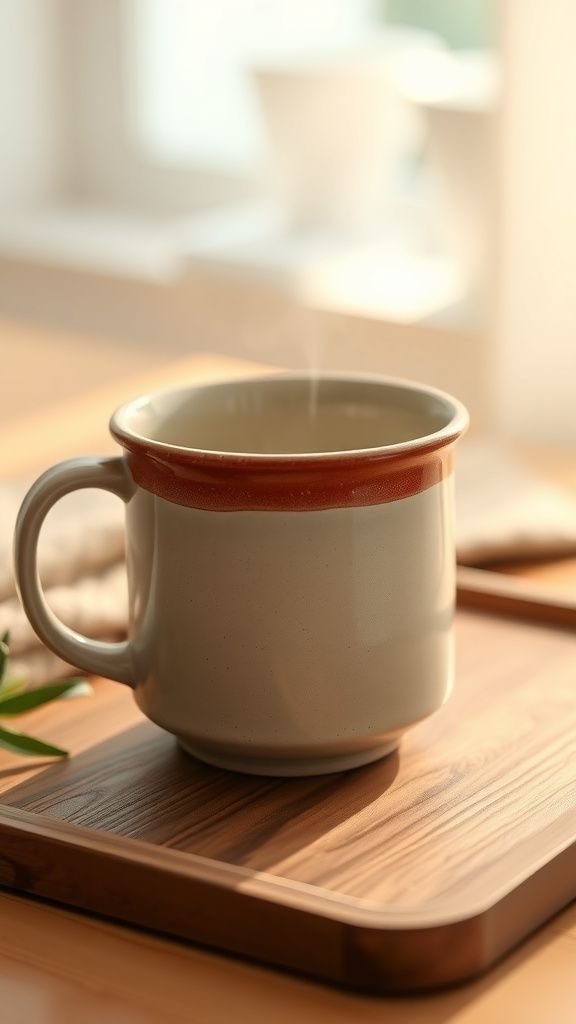
There’s a cozy warmth to a mug painted by hand; the uneven brushstrokes and tiny imperfections make every sip feel like a small ritual. I remember choosing a soft blue glaze and watching it pool at the base, where it created deeper tones.
The tactile rim and slightly lopsided handle add character, and the smell of fresh coffee seems to belong with it. When given away, the mug often becomes the morning companion for a favorite person, turning an ordinary drink into a moment of affection and routine.
Steps
- Select a plain ceramic mug and dry the surface thoroughly.
- Sketch a simple motif with a pencil, keeping designs light and personal.
- Apply ceramic-safe paints in thin layers, allowing drying time between passes.
- Bake in an oven following paint manufacturer’s instructions to set the finish.
Memory jar filled with handwritten moments

The memory jar feels like a small time capsule; tiny slips of paper folded gently hold jokes, thanks, and fragments of days. Tapping the glass brings a soft rustle, and the mix of colors from the notes makes the jar look celebratory on a kitchen counter.
When I opened one years later, I was surprised by how a single sentence could unlock an entire afternoon. The jar itself acquires fingerprints and smudges that are part of its story, and it invites revisiting on rainy evenings or quiet weekends.
Steps
- Gather a clear jar and an assortment of small colorful papers.
- Invite friends and family to write short memories or appreciations on slips.
- Fold each note into a soft bundle and place them inside the jar.
- Close the jar with a decorative lid and add a ribbon or tag for display.
Botanical soy candle in vintage teacup

Pouring wax into an old teacup transforms kitchenware into an aromatic keepsake. The soy wax takes on the teacup’s personality, cooling into a smooth surface that catches tiny dried botanicals for a charming, old-fashioned look.
The scent wafts gently — lavender or citrus — and the weight of the cup in hand feels reassuring. I like the way a flickering wick throws tiny reflections into the patterned china, making an evening feel softer.
It’s the kind of gift that invites pause, a little moment of calm amid busyness.
Steps
- Prepare a clean vintage teacup and wick assembly centered within.
- Warm soy wax until fully melted and stir in chosen fragrance oils.
- Pour wax slowly around the wick and allow cooling until solid.
- Trim the wick to a safe length and embellish the top with dried herbs.
Embroidered handkerchief with tiny floral motif

An embroidered handkerchief carries a quiet intimacy, the threadwork like a small, wearable poem. The texture of tiny stitches against fine cotton invites running a fingertip across them, and the little bouquet tucked into a corner can brighten a pocket or drawer.
I often choose thread colors that echo a beloved scarf or wallpaper pattern, and the slow rhythm of stitching becomes a calming ritual. When the piece is gifted, it feels like an heirloom started anew, with the stitcher’s presence stitched into every loop and tiny knot.
Steps
- Choose a soft cotton handkerchief and a simple floral design to transfer.
- Trace the motif lightly and select coordinating embroidery threads.
- Work small stitch types to fill petals and stems, keeping tension even.
- Finish thread ends neatly and gently press the finished square from the reverse.
Lavender sachets for drawers and linen closets
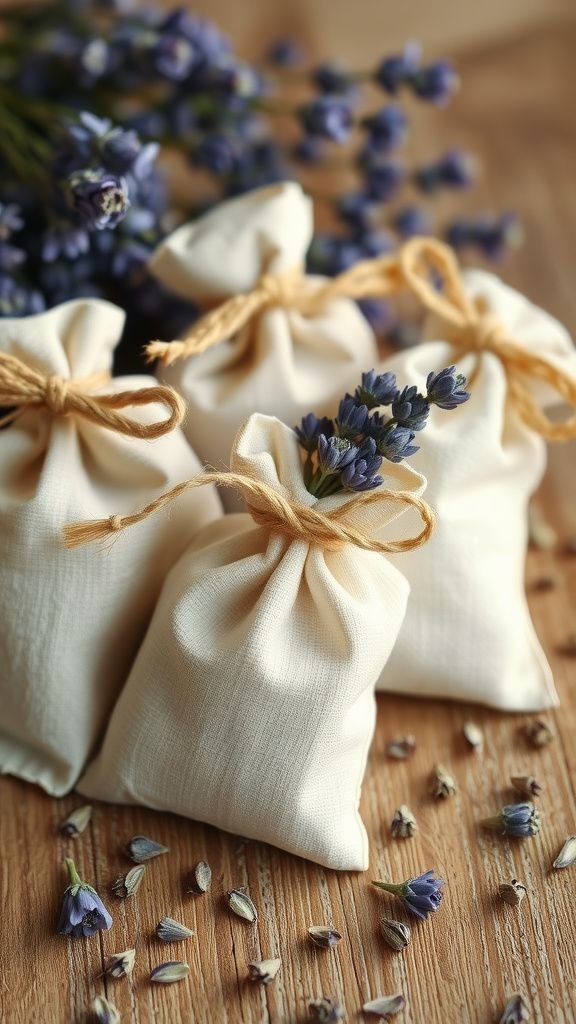
A handful of lavender tucked into tiny fabric pouches brings a serene scent to drawers and closets. The sachet fabric — a worn linen or cheerful cotton — rustles pleasantly against clothing, releasing a soothing herbal aroma when moved.
I enjoy the tactile contrast between the soft pouch and the dried buds, and the scent evokes summer meadows even in the middle of winter. Every now and then a sachet is squeezed between fingers, letting out a fresh burst of fragrance that feels like an invisible comfort.
Steps
- Choose breathable fabric squares and trim edges for a neat look.
- Spoon dried lavender buds into the center and gather the sides upward.
- Close the opening with a neat stitch or a decorative ribbon tie.
- Place sachets among linens or in a drawer to perfume clothing gently.
Personalized recipe book of family favorites
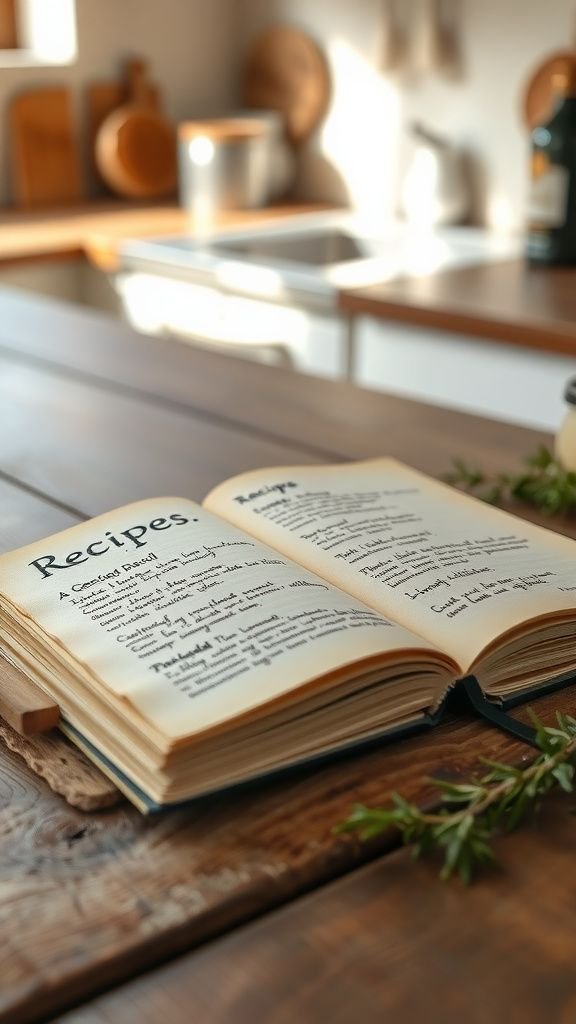
A handmade recipe book feels like a living family document. Thick paper absorbs fingerprints and tiny splashes that mark the most-loved pages; the smell of an old card or a smudge of sauce adds character.
I like adding little margins with anecdotes — where a dish was first served or a mother’s secret tweak — which turns ingredients into memory. The cover often shows hand lettering that nods to personality, and flipping through the pages is like touring a culinary map of family gatherings and quiet weekday comforts.
Steps
- Collect favorite family recipes and type or handwrite each one on quality paper.
- Arrange pages into a pleasing order and add small anecdotes or notes.
- Bind the pages using a sewn or ring-bound method to create a durable booklet.
- Design a cover with a personalized title and secure it to the binding.
Photo magnet set for kitchen memories

Turning favorite snapshots into small magnets brings a refrigerator to life. The glossy photos catch light, and the tactile flip of a magnet feels oddly satisfying.
I enjoy choosing a mix of candid smiles and quiet moments so the set reads like a tiny gallery. Over time the magnets gather fingerprints and notes, becoming part of daily life rather than a static decoration.
There’s a charm in seeing a photograph peeking from behind a grocery list, where personal history and everyday errands share the same surface.
Steps
- Select printed photos and cut them to slightly smaller than magnet blanks.
- Adhere photos to magnet sheets using a strong adhesive layer and smooth out air bubbles.
- Trim the magnet edges for a clean finish and round corners if desired.
- Arrange the magnet set on a metal surface for display and enjoyment.
Clay fingerprint dish for tiny treasures
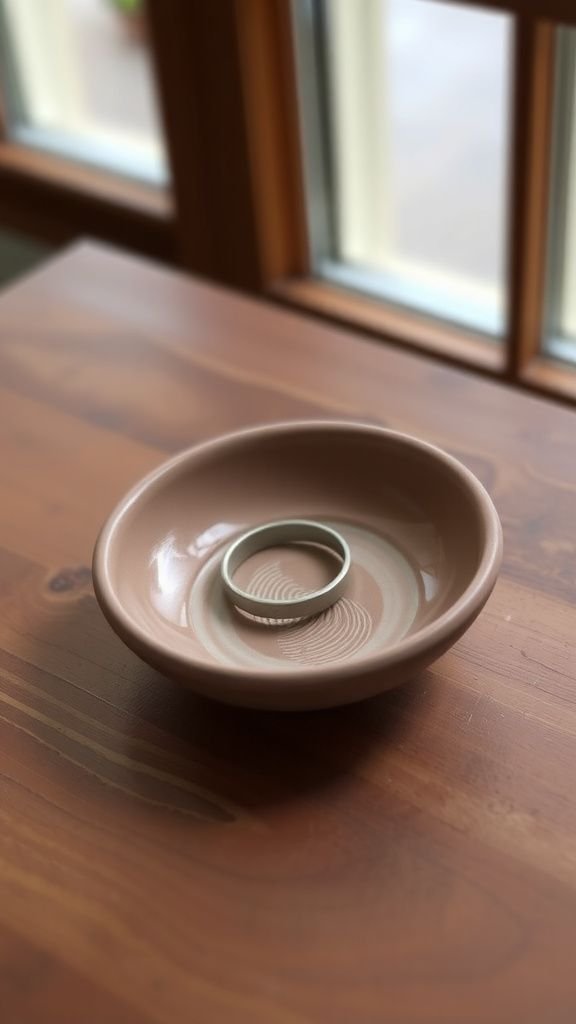
A small clay dish with an impressed fingerprint or initials feels very personal and tactile. The cool, earthy scent of clay while it dries is comforting, and the indentation catches light, shadow, and small items like rings or coins.
I often find these dishes on bedside tables, where the texture seems to anchor a bedside routine. The glaze can be glossy or matte, each giving a different mood, and the dish’s slightly uneven rim makes it endearing — a little imperfect, quietly loved and used daily.
Steps
- Roll a slab of air-dry clay to an even thickness and smooth the surface.
- Gently press a fingerprint or initials into the center of the clay.
- Shape the slab into a shallow dish by cupping edges and smoothing rims.
- Allow to dry fully and apply a chosen glaze or sealant appropriate for the clay.
Yarn-wrapped initials for mantel display
Yarn-wrapped initials have a cheerful, tactile presence on a shelf. The feel of wool under fingers and the slight fuzz that emerges over time give a cozy effect, while color choices can mirror a room’s palette.
I enjoy exploring contrasts where a thick yarn meets a slim cardboard edge, and the result is a playful, homey letter that leans against books or stands proudly on a mantel. Each wrap rhythm repeats until the letter seems covered in a solid, warm coat, like a tiny sweater for a name.
Steps
- Cut a sturdy cardboard letter base and smooth any rough edges for neatness.
- Anchor the yarn at one point and wrap evenly across the shape until covered.
- Tuck the yarn end behind the layers and secure with a small amount of adhesive.
- Display the initial leaning against books or on a small shelf.
Decoupage trinket box with treasured paper

A decoupage box becomes a collage of memories when it’s covered in scraps of beloved paper. The layered textures of tea-stained pages, ticket stubs, and floral scraps create a tactile map of choices.
When light skims the surface, the gloss highlights edges and patterns, making each scrap read like a small scene. I like the way the box’s interior keeps small things safe, its scent faintly sweet from the adhesives.
It sits on a dresser as a tiny archive, where buttons, pins, and small notes find a gentle home.
Steps
- Select a small wooden box and a collection of decorative paper scraps.
- Lay pieces onto the lid and sides, overlapping to create an interesting collage.
- Adhere each piece carefully and smooth for a seamless surface.
- Finish with a protective topcoat to create a unified, glossy exterior.
Mini succulent planter in painted teapot
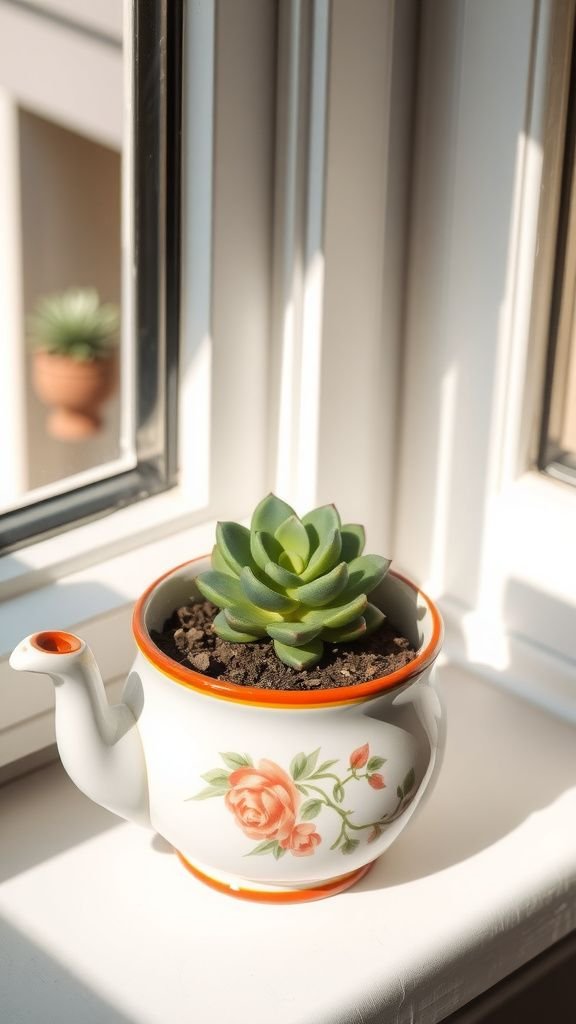
A tiny succulent tucked into a painted teapot brings persistence and personality to a windowsill. The contrast between glossy ceramic and muted green rosettes feels uplifting, and the little rosette textures invite close inspection.
I enjoy choosing a teapot with chipped glaze for added charm or a bright pattern for cheer. Over time the plant grows slowly, a living memento that requires little fuss, and the combination of pottery and plant softens a sill or desk with an approachable botanical presence that keeps giving small moments of enjoyment.
Steps
- Choose a small teapot and add drainage material at the bottom for proper airflow.
- Place a compact succulent into a mix of well-draining soil and position firmly.
- Water sparingly and situate the planter where bright light is available.
- Rotate occasionally to encourage even growth and display on a sunny sill.
Handwritten poem on watercolor paper
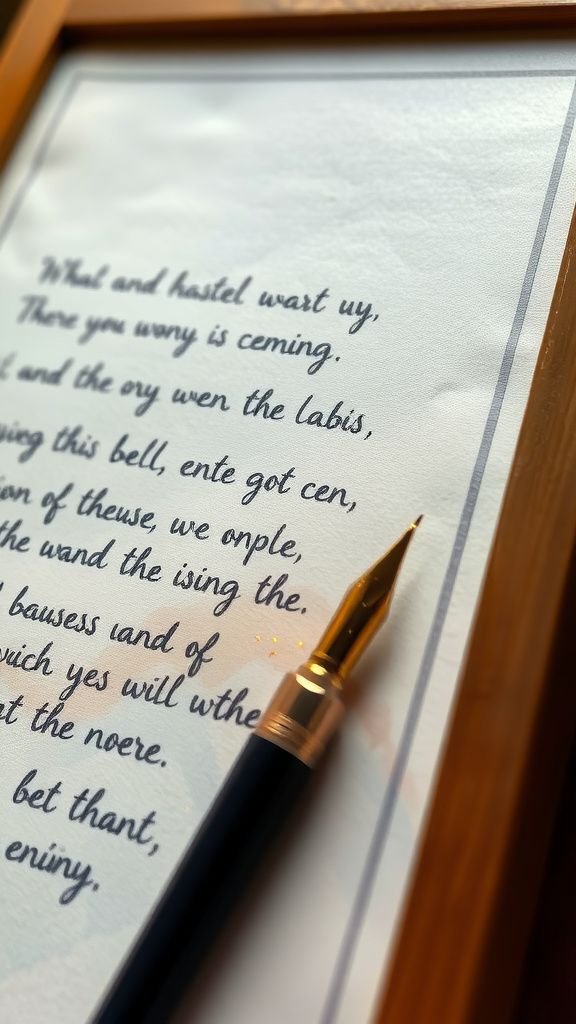
A handwritten poem on textured watercolor paper feels intimate and visual at once. The ink sinks slightly into the fibers, creating soft edges to letters, and the watercolor wash behind can hum a mood of dusk blues or warm apricots.
I often choose wording that recalls a shared laugh or a quiet morning, and the page hangs framed or tucked into a book. Holding it close, the paper’s slight weight and the rhythm of pen strokes create a sense of presence — as if a conversation had been captured and preserved.
Steps
- Select high-quality watercolor paper and mix a soft wash for the background.
- Apply the wash and let it dry fully to avoid smudging ink.
- Handwrite the poem using a fine pen, paying attention to line spacing.
- Frame the finished piece under glass to protect and display it.
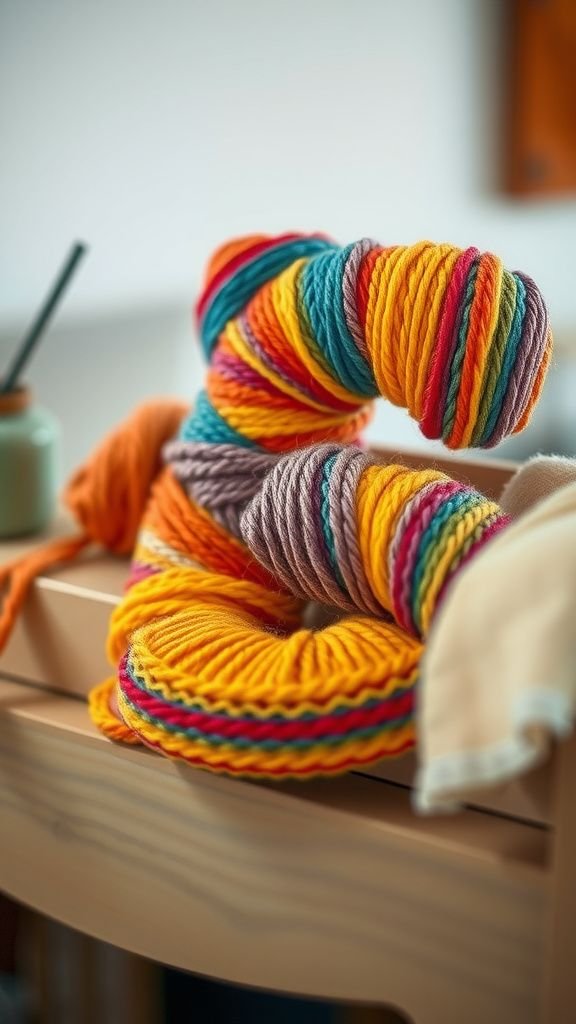
Knitted dishcloth in soft cotton yarn

A knitted dishcloth feels pleasantly utilitarian and warm, offering a hand-knit texture to everyday chores. The cotton yarn becomes softer with gentle washing, and the rhythmic knit pattern creates subtle ridges that catch suds.
I remember making a batch in cheerful stripes and imagining them folded in a gift basket; they smelled faintly of soap and sunlight after their first wash. The cloth’s edges roll slightly in a comforting way, and seeing them on the sink reads like a quiet gesture of care for the home.
Steps
- Choose cotton yarn and cast on stitches for a comfortable square size.
- Knit a simple textured stitch pattern across rows until reaching desired dimensions.
- Bind off neatly and weave in loose thread ends for a tidy finish.
- Wash gently and press flat to soften fibers and set the fabric.
Herb garden kit in painted wooden crate
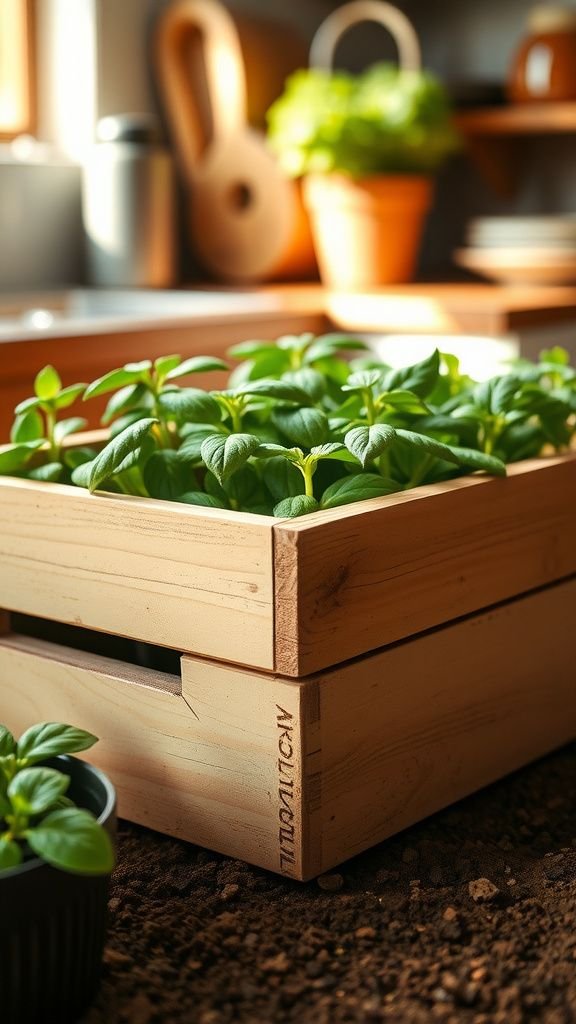
A tiny herb garden in a painted crate brings the garden indoors with a mix of green scents and youthful shoots. The dirt feels cool and slightly sweet when a small pot is handled, and the leaves’ aroma — basil, mint, or rosemary — perfuses the air each time the crate is moved.
I enjoy the contrast between the rustic wood and the fresh, glossy herbs; the painted exterior can be cheerful or understated. It feels like gifting a miniature kitchen landscape that invites snips of flavor and a touch of daily care.
Steps
- Paint a small wooden crate and allow it to dry fully for a neat finish.
- Line the crate with a breathable material and add well-draining potting soil.
- Plant young herb seedlings spaced for growth and press soil gently around roots.
- Place in bright light and water sparingly to establish healthy growth.
Dried flower wreath with muted tones

A dried flower wreath carries a soft, papery echo of summer. The palette of muted roses, strawflowers, and seeded eucalyptus creates a quiet composition that wears well on a wall or door.
I love the dry crinkle of petals when the wreath is lightly shaken, and the subtle herbal scent that lingers. It reads as a celebration of a season preserved, with textures that range from feathery to robust.
Hung against a pale wall, the wreath becomes a small statement of continuity and memory.
Steps
- Gather an assortment of dried flowers and a circular base for support.
- Layer blooms and foliage around the base to form an even arrangement.
- Secure stems with thin twine or bindings to hold their positions firmly.
- Trim any protruding pieces and hang the wreath where it can be admired.
Bath salts in labeled glass apothecary jars

A glass jar of bath salts feels like a small ritual waiting to happen; crystals glint against glass and the scent of eucalyptus or rose petals is immediate. The jars clink softly when handled, and the layered colors — pale pinks, sea greens, warm ambers — are pleasing to the eye.
I remember opening one and inhaling a comforting, spa-like aroma that softened a bad day. The label, handwritten, adds a tactile human touch, and the whole package sits on a shelf like a promise of slow, restorative evenings.
Steps
- Mix coarse salts with chosen essential oils and optional dried botanicals in a bowl.
- Spoon the fragrant blend into clean glass jars and tamp gently for compact layers.
- Seal jars with airtight lids to keep aromas fresh.
- Add handwritten labels describing scents and suggested soaking notes.
Sunprint art on canvas for botanical silhouettes
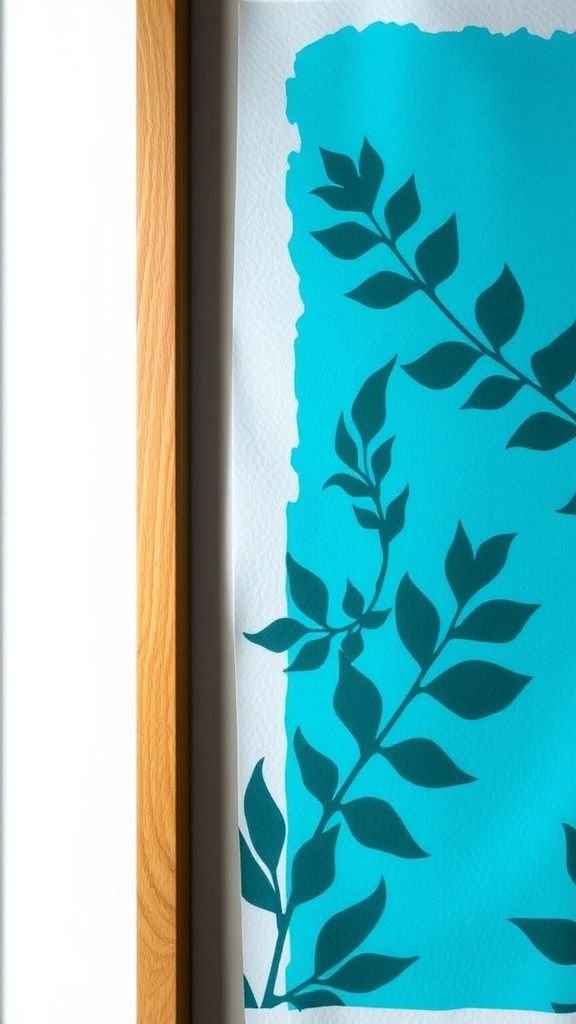
Sunprint art captures botanical forms with a simple, graphic grace; leaves and flowers leave pale silhouettes against cyan backgrounds that feel both modern and nostalgic. The paper’s texture shows subtle variations where pigments settled, and the contrast between negative shapes and deep blue is striking.
I enjoyed arranging odd leaves and watching the slow shift in tone under light, then seeing the crisp outlines emerge. Framed, the print reads like a study in shapes and memory — a small window onto a garden that lives on a wall.
Steps
- Arrange fresh leaves and flowers on sunprint paper with the chosen composition.
- Expose to sunlight until the paper’s color change is complete.
- Rinse the paper to reveal the botanical silhouettes and allow to dry flat.
- Mount the finished print on canvas or frame for display.
Vintage recipe card box with hand-lettered lid
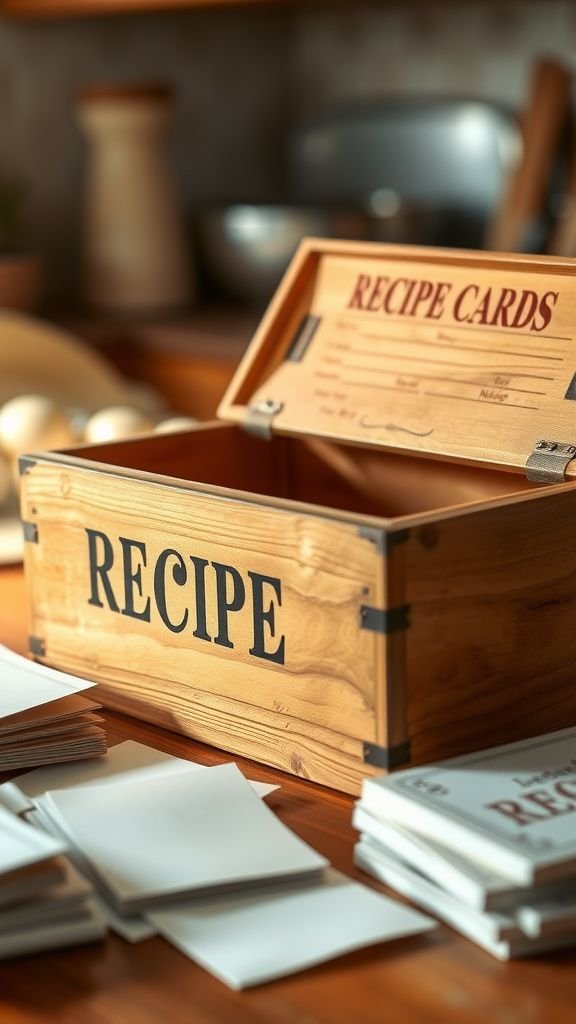
A vintage-style recipe card box with a hand-lettered lid invites rummaging through favorite dishes. The box’s wood grain and tiny hinges creak slightly when opened, and the cards inside bear spills and notes that tell stories of dinners and celebrations.
I enjoy the slow, patient act of flipping through cards and finding a familiar handwriting or a smudged measurement. The lid’s lettering can be playful or elegant, setting the tone for the contents, and the whole thing sits ready on a counter, ready to be pulled out when a recipe is needed.
Steps
- Choose a small wooden box and sand the exterior lightly for a smooth surface.
- Paint or stain the lid and add hand-lettered title using waterproof ink.
- Fill with recipe cards sorted by category and include dividers for organization.
- Keep the box in the kitchen for frequent referencing and to gather new notes.
Beaded bookmark with tassel for book lovers
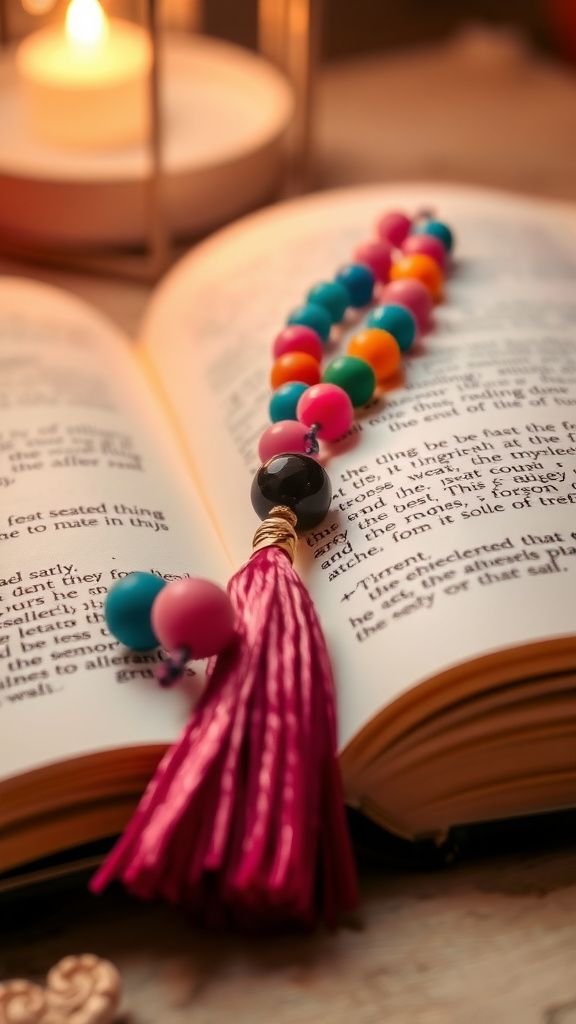
A beaded bookmark with a soft tassel feels like a small luxury for reading rituals. The beads catch light as the book is opened, and the tassel peeks out like a promise to return.
I enjoy threading beads with mixed textures — glass, wood, a small metallic charm — and the weight of the bookmark is pleasantly reassuring as it nestles between pages. It’s the kind of gift that shows thought about quiet moments, and every time the bookmark is found it tugs memory toward the giver with a gentle, colorful reminder.
Steps
- Select a sturdy ribbon or cord and gather beads and a small charm.
- Thread beads onto the cord in a pleasing sequence, finishing with a secure knot.
- Create a tassel at the end and bind it neatly for durability.
- Trim any loose threads and present tucked into a favorite book.
Stamped linen tea towel with playful motifs
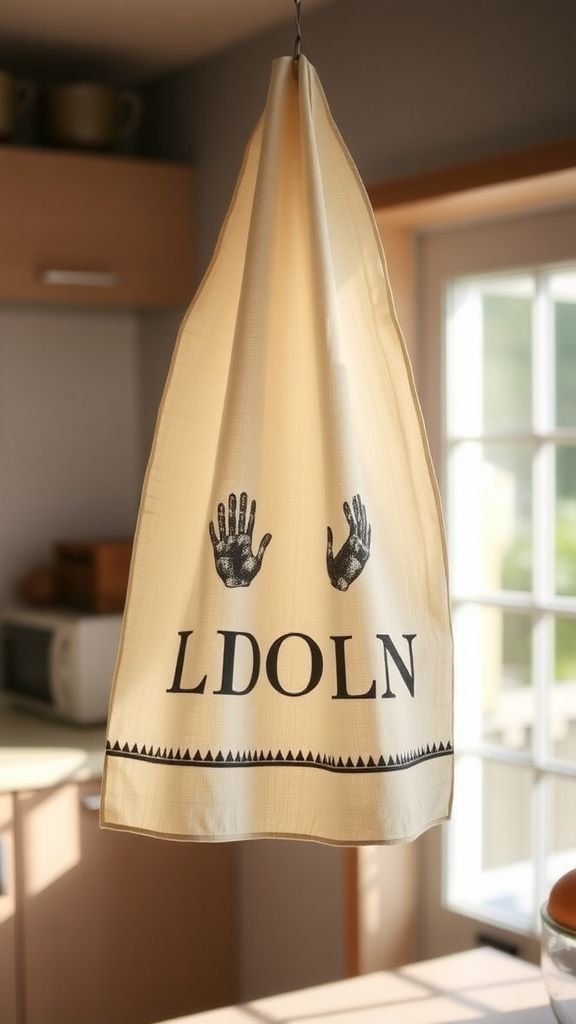
A stamped linen tea towel carries charm in its hand-pressed motifs and slight ink irregularities. The fabric’s weave is visible and pleasant to touch, and the stamped images — tiny flowers or coffee cups — repeat like a little story across the cloth.
I love how the ink settles into the fibers differently each time, creating a unique print. Hung on a hook, the towel adds everyday cheer to a kitchen, and its familiar presence makes small routines feel cared for and slightly more beautiful.
Steps
- Lay a clean linen towel flat and arrange stamp designs across its surface.
- Apply fabric ink to stamps and press evenly onto the towel for clear impressions.
- Allow the ink to dry fully and heat-set if required by the ink manufacturer.
- Wash gently before first use to soften the fabric and set the print.