I’m always charmed by how simple paper can lift the mood during the holidays. Over the years I tried a lot of Festive Hanukkah Paper Decor Crafts, experimenting with blues, golds, and textures to see what caught the light and made the table feel warmer.
These projects came from quiet afternoons with a cup of tea and a stack of scraps.
Each idea here grew from small happy accidents and little tweaks that made a room feel both cozy and playful without fuss.
Layered paper menorah centerpiece with soft glow

I remember arranging layered paper shapes on the table and being surprised by how much depth emerged from flat pieces. The menorah felt almost sculptural with overlapping blues and metallic accents catching the candlelight.
The edges sometimes cast delicate shadows across the tablecloth, and the metallic paper added a faint, warm shimmer. Holding the finished piece felt like cradling a tiny winter skyline.
It became a conversation starter when friends leaned closer to admire the paper textures and the subtle way colors blended together under the lights.
Steps
- Cut menorah base and flame shapes from heavyweight cardstock in complementary colors.
- Layer base pieces from largest to smallest, aligning central columns and securing with adhesive points at the center back.
- Affix metallic flame shapes to the top of each column and add small dimmable tea lights in front for a soft glow.
Dreidel garland made from patterned paper strands

Stringing little dreidel shapes across a mantel brought a playful rhythm to the room. Each dreidel carried a different pattern—small florals, geometric dots, subtle stripes—and the collective mix felt lively without being overly sweet.
When a breeze moved through the window the garland swayed, and the paper edges made a faint whispering sound that somehow felt festive. I noticed how the scale of the dreidels changed the mood: smaller shapes offered a delicate, refined look, while larger ones read more whimsical and jaunty.
Steps
- Trace dreidel templates onto assorted patterned paper and cut out multiple shapes.
- Score a small tab at the top of each dreidel and fold slightly to create a loop.
- Thread a length of twine or thin ribbon through the loops, spacing shapes evenly along the garland.
Star of David papercut window hangers, delicate silhouettes

Cutting delicate Stars of David and letting light flood through felt quietly satisfying. The crisp silhouettes projected on the wall created a layered shadow play that shifted with the sun.
Some stars had intricate filigree patterns while others relied on clean geometric lines; together they balanced ornate and minimal vibes. I enjoyed the tactile contrast between smooth vellum and heavier cardstock, and the tiny paper edges that caught dust and light in a way that made each star feel hand-made and warm.
Steps
- Fold and trace Star of David templates onto chosen papers, ensuring mirrored symmetry.
- Carefully cut along traced lines using a sharp craft blade or scissors for clean edges.
- Attach thin invisible thread or fishing line at the top and suspend from window hooks at varied lengths.
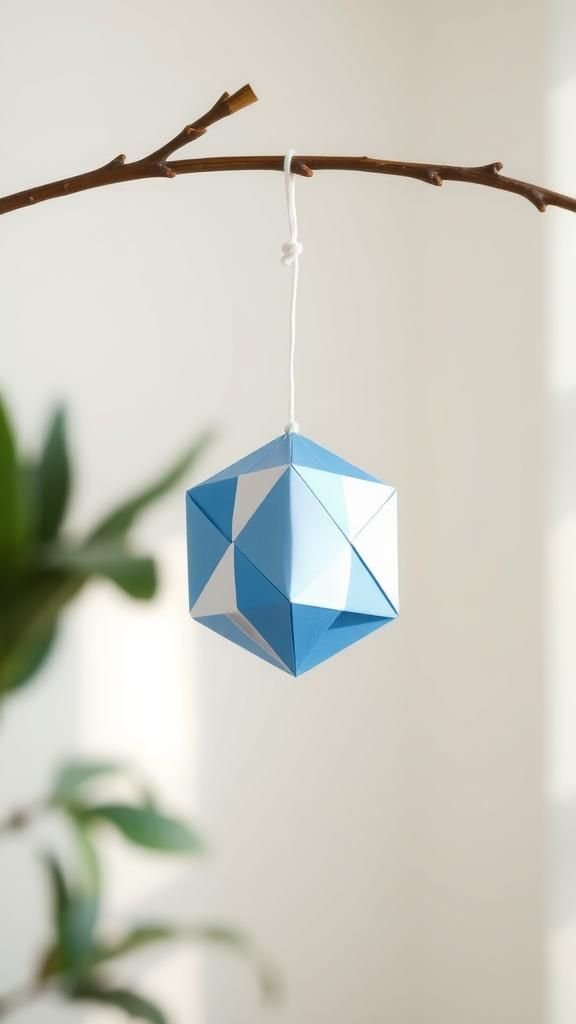
Honeycomb paper gelt ornaments that pop on branches

Creating honeycomb paper orbs for gelt felt playful and almost edible when they opened into rounded shapes. The texture reminded me of vintage party décor and added a three-dimensional punctuation to a branch arrangement.
Colors in cool blues and shimmering gold mirrored the actual chocolate coins, and the slight rustle when they moved was quietly joyful. Placed near a menorah or woven into greenery, these orbs created pockets of visual interest that invited touch and coaxed people closer to admire the layered paper structure.
Steps
- Cut identical circular shapes from patterned paper stacks and prepare adhesive strips for assembling honeycomb layers.
- Align and glue alternating circle halves together to form the honeycomb sphere, ensuring edges meet cleanly.
- Attach a small loop of thin ribbon at the top and hang on a decorative branch or garland.
Blue-and-gold tissue paper lanterns for soft ambiance

Tissue paper lanterns in Hanukkah hues offered a gentle, diffused light that felt instantly comforting. The tissue layers gave a soft-sculpted look and the edges had a feathered quality that softened the overall shape.
When lamps shone through, the blues warmed into indigo and the golds picked up a buttery sheen. I liked placing them at varying heights so the glow pooled in different spots around the room.
The flutter of tissue in a draft had a lively, delicate motion that made the space feel lived-in.
Steps
- Stack tissue paper squares and cut into desired lantern shapes using a template for uniformity.
- Layer colors and secure edges with a thin strip of adhesive, creating a cylindrical or spherical form.
- Insert battery-operated LED lights inside each lantern to produce a warm, even glow.
Origami dreidels on a branch mobile — playful movement
Folding origami dreidels felt like a quiet ritual, and hanging them from a slender branch made a simple mobile that spun slowly when the air moved. The corners and precise folds captured light in crisp lines, and patterned paper gave each dreidel its own personality.
Watching the mobile rotate created tiny changing compositions that caught attention without shouting. The tactile satisfaction of folded corners and the gentle balancing act of the branch made this piece feel both meditative and charming in a casual sitting area.
Steps
- Follow an origami dreidel pattern to fold several dreidels from assorted paper squares.
- Thread fine cord through the top of each folded dreidel and secure with a small knot.
- Tie cords to a natural branch at staggered lengths and hang the branch from a ceiling hook.
Papercraft floating candle votives with soft shimmer

Creating votive holders from thick paper produced warm reflections and an unexpectedly cozy atmosphere. The edges of punched patterns let the candlelight seep through like tiny windows, and the paper textures gave a softer feel than metal or glass.
I noticed that metallic paper interiors amplified the glow while matte exteriors kept things grounded. Moving a hand past the votive sent dancing light across the tabletop.
The scent of a beeswax candle nearby and the soft rustle of the paper made the whole setup feel intimate and thoughtful.
Steps
- Cut votive sleeve templates from heavyweight paper and punch decorative patterns into the sides.
- Form the sleeve into a cylinder, securing the seam with adhesive and allowing a small base opening.
- Place a battery-operated tealight into the sleeve so it casts patterned light without heat risk.
Paper chain menorah that’s playful and tall

A paper chain menorah took me back to childhood crafts, but with cleaner lines and mature colors. The linked loops rose like a playful skyline when arranged vertically, and mixing blues with pearlescent papers added a grown-up touch.
The tactile clink of paper loops against each other had a surprisingly pleasant sound, and the vertical rhythm guided the eye along the mantel. It felt informal yet intentional, an approachable centerpiece that read festive without being fussy, and family members liked adding an extra loop as candles were lit.
Steps
- Cut paper strips of uniform width from cardstock in various blues and metallic tones.
- Form each strip into a loop, secure the end, and link through the previous loop to create a chain.
- Arrange chains upright or drape them to suggest menorah form, anchoring ends with small weights if needed.
Embossed cardstock Hanukkah placemats with texture

Embossed placemats brought a quiet tactile luxury to the table. Running my fingers over the raised Stars and subtle patterns felt satisfying, and the relief on the cardstock picked up low light in a way that made the table look layered and considered.
The combination of smooth cardstock and embossed ridges created a contrast that complimented the plates and napkins. Guests often commented on how the texture made the meal feel special, and I liked that the mats could be stacked and saved for future gatherings without feeling delicate.
Steps
- Select heavyweight cardstock and an embossing tool or folder with Hanukkah motifs.
- Run cardstock through the embossing folder to create raised patterns across the surface.
- Trim embossed sheets to placemat size and edge with a complementary border for neat presentation.
Mosaic paper Star of David collage — layered color play
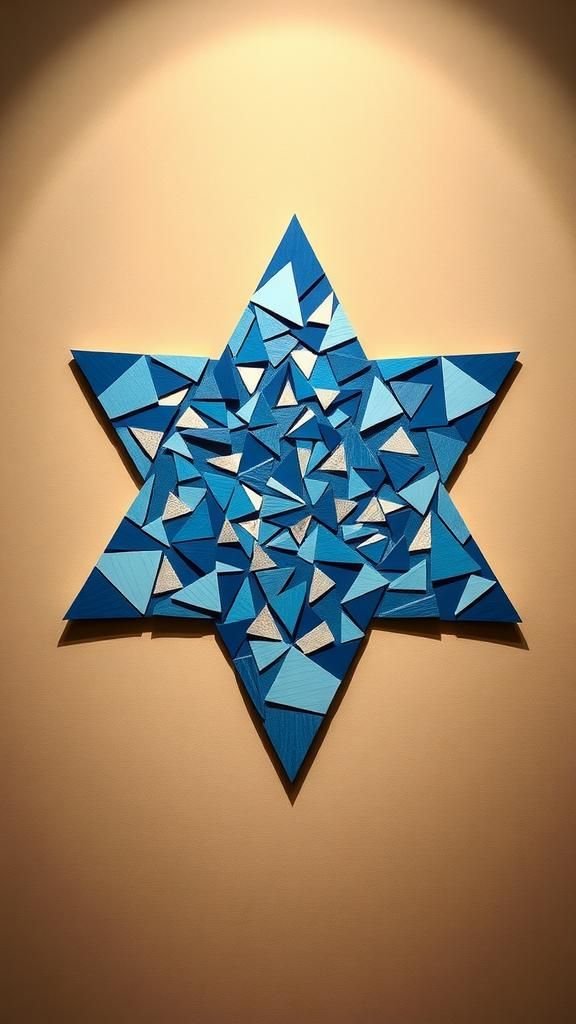
Piecing small paper tiles into a Star of David felt like painting with paper. Tiny fragments of blues, silvers, and creams assembled into a cohesive pattern that shifted depending on viewing angle.
The surface had a tactile mosaic quality, with edges catching light and creating subtle ridges. I felt absorbed while arranging tiles, trading quick decisions for small visual rewards.
The finished collage read both modern and handcrafted, and it hung well against a neutral background where the interplay of colors could breathe.
Steps
- Cut small square or irregular paper tiles from a variety of blue and metallic papers.
- Sketch a Star of David outline on backing paper and apply adhesive in small sections.
- Place tiles closely together within the outline until the star is fully filled and allow to dry.
Paper quilled dreidel ornaments with curled details

Quilling tiny dreidels felt surprisingly meditative; the curled paper coils added a lively energy that was hard to achieve with flat shapes. The narrow spirals caught ambient light and created a delicate lacework effect.
Hanging a cluster of quilled ornaments together produced a small forest of curls that moved slightly and made a soft whisper as they touched. Colors ranged from deep indigo to bright sapphire, and metallic strips threaded through coils added a little flash.
Each ornament felt like a tiny, fragile sculpture someone had patiently grown.
Steps
- Roll narrow strips of paper into tight coils and shape into dreidel components using a quilling tool.
- Glue shaped coils onto a lightweight backing to define the dreidel silhouette and trim excess edges.
- Attach a fine thread loop to the top for hanging and optionally add a small bead for weight.
Accordion folded paper shimmer fans for corners

Accordion fans opened like small sunbursts and instantly filled corners with movement. The pleats created rhythmic lines that echoed the glow from candles, and shimmer paper introduced a subtle metallic sheen that shifted as the fans tilted.
I liked tucking mini fans into shelves, pairing them with small branches or clay bowls for contrast. The effect felt festive without overstating itself; the fans provided visual punctuation at the edges of a room, inviting the eye to travel from centerpiece to corner with a gentle, unforced cadence.
Steps
- Fold long strips of paper back and forth in equal pleats to form accordion sections.
- Bring together the ends of each pleated strip to form a fan and secure at the base with adhesive.
- Fluff and spread pleats evenly and attach a hanging loop or place them on shelves as accents.
Stenciled kraft paper gift wraps with Hanukkah motifs

Using stencils on kraft paper gave gift wrap a handmade, earthy charm. The simple brush strokes over Star and dreidel shapes felt casual and sincere, and the contrast between the brown paper and crisp blue ink had a homey aesthetic.
Tying with twine and a small paper tag rounded out the look with a rustic touch. I liked how imperfections in the stencil marks highlighted the human hand behind each package, and guests often complimented the quiet, thoughtful presentation when unwrapping.
Steps
- Lay a Hanukkah stencil over kraft paper and dab paint sparingly with a sponge for crisp shapes.
- Allow painted motifs to dry fully before rolling paper around gifts to avoid smudging.
- Finish wrapped gifts with twine and a small paper tag for a natural, handmade look.
Pop-up Hanukkah cards with layered paper depth

Opening a pop-up Hanukkah card felt like a tiny stage reveal; layers unfurled into miniature scenes that delighted friends. The architecture of little towers, candles, or dreidels created a playful sense of depth, and delicate tabs held elements at different planes.
Paper edges cast soft shadows that enhanced the scene, and metallic accents added a pinch of celebration. Crafting these cards became a personal way to send warmth; each fold and layered piece carried a whisper of the hands that made it, which people noticed when they opened the envelope.
Steps
- Score and fold the card base to create pop-up platforms at planned intervals.
- Cut layered paper elements like candles or dreidels and attach to pop-up tabs so they rise when opened.
- Decorate with small metallic accents and write a short message inside before sealing in an envelope.
Paper fortune gelt envelopes with tiny messages

Tiny envelopes holding chocolate gelt and a folded note felt like a miniature surprise. The envelopes had a quaint weight when held, and the small messages tucked inside often sparked smiles.
Using patterned paper and trimmed edges gave each envelope a little character, and the combination of sweet taste and a few thoughtful words made the gesture feel personal. I enjoyed arranging them in a bowl near the table so guests could pick one; the tactile delight of unsealing a tiny flap became part of the evening’s small pleasures.
Steps
- Cut small envelope templates from decorative paper and fold along creases to form pockets.
- Place a small piece of chocolate gelt and a short handwritten note inside each envelope.
- Seal with a tiny sticker or dab of adhesive and arrange in a decorative bowl or tray.
Layered cardstock dreidel wall art in modern palette

A wall-mounted dreidel built from layered cardstock read like a modern print rather than a craft. The stacked layers created a subtle relief that caught light at different angles, and the clean edges lent a graphic quality.
Blues mixed with cool grays and pops of gold produced a restrained, contemporary look. I enjoyed stepping back and noticing how shadows defined the piece from across the room.
Mounted above a side table, it became an understated focal point that balanced handcrafted warmth with gallery simplicity.
Steps
- Cut dreidel shapes from multiple layers of cardstock in descending sizes to create depth.
- Adhere layers together centered on a sturdy backing to form a raised silhouette.
- Mount the finished piece in a frame or attach directly to the wall using secure hanging hardware.
Fretwork paper luminaries with intricate cutouts

Paper luminaries with ornate fretwork felt almost like lace when lit from within. The tiny cutouts created a carpet of patterned light across surfaces, and the warmth of the inner glow contrasted with the cool tone of blue papers.
Touching the edges revealed the delicate teeth left by the cutting tool, adding a handcrafted imperfection that made them feel alive. I often placed these with low lights so the patterns could be admired without glare.
Their silhouette against a dark window turned the night into a gentle film of shadow play.
Steps
- Transfer a fretwork pattern onto heavyweight paper and cut out designs carefully with a craft blade.
- Form the paper into a luminary sleeve and secure seams to prevent gaps at the base.
- Place a battery-operated candle inside the luminary to illuminate cutout patterns safely.
Crepe paper blue tassel garland with soft texture
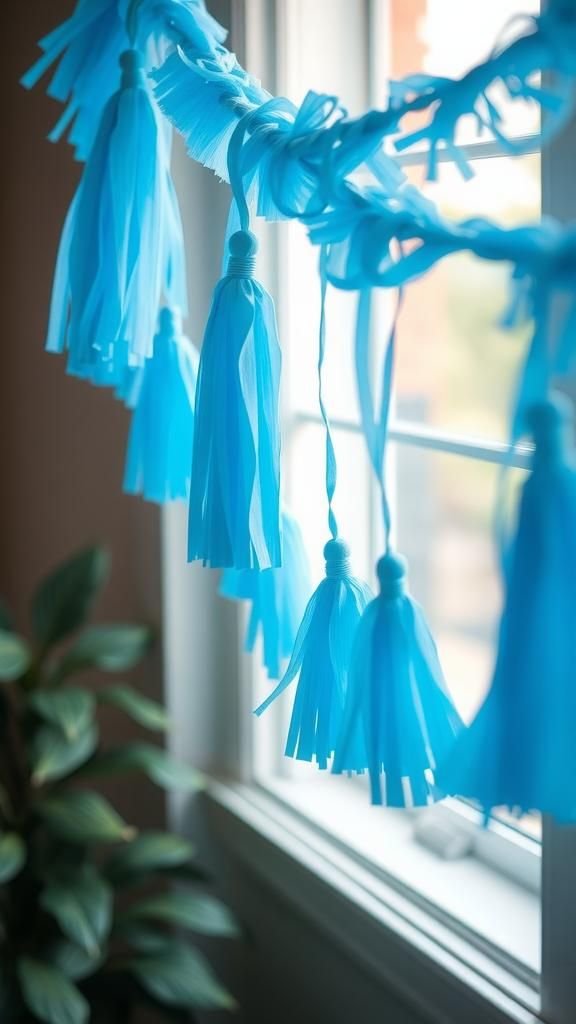
Tassels made from crepe paper introduced a soft, textile-like element to paper decor. The fringed edges fluttered and created a gentle, informal rhythm along a garland.
Deep indigo tassels paired with lighter sky blues produced a layered ombré effect that felt both festive and relaxed. I liked arranging the garland at chair backs and across windows so the tassels could move with people passing by.
Their tactile softness was inviting, and the quiet whisper as they brushed surfaces added a charming sensory detail.
Steps
- Cut long strips of crepe paper and fringe one edge finely for a soft, textured look.
- Roll the unfringed edge to form tassels and secure with a small band or adhesive.
- Thread tassels onto twine or ribbon at regular intervals to form a flowing garland.
Paper mosaic menorah votive holders, tactile tiles
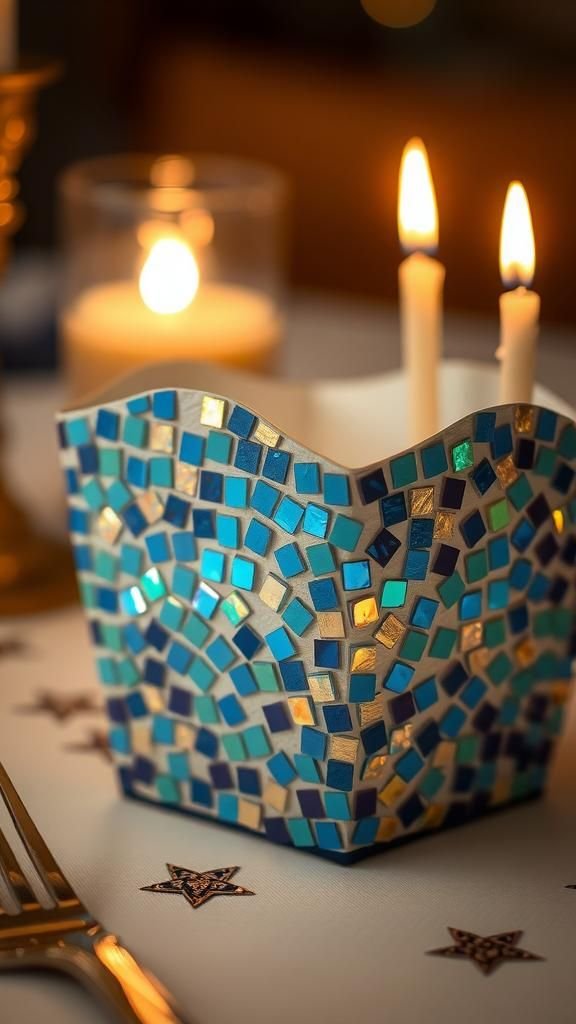
A votive holder covered in tiny paper tiles looked like a little architectural study. Each tile had its own hue and grain, and the assembled surface read like a miniature tiled wall.
The paper edges offered a surprising warmth beneath the candlelight, and the varied matte and metallic tiles created a lively surface. I enjoyed running a finger along the mosaic rim and watching how the candle reflected in tiny metallic pieces.
The finished holder felt hand-built and solid enough to stand amongst other table elements without dominating them.
Steps
- Cut small square paper tiles from various blues, whites, and metallic papers.
- Adhere tiles onto a votive sleeve in a staggered mosaic pattern, trimming excess edges as needed.
- Seal lightly with a matte fixative if desired and place a safe battery tea light inside.
Rolled paper rosette Star ornaments with layered petals

Rosettes folded and rolled into star shapes had a floral quality that softened geometric lines. The layered petals created a sense of motion even when still, and the mix of matte and metallic papers added visual depth.
Hanging a cluster of rosette stars produced an almost floral chandelier effect, and the tactile ridges invited curiosity. I often coaxed a few fluffed petals to adjust light catching, and the subtle scent of paper and glue reminded me of slow afternoons spent crafting without rush.
Steps
- Cut concentric petal shapes from selected paper and curl edges gently to add dimension.
- Layer petal rings together around a central disc, securing each layer to form a rosette.
- Attach a thin hanging loop to the back and suspend rosettes at varied heights.
Hand-lettered paper place cards with small motifs

Hand-lettered place cards felt intimate and inviting, and small paper motifs added a festive wink to each setting. The texture of the paper and the graceful curve of ink strokes created a pleasant contrast against plain dishes.
I liked experimenting with different pens and nibs to get a range of line widths, and adding a tiny stamped dreidel or star provided a unifying touch. Guests appreciated the personal feel of their cards, and the little ritual of finding one’s name at the table seemed to slow the moment in a warm way.
Steps
- Cut card stock into uniform rectangles and fold to create tented place card shapes.
- Write guest names with a calligraphy pen or marker and add a small hand-drawn motif.
- Place cards at each seat or tuck into napkin rings to complete the table setting.