I always end up collecting odd packaging and little scraps around Earth Day, drawn to the small challenge of turning trash into something that feels warm and handmade. Those quiet afternoons of sorting bottles and boxes have become a kind of ritual, a chance to slow down and play with texture and color while thinking about what might have gone straight to the bin.
Earth Day Recycled Crafts have a comforting, hands-on rhythm to them.
Trying a new recycled craft often sparks an unexpected memory or a fresh idea, and there is a gentle satisfaction in seeing humble materials take on a second life.
Glass bottle planter with a rustic charm
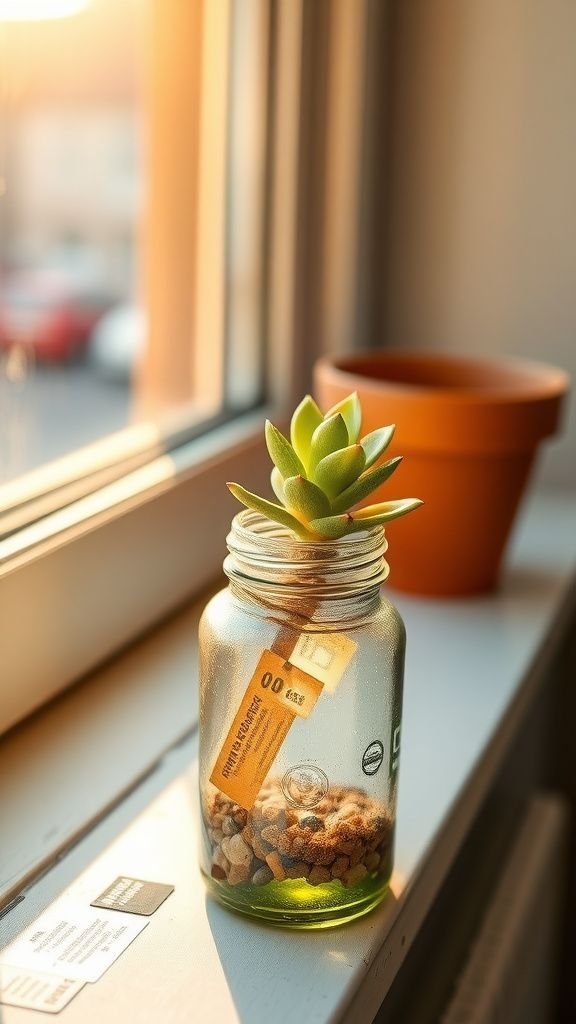
I love the way a reclaimed glass bottle catches late afternoon light, turning clear green into a warm glow. There is a quiet pleasure in trimming away labels and arranging a thin layer of stones at the base so the soil seems to float.
The cool, smooth surface of the bottle contrasts with the roughness of potting mix and tiny leaves peeking out. It always feels like a little seaside souvenir on the windowsill, and the scent of damp earth brings an immediate calm to the kitchen corner.
Steps
- Remove any labels by soaking the bottle in warm soapy water until adhesive softens and then scrape gently.
- Add a small layer of pebbles or gravel at the bottom for drainage and then pour in potting soil to the desired height.
- Place a young herb or succulent so roots sit comfortably and pat soil lightly around it.
- Position the bottle planter on a sunny windowsill and water sparingly, allowing excess to drain into the pebbles.
- Rotate the bottle occasionally so the plant grows evenly toward the light.
Newspaper bowls that smell faintly of ink

I remember the first time I shaped a bowl from old newsprint, hands turning soft layers into a little nest. The paper edges form a pleasing ridged texture that feels surprising against fingertips.
The faint scent of ink and dryer-warmed paper evokes rainy mornings and quiet reading. When a bowl sits on a table it holds small treasures in a humble, honest way; stray keys, dried flowers, or coins feel right there.
The crinkled rim, slightly uneven, adds a homespun character that always invites a second look.
Steps
- Stack several sheets of newspaper and tear into long strips of uniform width.
- Twist each strip along its length to form slender ropes, then braid or coil these ropes into a circular bowl shape.
- Secure the coils together with adhesive applied between layers, smoothing seams as you go.
- Once dried, apply a thin coat of a protective finish to strengthen the bowl and enhance texture.
- Allow the bowl to dry completely before placing lightweight items inside.
Tin can lanterns glowing on a porch night
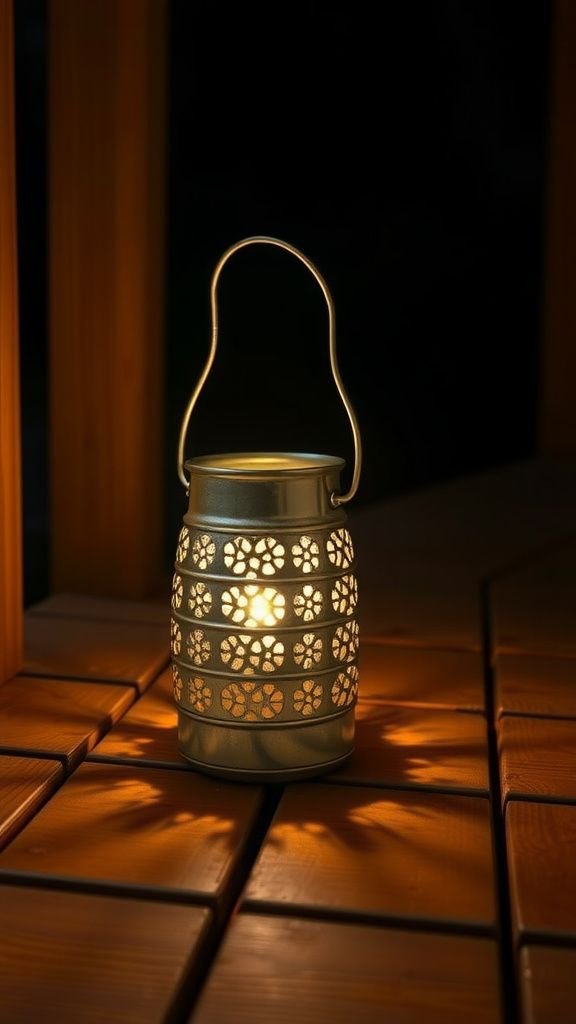
There is a simple kind of magic when a pierced tin can throws patterns across a porch wall. The metal surface, dented and matte, contrasts with the delicate pinholes through which light spills.
Holding one up close reveals the tiny perforations like constellations, and a faint metallic scent drifts through the air on cool evenings. Placing a candle inside sends moving shadows across wooden boards, and the soft clink of cans stacked nearby brings a nostalgic, playful feeling of summer evenings and quiet conversation.
Steps
- Clean out an empty tin can and remove any sharp edges, rinsing and drying thoroughly.
- Sketch a simple pattern on the surface with a marker as a guide for hole placement.
- Use a nail and hammer to puncture holes along the drawn pattern at regular intervals.
- Place a small candle or LED light inside the can, ensuring stable placement.
- Set the lantern on a protected surface outdoors and enjoy the patterned glow.
Magazine bead necklaces with glossy colors
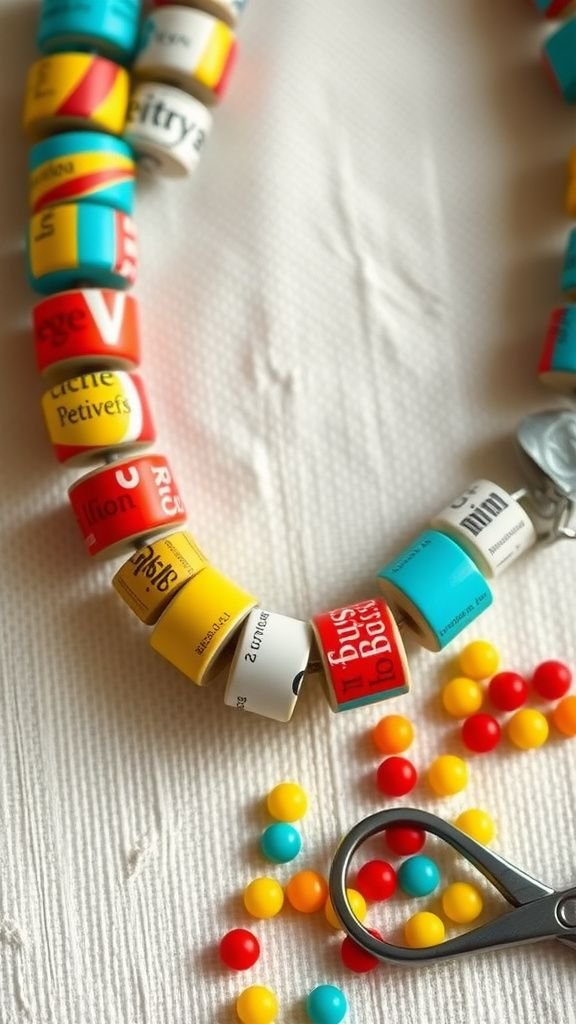
Making beads from old glossy magazines turned lazy afternoons into a rhythm of rolling and watching color shift. Each strip reveals a tiny hidden image when rolled tight, a sliver of type or a flash of teal that becomes a tiny jewel.
The glossy finish reflects light in a small, bright way and the finished strand has a surprising flexibility that feels good against the neck. When worn, the necklace has a whisper-light presence and sparks conversation about the images trapped inside each bead, like miniature keepsakes of print culture.
Steps
- Cut magazine pages into long triangular strips, with the wide end determining bead size.
- Apply a thin line of adhesive along the wide end and roll the strip tightly toward the point.
- Seal the tip with a small dab of glue and allow beads to dry fully on a flat surface.
- String the dried beads onto cord or thread, alternating colors and sizes for visual interest.
- Finish the necklace with secure knots or clasp attachments and trim any excess cord.
Woven plastic bag tote with tactile appeal
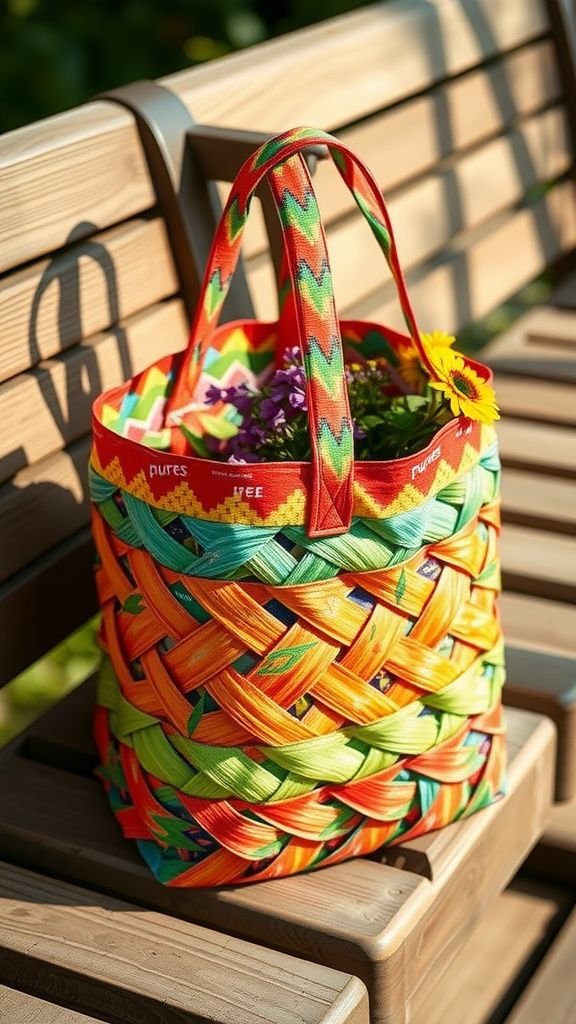
That crinkly texture of woven shopping bags has always felt oddly satisfying in the hands. Flattened strips of thin plastic interlock to form a surface that rustles softly and catches the light in places.
The repetitive pattern creates a comfortable weight and a hint of resilience; the tote carries small groceries with a relaxed, utilitarian attitude. There is a small thrill in spotting the original print peeking through a weave intersection, like a hidden signature.
Holding the finished bag brings a warm sense of resourceful creativity to everyday errands.
Steps
- Collect clean plastic bags and flatten them, trimming off handles and seams.
- Cut the bags into uniform strips and fold or roll each strip into narrow plarn strands.
- Begin weaving the strands on a simple frame or between two stable edges, alternating over and under.
- Continue weaving until the desired width and length are reached, keeping tension even throughout.
- Secure the edges by knotting or stitching the ends together to form handles and a finished rim.
CD mosaic mirror catching fractured light
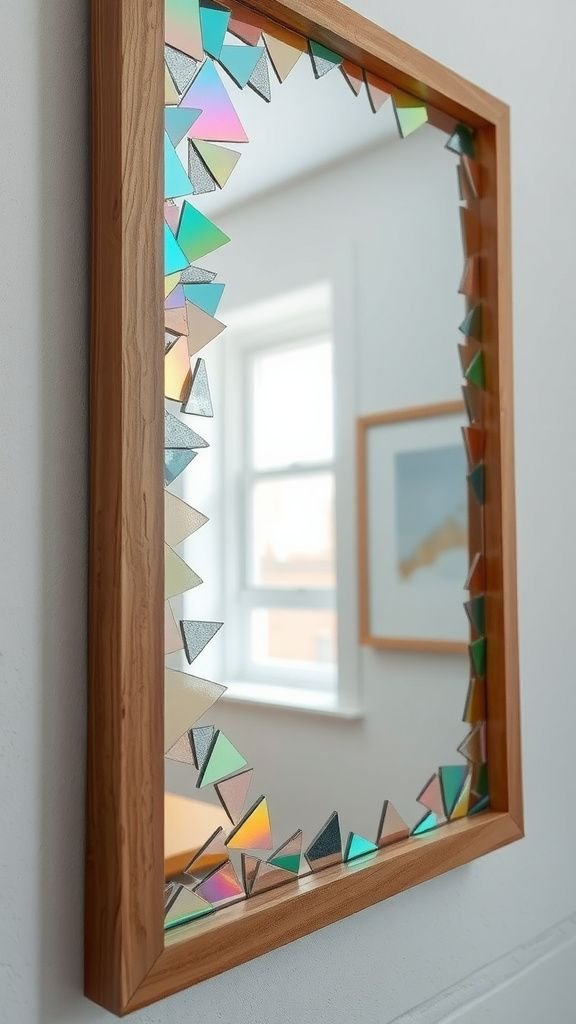
Old compact discs refract light into tiny rainbows, and when arranged around a mirror they create a fascinating fractured glow that changes with movement. The shimmering squares and slivers reflect colors differently depending on the angle, producing an almost kinetic sparkle.
The smooth iridescent surfaces sit nicely against the flat matte of a frame, and the sound of discs clinking while sorting them is oddly comforting. Hung near a window, the mirror becomes a little weather vane for sunlight, scattering animated color across a wall like a miniature light show.
Steps
- Gather old CDs and carefully break them into small pieces, wearing eye protection and working over a soft surface.
- Arrange the reflective fragments around the edge of a round or square mirror to plan the mosaic layout.
- Adhere the pieces to the mirror frame with a strong adhesive, pressing each fragment firmly into place.
- Allow the adhesive to set completely before handling the mirror.
- Seal the mosaic with a clear protective coating if desired and hang in a bright location to catch light.
Egg carton succulents: tiny textured planters
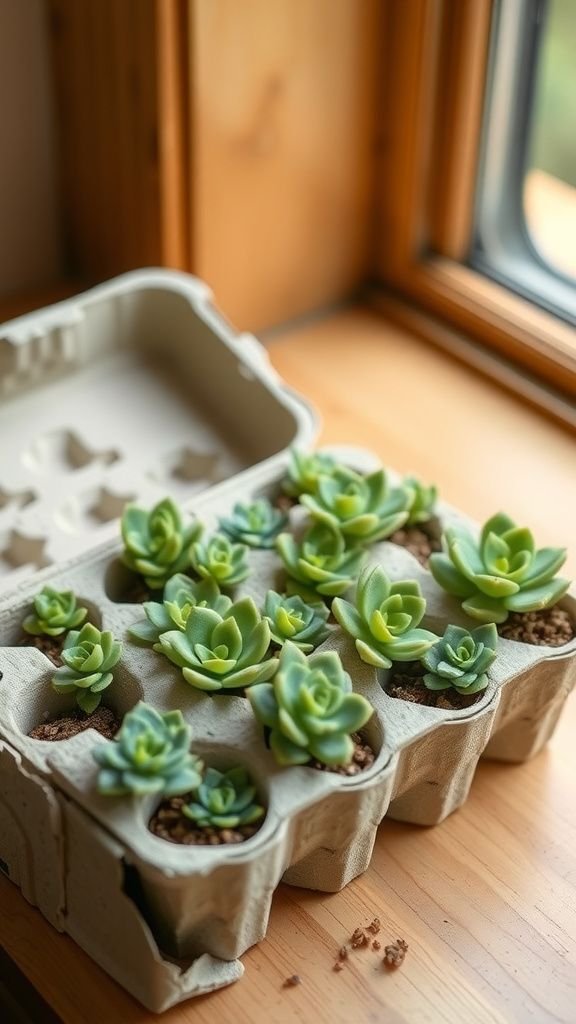
Cardboard egg cartons have a gentle, papery weight that hugs little succulents beautifully. The porous texture absorbs a hint of moisture and the familiar rounded cups cradle soil in a reassuring way.
Arranging several small plants in a single carton feels cozy, like a miniature landscape with tiny hills and valleys. I often find myself leaning in to admire little rosettes and the dry, earthy scent that rises when the carton is touched.
Displayed on a bright sill, the tableau has a delicate, almost nursery-like charm that invites quiet attention.
Steps
- Cut apart sections of an egg carton to create individual planting cups.
- Fill each cup with potting mix suited for succulents, leaving space at the top for the plant.
- Gently place a small succulent into each cup so roots sit comfortably in the soil.
- Lightly mist or water sparingly to settle the soil around the plants.
- Arrange the carton on a bright windowsill and rotate occasionally for even light exposure.
Wine cork stamps with earthy impressions
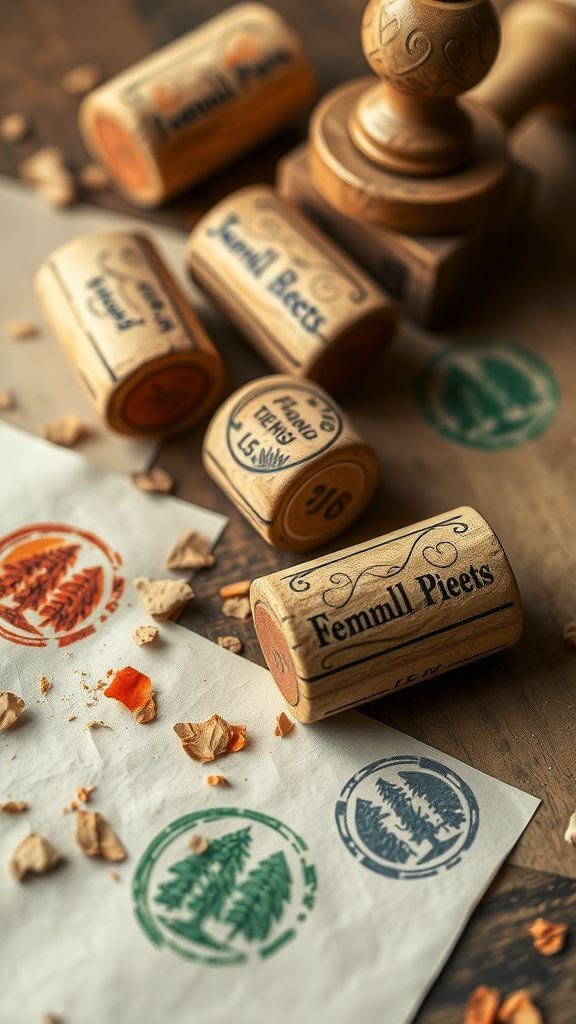
There is something delightfully improvised about stamping paper with a wine cork. The dense cork gives a satisfying resistance when pressed, and the resulting round impressions carry a warm, organic quality.
Dipping the cork into ink leaves a faint aroma that mingles with memories of clinking glasses at gatherings. The stamps render imperfect circles and textured edges that feel handmade and friendly on a page.
Folded into gift tags or scattered across wrapping, the impressions read like little footprints, simple and personal, each bearing tiny variations that make them charming.
Steps
- Select clean wine corks and trim any damaged ends to create a flat stamping surface.
- Press a thin layer of ink or paint onto a flat palette and gently tap the cork to pick up color.
- Align the cork over paper or cardstock and press down firmly to transfer the impression.
- Repeat with different orientations or inks to build a pattern.
- Allow the stamped pieces to dry fully before layering or folding into finished items.
Jar lid magnets with miniature scenes
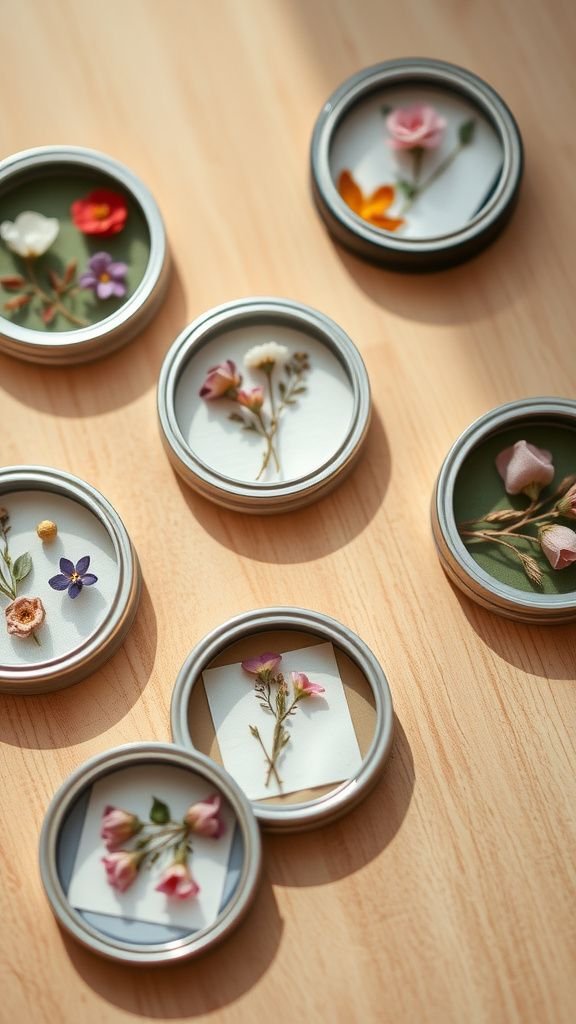
The inward bowl of a jar lid makes a perfect tiny stage for miniature scenes. A sliver of pretty fabric, a pressed flower, or a cutout image creates a pocket that feels secretive and playful.
The cool metal rim frames the composition like a tiny portal, and the slight clink when a magnet is handled is oddly satisfying. When clustered on a fridge, these small circles form a mosaic of memories and colors.
I find myself smiling at the little worlds tucked inside, a pleasant reminder of moments that linger in small objects.
Steps
- Collect jar lids and clean their interiors thoroughly, removing any labels or residue.
- Cut small images, fabric swatches, or dried flowers to fit inside each lid.
- Affix the chosen miniature scene inside the lid using a strong adhesive, smoothing it flat.
- Seal the interior with a clear resin or protective coating and let it cure completely.
- Attach a small magnet to the backside and press it firmly to set.
Yogurt pot herb garden on a sunny sill
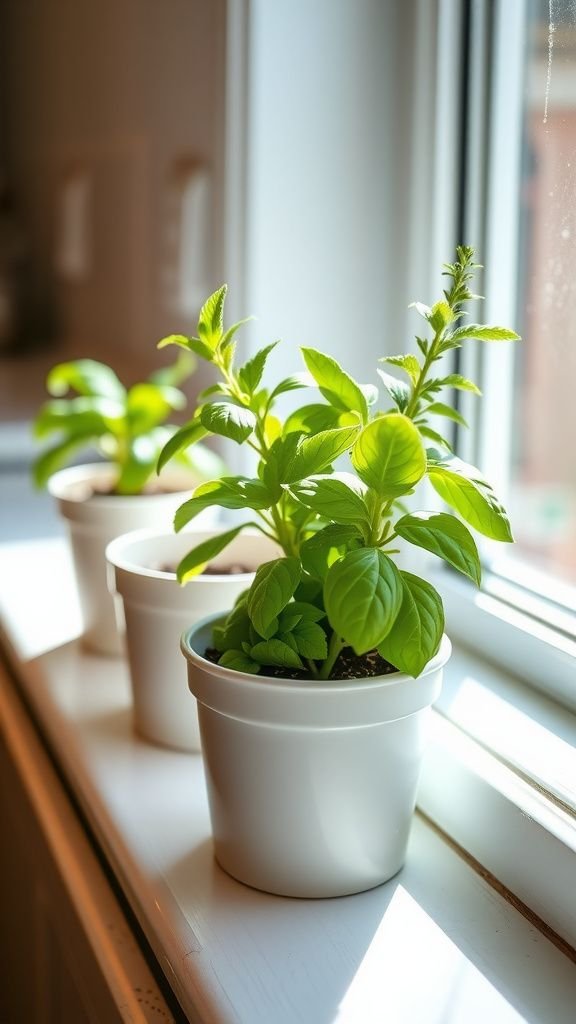
Those small yogurt pots feel just right for a windowsill herb colony. The little rounded cups are comforting to hold and the faint tang of their previous contents is replaced quickly by the earthy smell of fresh soil.
Grouped together, the pots form a miniature orchard of green stems and lively scent. The contrast between the smooth plastic and soft leaves is tactile and pleasing.
I often catch myself inhaling the sharp aroma of basil or mint while watering, and the tiny green shoots always seem to bring an instant sense of freshness to the kitchen.
Steps
- Clean empty yogurt pots and create a small drainage hole at the bottom if needed.
- Add a bit of gravel or small pebbles for drainage, followed by potting soil suitable for herbs.
- Plant small herb seedlings or sow seeds in each pot, pressing them gently into the soil.
- Place the pots on a sunny windowsill and water lightly, keeping soil lightly moist but not soggy.
- Rotate the pots occasionally so plants receive even light and trim back as they grow.
Cereal box bookmarks with playful edges
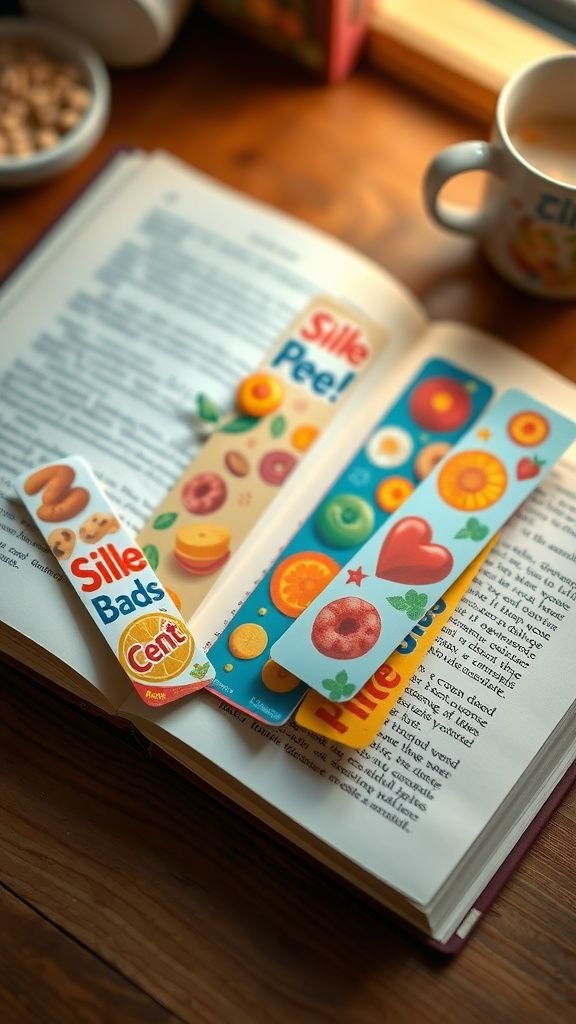
The stiff cardboard from breakfast boxes makes bookmarks that feel reassuringly substantial in the hand. There is a satisfying contrast between glossy printed graphics and the raw brown core revealed at the cut edges.
Decorating a strip with torn colored paper or a snippet of typography turns this modest material into a little personal flag that peeks out of a book like a secret. The little friction against the page when sliding a bookmark in and out carries a tactile comfort, and seeing a bright corner between chapters always sparks a smile.
Steps
- Cut a rectangular strip from a cereal box to the desired bookmark size.
- Round the corners and sand any rough edges for a smooth finish.
- Decorate the front with paper scraps, washi tape, or small printed images, adhering them securely.
- Apply a thin protective layer over the surface to increase durability.
- Add a ribbon or tassel to the top by punching a hole and threading it through if desired.
Denim pocket organizer with soft worn texture

Old jeans pockets retain the memory of the body that wore them; worn denim has a soft, familiar hand that feels comforting. Grouped together on a board, pockets become a functional tapestry of faded blue and frayed edges.
The little rivet details and stitched seams add a pleasing industrial accent, while the depth of each pocket hides tiny everyday tools or notes. I find that the roughness of the denim paired with the warmth of wooden backing creates a pleasing contrast, and slipping small objects into those pockets feels unexpectedly satisfying.
Steps
- Cut pockets from worn denim garments, leaving a little surrounding fabric for stability.
- Arrange the pockets on a wooden board in a pattern that balances large and small sizes.
- Secure each pocket to the board with strong adhesive and reinforced stitches around the edges.
- Add hooks or labels above selected pockets to identify contents if desired.
- Hang the organizer on a wall using sturdy hardware and place small items inside the pockets.
Paper bead garland for a festive corner
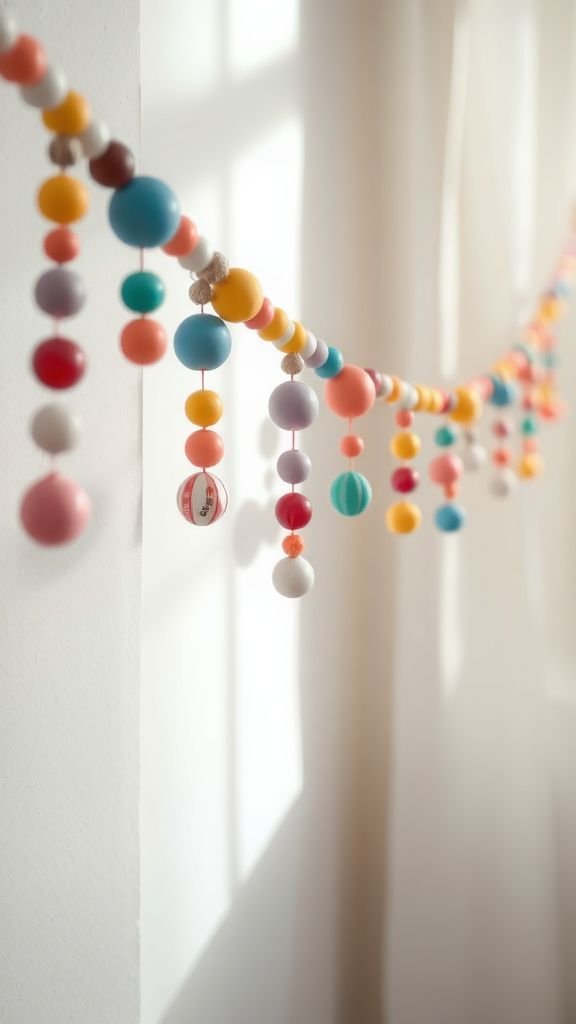
Stringing paper beads into a garland turns small printed scraps into a playful cascade of color. Each bead is a tiny capsule of pattern and sheen that catches light differently as it moves.
Draped loosely, the garland creates an easy, joyful accent above a shelf or along a window frame. The tiny friction of beads sliding together makes a gentle whisper when touched, and the air carries faint echoes of the original paper source.
Hanging the finished strand feels like pausing a lively scrapbook across a room, light and personable at once.
Steps
- Cut magazine or decorative paper into long triangular strips for bead rolling.
- Apply adhesive along the wide end of each strip and roll tightly into beads, sealing the tip.
- Coat each bead with a protective finish to strengthen and allow drying.
- Thread beads onto a sturdy string or thin cord, spacing them as desired.
- Tie loops at each end of the garland for hanging and drape in the chosen location.
Bottle cap wind chime with tinny melody

Scavenged bottle caps create a tinkling chorus when they meet in a breeze, and arranging them into a mobile turns small metal discs into playful instruments. The etched logos and faded paint on each cap tell a brief story, and the thin ringing sound is bright and cheerful against a summer afternoon.
Suspended from a reclaimed branch, the caps spin and catch light, sending brief flashes of color. I often stand beneath the chime and listen, remembering small conversations and sunny days, the sound offering an easy, lighthearted soundtrack to a porch.
Steps
- Collect bottle caps and flatten them gently if needed to create even surfaces.
- Drill or punch small holes near the rim of each cap for threading.
- Attach caps to lengths of strong thread or thin wire, grouping them into strands of varied lengths.
- Tie the strands to a reclaimed piece of driftwood or a sturdy ring, balancing weight evenly.
- Hang the wind chime outdoors where it can catch breezes and enjoy the sound.
Cork trivets with warm muted texture
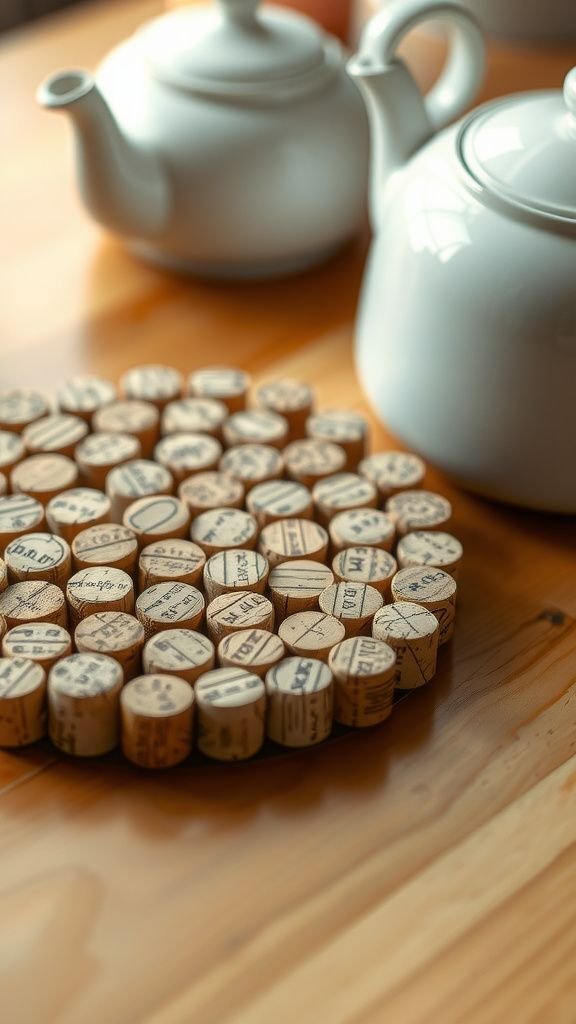
Sinking a hand into a pile of wine corks feels oddly comforting; the tiny porous cores give under pressure and the faint woody smell can be quite grounding. When joined, the corks form a surface that is soft under a warm pot yet sturdy to the touch.
The patchwork of natural tones creates a neutral mosaic that looks at home on a kitchen counter. Each little cylinder remembers evenings and conversations, and the whole trivet carries that memory forward, offering both function and a pleasant, slightly rustic aesthetic.
Steps
- Gather wine corks and slice them lengthwise for a flatter surface if desired.
- Arrange the corks into a tight grid or circular pattern on a heat-resistant base.
- Adhere the corks together with a strong, heat-safe adhesive, ensuring edges align neatly.
- Allow the adhesive to cure fully according to product instructions.
- Trim any uneven edges and test under hot dishes in a safe environment.
Pallet wood coasters with rustic grain patterns
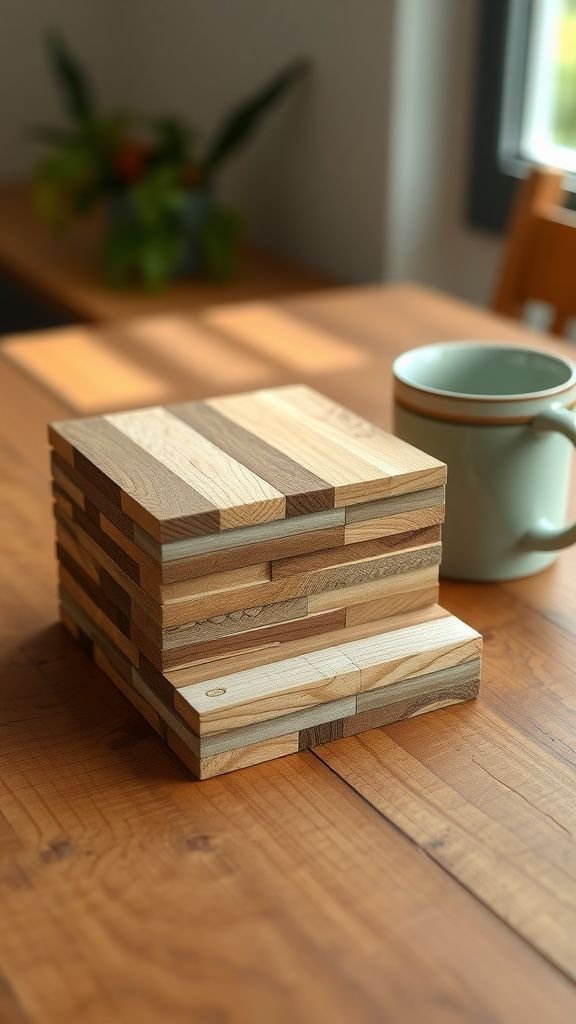
Pallet wood carries weathered grooves and pale streaks that read like a map of past seasons. Small offcuts turned into coasters highlight that grain and bring a tactile warmth to tabletop moments.
The rough edges and slight color variation give each coaster an individual portrait of time spent outdoors. When a cold glass is placed down, the wood absorbs a whisper of condensation and the scent of warm timber fills the air.
Grouped in a stack, the coasters look like a compact forest cross-section, ready to anchor casual gatherings.
Steps
- Select pallet wood offcuts and cut them into uniform coaster-sized pieces.
- Sand surfaces lightly to remove splinters while retaining natural grain and texture.
- Apply a protective finish suitable for wood to resist moisture and enhance color.
- Allow the finish to dry thoroughly and add felt pads to the underside to protect surfaces.
- Stack and present the coasters on a tray or keep them by the beverage station.
T-shirt yarn bowl with soft cozy texture
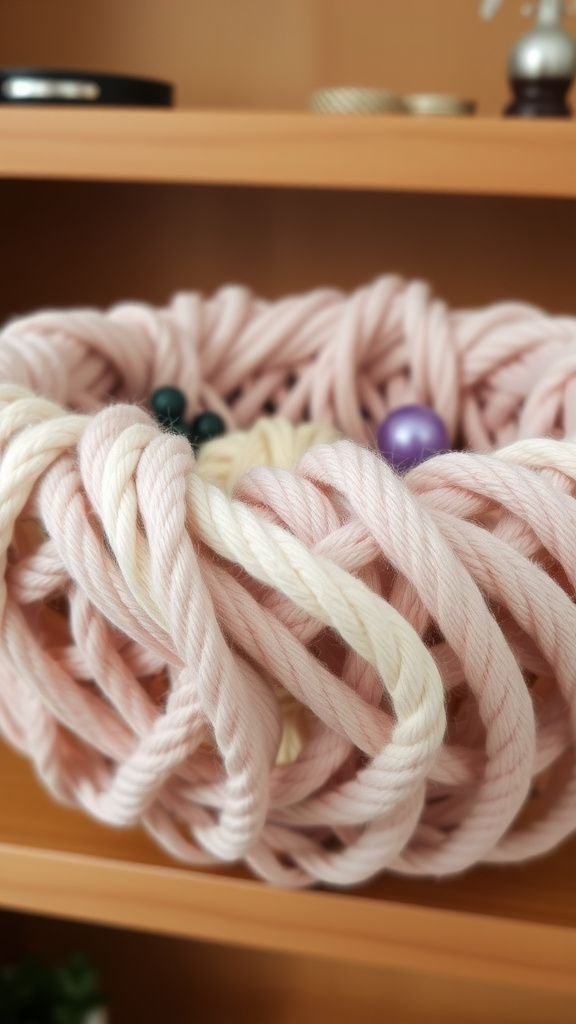
Old cotton tees stretched into yarn become wonderfully soft coils that feel like a gentle hug for small items. The fabric yields with a satisfying give and the colors blend into subtle ribbons along the bowl’s side.
The surface is pleasantly tactile, inviting fingers to trace the loops and ridges. Placing a bowl on a dresser to hold jewelry or loose change turns everyday detritus into something cared for.
The familiar stretch and faint scent of laundry make the piece feel lived-in and quietly comforting, a small domestic luxury made from what was once worn.
Steps
- Cut old T-shirts into continuous strips and stretch each strip to form soft yarn.
- Coil the yarn tightly into a circular base, securing with stitches or adhesive as you progress.
- Continue coiling upward to build the sides, maintaining even tension for a consistent shape.
- Finish the rim securely and tuck any loose ends back into the woven surface.
- Place the finished bowl on a dresser or shelf and fill with small items.
Crayon melt art with a bright stained edge

Melting old crayon stubs into layered color creates a saturated, tactile edge on paper or canvas. The wax carries a faint, nostalgic smell that brings childhood afternoons to mind.
As colors flow into one another, little ridges and glossy puddles appear, catching light differently across the surface. The finished piece has a tactile relief that invites closer inspection, and the interplay between matte paper and shiny wax is unexpectedly pleasing.
Displayed on a wall, the work radiates a cheerful energy and a hint of playful spontaneity.
Steps
- Gather broken crayon pieces and organize them by color on a protected surface.
- Secure the crayons at the top of a canvas or heavy paper using a heat source to soften them carefully.
- Direct softened wax to flow downward to create drips and layered color bands.
- Allow the wax to cool and set completely before moving the artwork.
- Trim any excess wax and frame or hang the finished piece in a well-ventilated spot.
Mason jar soap dispenser with vintage feel

A reclaimed mason jar filled with soap changes the familiar act of washing into a small ritual. The cool glass, embossed lettering, and visible air bubbles create a nostalgic, tactile experience.
Pumping releases a gentle foam and a faint scent that mingles with the jar’s cool surface. The contrast between smooth glass and warm soap texture is inherently satisfying, and the jar sits sturdily beside the sink like a small heirloom.
Guests often comment on the charm of a repurposed container holding something so routine, transforming ordinary moments into little pleasures.
Steps
- Clean a mason jar thoroughly and remove any labels or residue from the surface.
- Fit a pump dispenser mechanism into the jar lid, cutting a hole if necessary for a snug fit.
- Fill the jar with liquid soap or a soap and water mixture, leaving space at the top.
- Secure the lid and test the pump to ensure smooth operation.
- Place the dispenser by the sink and refill as needed.
Tin postcard frames with a rustic patina
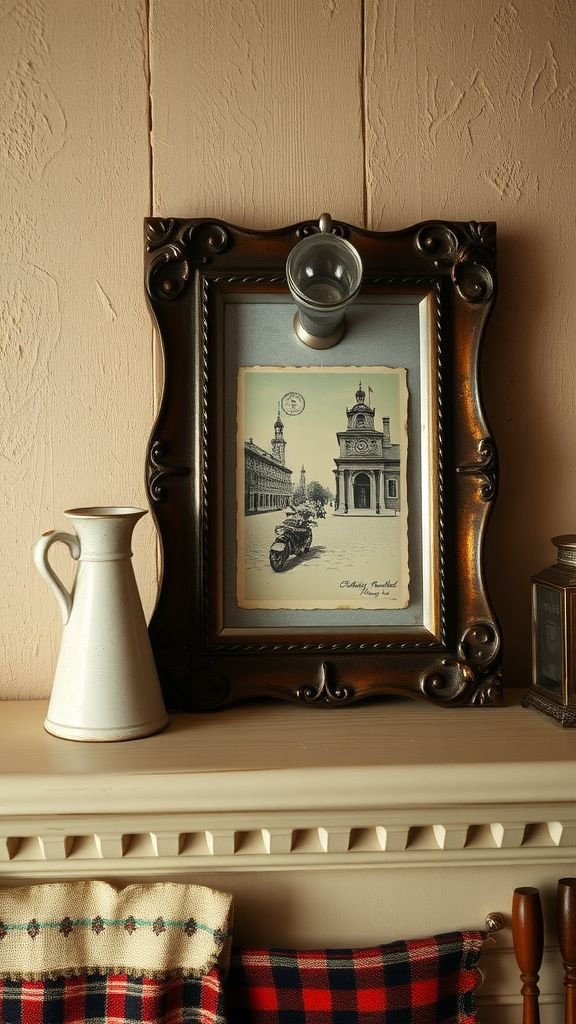
Old tin sheets can be turned into small frames that carry a pleasant coolness to the touch. The gentle patina and tiny dings give the metal a lived-in personality that complements faded postcards or family photos.
The narrow rim acts almost like a window, focusing attention on the image while the reflective metal edge adds a soft gleam. I like the way the tin’s subtle imperfections echo the aged paper of the postcard, creating a harmonious interplay.
Placed on a mantel, these framed pieces feel quietly sentimental and domestic.
Steps
- Cut tin sheet to size for a small frame and bend edges inward to form a shallow rim.
- Smooth any sharp edges and add a backing board that holds the postcard securely in place.
- Press the postcard under the rim and secure the backing with clips or adhesive.
- Attach a small stand or hanging hardware to the back of the frame.
- Position the frame on a shelf or hang it on the wall to display the image.
Bottle garden terrarium in a clear globe
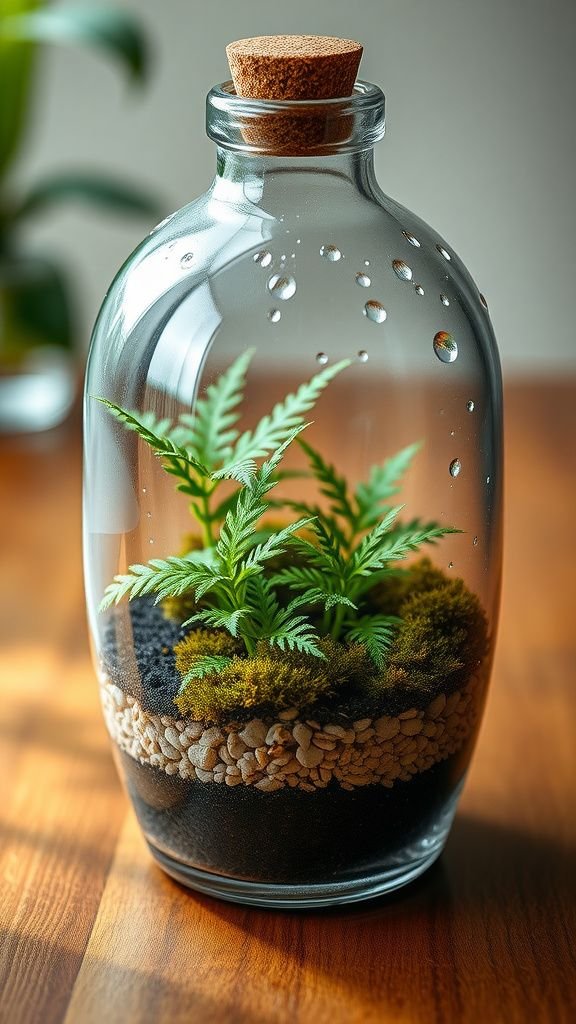
A clear bottle globe becomes a tiny greenhouse where breath fogs glass briefly on cool mornings and droplets bead on the inside. The mini ecosystem feels private and slightly mysterious, with layers of gravel and moss forming textural floors.
The soft green hush of tiny leaves and the faint mineral scent of wet pebbles makes peering into the globe feel calming. I often find myself tilting it slightly to inspect little roots or to enjoy the light filtering through leaves, as if peeking into a miniature, self-contained landscape that invites a slow kind of joy.
Steps
- Clean a clear glass bottle or globe and add a layer of small pebbles for drainage at the base.
- Add a thin layer of activated charcoal to keep the terrarium fresh, followed by a layer of potting mix.
- Plant small mosses, ferns, or tiny tropical seedlings, arranging them with gentle placement.
- Mist lightly to settle the soil and place the terrarium in bright, indirect light.
- Monitor moisture and open the globe periodically to allow air exchange if needed.