I’ve spent lazy Saturdays wandering Dollar Tree aisles, fingers grazing bright bins and plastic jars, picking up odd little finds that later turned my living room into a place that feels like home. Those small purchases often surprised me by becoming focal pieces or quiet accents that made a space feel warmer and more personal.
Dollar Tree DIY Home Decor Crafts has become a kind of happy puzzle for me, a way to mix texture and color on a tiny budget.
Turning humble items into layered decor has been oddly satisfying, sparking small moments of creativity and a few proud displays on shelves and tables.
Farmhouse Clip Frame from Dollar Tree Finds

I stumbled on slim picture frames, tiny metal clips, and strands of twine one afternoon and left with a handful of pieces that felt full of possibility. The frames have a cool, smooth glass that reflects sun in a soft, pleasing way.
The clips have a satisfying, slightly gritty metal feel when they grip paper. Arranging little handwritten notes or mini prints behind the glass gives a cozy, casual look, like memories pinned in a sunlit corner.
I often nestled one near a potted plant where light softened the edges.
Steps
- Gather a slim picture frame, a small metal clip, a length of twine, and a favorite printed quote or photo.
- Thread the twine through the clip or tie it across the frame backing and position the paper behind the glass.
- Secure the clip to the twine, adjust the placement of the image, and hang or lean the frame on a shelf.
Candle hurricane with glass gems and sand

I picked up translucent glass nuggets and a clear tumbler while thinking of evenings when the light makes everything glow. The gems catch the candle flame and scatter tiny glints, while the sand gives a muted base that anchors the piece.
There’s a quiet ritual in arranging items until the glow feels just right, a softness that comes alive at dusk. I liked the way the top rim of the tumbler reflected candlelight like a tiny horizon, and how the glass felt cool and smooth against fingertips when arranging it on a tray.
Steps
- Select a clear glass tumbler, a handful of glass gems, and a small amount of decorative sand.
- Layer the sand inside the glass to create a stable bed and nestle the glass gems around where a candle will sit.
- Place a pillar or votive candle in the center, adjust gems until the sparkle complements the flame, and set on a coaster or tray.
Mini succulent planter from foam and faux greenery

The tiny faux succulents felt almost real under my fingertips, with smooth, cool plastic leaves and a faint earthy smell from the potting mix. Nestled inside small plastic cups, the little rosettes bring a bright pop of green without any fuss.
I liked arranging a cluster of them along a sunny windowsill where they seemed to nod toward the light. The contrast between the silky leaves and the matte plastic pot creates a playful, small-scale landscape that’s cheerful and low-maintenance, brightening shelves and breakfast tables alike.
Steps
- Select small plastic cups or mini planters and pick matching faux succulent stems from the craft aisle.
- Press a piece of floral foam into each cup and position the succulent stems into the foam to create a full top.
- Place planters on a windowsill or tabletop grouping and rotate occasionally to balance the display.
Charming mason jar lanterns with doily accents

I have a fondness for the weight and coolness of mason jars, especially when the glass picks up speckles of late afternoon sun. Layering a delicate paper doily around the jar rim softens the jar’s straight lines, creating a mix of feminine and utilitarian that felt unexpectedly pleasing.
When a small candle glows inside, the doily casts gentle patterns nearby, like lace shadows on a tabletop. The contrast of smooth glass with airy paper invites lingering and a sense of slow, soft evenings at home.
Steps
- Gather clean mason-style jars, paper doilies or lace circles, and small flameless or real candles appropriate for jars.
- Wrap the doily around the jar rim and adjust until the pattern sits evenly, lowering the candle inside the jar.
- Arrange jars in a cluster on a tray or mantel and light to enjoy the patterned glow.
Painted wood bead garland with tassel ends

The round wooden beads had a satisfying, slightly rough grain that felt grounding when threaded together, and painting them brought a small thrill of transformation. Choosing muted, earthy tones made the garland feel calm and collected, while the tassel ends added playful movement when draped over a shelf.
I enjoyed the soft scratch of the brush across bead surfaces and the faint scent of drying paint lingering in the air for a moment. It’s a small object that reads like a styling accent, lending quiet rhythm to a coffee table vignette.
Steps
- Select a string of wooden beads and pick acrylic paint shades that complement your decor.
- Lay beads out and brush each bead until coverage is even, letting paint dry between coats.
- Thread the beads onto a strong cord, knot the ends, and add tassels for a finished look.
Cozy tea towel wall hanger with wooden dowel

A soft cotton tea towel with a faded stripe pattern felt like an invitation to slow mornings. Sliding it over a slim wooden dowel gave a hint of vintage kitchen charm, the fabric folding into gentle pleats that danced with a passing breeze.
The wood offered a warm counterpoint to the cotton, and the whole arrangement felt casual yet put-together. I liked seeing a familiar pattern hanging nearby while washing a mug, a small domestic comfort that made the space feel lived-in and quietly curated.
Steps
- Choose a patterned cotton tea towel and a slim wooden dowel or stick that complements its colors.
- Fold the towel over the dowel to create even pleats and add a simple cord or ribbon to hang the dowel.
- Hang the piece on a wall hook or nail in a kitchen or nearby entry space for a soft decorative touch.
Wreath of faux greenery and twine details

When I picked up a bundle of faux eucalyptus stems, the scent of plastic didn’t bother me at all because the soft green tones were so comforting. Wrapping stems into a circular shape produced a satisfying loop of leaves that looked right at home on a hallway wall.
A few bits of twine added an organic, rustic edge, and the overall silhouette read like a small seasonal pause without shouting. I enjoyed how the leaves caught light differently throughout the day, creating gently shifting highlights.
Steps
- Collect faux greenery stems and a small foam or wire wreath base to anchor the pieces.
- Layer stems around the base, tucking ends to create a continuous ring, and secure with thin floral wire.
- Wrap twine around sections for texture and hang the wreath on a door or above a mantel.
Mirrored tile accent wall art with metallic trim

Small mirrored tiles felt crisp and bright under my fingers, reflecting snippets of the room back with a slightly fragmented charm. Grouped into a grid and framed by a narrow metallic trim, the piece picked up light in little bursts, turning a blank wall into a lively surface.
The metallic edge gave a hint of shine without overwhelming, and the mirror surfaces created tiny flashes whenever someone walked by. I enjoyed the way this small composition multiplied angles and glimpses, making a space feel a touch larger and more layered.
Steps
- Gather mirrored tiles, a narrow metallic frame or trim pieces, and a sturdy backing board.
- Arrange the tiles into a pleasing grid on the backing, then secure trim around the outer edge to frame the composition.
- Mount the completed piece on a wall where reflected light can enliven the room.
Rope-wrapped glass vase for textured florals

A clear glass vase gained instant warmth when wrapped with natural rope, the fibers creating a rough, tactile band that warmed the cool glass. The texture invited touch and made floral stems seem more rooted and earthy.
I liked the contrast of soft petals against the coarse rope, a mix that felt balanced and comforting. The vase sat beautifully on a windowsill where a slight breeze made the ribbons of coarse fiber move, adding a whisper of motion to an otherwise still display.
Steps
- Select a clear glass vase and a length of natural rope suitable for wrapping around the exterior.
- Secure one end of the rope at the base, wrap tightly around the vase in successive coils, and fasten the final end neatly.
- Place floral stems or faux blooms inside and position the vase on a table or shelf.
Framed vintage-inspired fabric wall panels

A square of vintage-looking fabric with a faded floral print brought a soft, nostalgic note that felt like a memory. Nestled inside a simple frame, the textile became a calm graphic element, its weave and muted dyes visible up close.
The frame’s matte finish complemented the fabric’s quiet color washes, and it felt satisfying to line up a trio of panels for a cohesive wall grouping. I often paused to admire the tiny irregularities in the print that hinted at something handmade and gently worn-in.
Steps
- Pick fabric squares with interesting prints and a set of frames that fit the cloth dimensions.
- Stretch each fabric piece over a backing board and secure it in the frame to create a smooth surface.
- Arrange framed panels on a wall in a balanced layout to create a unified display.
Layered tray vignette with thrifted trinkets

A shallow serving tray felt like a tiny stage for small treasures: a ceramic salt dish, an oak coaster, and a brass-tone letter opener gathered into a quiet scene. The tray’s rim gave order to the group, and arranging the pieces created a pleasant rhythm of shapes and surfaces.
I enjoyed the way the eye moved from glossy ceramics to matte wood and then to a small metallic glint. It made a coffee table feel curated without much fuss, a little corner that invited a slow glance and a smile.
Steps
- Choose a shallow tray and collect a handful of small decorative objects that share a color story or texture.
- Group items in odd numbers, placing taller pieces toward the back and balancing shapes for visual flow.
- Set the tray on a coffee table or console to anchor the surrounding decor.
Rustic shelf accent with painted chipboard letters

Chunky chipboard letters have a pleasing weight and a slightly rough edge when handled, and painting them in muted tones felt oddly relaxing. Placing them on a shelf among books and jars gave a whisper of personality without shouting.
The matte finish on the letters softened the color, which paired well with woven baskets and old paperbacks. I liked how a single word or monogram could anchor a small area, offering a little human touch that reads like a friendly hint from the room’s owner.
Steps
- Purchase chipboard letters and select paint colors that harmonize with surrounding decor.
- Brush the letters with even strokes and allow them to dry fully before display.
- Lean or place letters on a shelf amid other items to create a balanced vignette.
Decorative tray from dollar placemat and trim

A smooth plastic placemat gained new life as a base for a low tray, its patterned surface catching light in a relaxed way. Adding a narrow trim around the edge gave a subtle frame that made the piece feel intentional.
The finished tray held small cups and a vase, its shallow sides inviting casual placement. I liked running my hand along the rim and noticing the neat seam where trim met mat.
It served as a humble stage for my morning coffee and a small stack of books.
Steps
- Select a patterned plastic placemat and a thin trim or ribbon to edge the mat.
- Adhere the trim around the perimeter of the placemat, ensuring a neat, even border.
- Place small items on the tray and situate it on a table as a decorative base.
Seasonal garland made from felt and wooden shapes

Soft felt shapes in seasonal hues felt like small confetti, light and tactile, their edges slightly fuzzy under a fingertip. Strung together on a thin cord, they became a gentle stream of color that could be draped across a mantel or window.
The wooden cutouts added a firmer counterpoint, their smooth surfaces and subtle grain introducing a quiet natural element. It’s a small, flexible accent that shifts mood with the seasons, and I enjoyed the tiny rhythm it created when it gently brushed against curtains or picture frames.
Steps
- Choose felt shapes and a few wooden cutouts that reflect the current season or mood.
- Arrange the pieces on a length of cord at intervals that feel balanced, securing each shape so it remains in place.
- Drape the garland across a mantel, shelf, or window frame to add seasonal color.
Minimalist circle mirror with painted frame
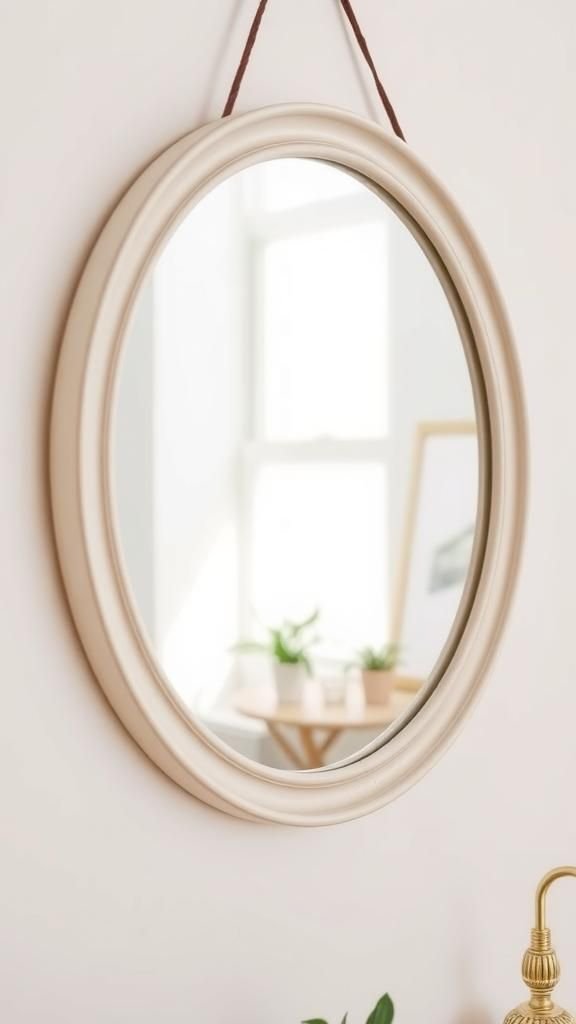
A simple round mirror had a crisp edge that felt calm and modern in my hands. Painting its slim frame in a soft neutral softened the reflection, making it blend into a wall instead of dominating it.
The smooth glass returned tiny echoes of the room in a friendly, compact way, and the painted rim created a finished, intentional look. I preferred hanging it at eye level so it caught light and reflected small vignettes around the room, adding a hint of depth without fuss.
Steps
- Select a small round mirror and choose a paint color that complements your wall tones.
- Carefully paint the frame, keeping brushstrokes smooth and even, and let it dry thoroughly.
- Hang the mirror at a height where it reflects a pleasing portion of the room.
Fragrant sachets from muslin bags and dried herbs

Tiny muslin bags felt soft and natural in the palm, their weave warm against my skin. Filled with dried lavender and a hint of citrus peel, they rested on a dresser and gave off a calm, herbal scent that was subtle and reassuring.
The fabric held the herbs quietly, releasing fragrance without overwhelming the room, and a small knot of ribbon added a handmade charm. I enjoyed the way opening a drawer revealed those gentle notes, like a soft invitation to pause and breathe for a moment.
Steps
- Gather small muslin bags and a mix of dried herbs or fragrant dried peels.
- Spoon the dried materials into each bag, then tie the openings securely with ribbon or twine.
- Place sachets in drawers, closets, or tuck into linen stacks to impart a gentle scent.
Textured pillow cover from napkins and trim

A soft fabric napkin with a woven pattern felt like a small discovery when I unfolded it; its texture invited closer touch. Transforming it into a pillow cover gave a cushion a new personality, the napkin’s edges and pattern creating a quiet focal point on a couch.
The fabric’s grain and the little irregularities in weave read as artisanal, lending the sofa a comfortable, informal look. I often sank into those cushions during movie nights, appreciating the small, cozy detail that made the whole couch feel more welcoming.
Steps
- Select a fabric napkin large enough to cover a small pillow and choose trim that complements the pattern.
- Wrap the napkin around the pillow, tuck or stitch edges to secure, and add trim along seams for decoration.
- Place the pillow on a couch or chair to add texture and comfort to the seating area.
Gallery ledge with alternating prints and objects
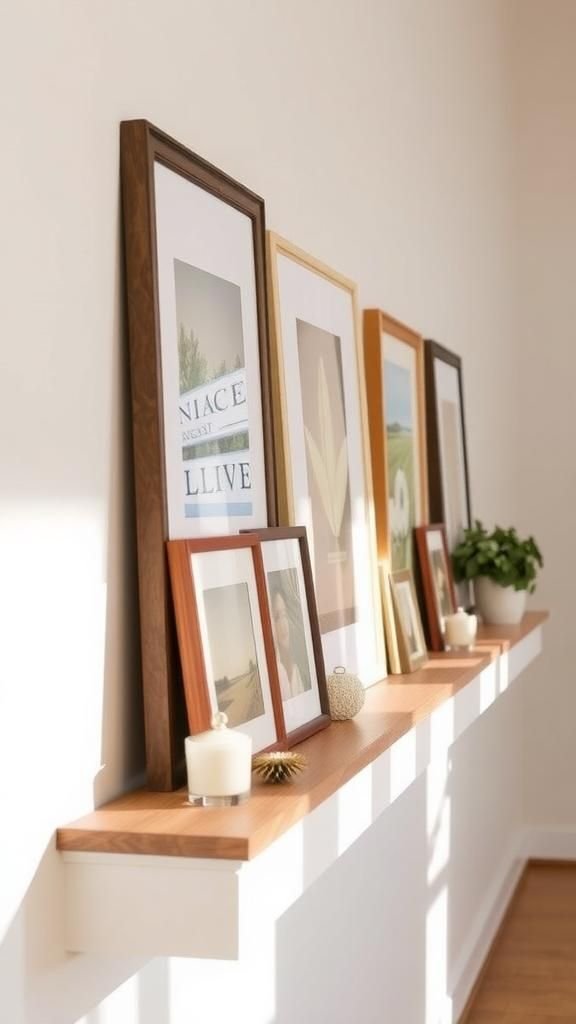
A narrow ledge became an informal stage for prints, frames, and small objects that seemed to converse with one another. I liked spacing larger framed photos beside a stack of small ceramics, the varying heights creating a pleasant cadence.
The ledge’s shallow depth made the grouping feel casual, encouraging occasional shuffles and updates. Watching the arrangement change with seasons or moods was quietly satisfying, a low-stakes way to keep the room feeling fresh.
It felt like a small rotating exhibition of favorite things.
Steps
- Install a narrow gallery ledge at eye level and gather a mix of framed prints, small ceramics, and decorative objects.
- Place larger frames first, then layer smaller pieces and objects to build depth and balance.
- Swap or rearrange items periodically to refresh the display and keep the arrangement lively.
Chalkboard menu sign with reclaimed frame

A slim reclaimed frame felt like a small piece of history, its scuffs and soft edges telling of earlier days. A chalkboard panel inside took on lists and doodles with a rustic friendliness, the chalk’s powdery texture contrasting with the frame’s worn wood.
I enjoyed writing little notes that felt ephemeral, fading gently as time passed. Hanging the sign near a kitchen nook added a warm, casual point of focus, where scribbled reminders and small sketches became part of morning routines.
Steps
- Find a reclaimed or weathered frame and a chalkboard panel cut to fit the opening.
- Fit the chalkboard into the frame and secure it so the surface is flat and even.
- Write menus, reminders, or small messages on the board and place it in a kitchen or entry area.
Tiered dessert stand from plates and dowel

Two mismatched plates stacked into a tier felt charmingly domestic, their glazes imperfect in a way that seemed friendly. A central dowel gave the structure a vertical elegance, lifting small pastries and trinkets into a layered display.
The plates’ cool ceramic surfaces and the warmth of wooden support created a pleasant contrast, and arranging tiny treats felt celebratory even on an ordinary afternoon. It’s the sort of object that brightens a counter, making everyday moments feel a little more intentional and gathered.
Steps
- Select two plates with complementary diameters and a wooden dowel or rod to act as the central support.
- Place the larger plate as a base, position the dowel through a hole or center support, then add the smaller plate above.
- Balance small pastries or decorative items on each tier and set the stand on a dining surface.
Repurposed picture frame turned into jewelry display

An empty picture frame felt like a tiny portal, and hanging threads across the opening created delicate lanes perfect for hanging earrings and necklaces. The contrast between the frame’s solid border and the airy lines of the threads made jewelry pop, turning everyday accessories into a small visual story.
I enjoyed the ease of scanning the display to choose a piece, the little clinks as metal met metal like a soft, domestic soundtrack. The whole piece read like a personal boutique tucked into a bedroom corner.
Steps
- Choose a shallow picture frame and several lengths of thin cord or chain to stretch across the opening.
- Anchor the cords securely to the frame edges to form rows for hanging jewelry.
- Hang necklaces and dangle earrings from the cords to create an organized and visible display.