I still remember the day my kitchen counters stopped disappearing under mail, keys, and random mugs. I started tinkering with small, homey projects and found that Clever DIY Home Organization Crafts make living spaces feel calmer and more personal.
These crafts became tiny rituals for me, a way to turn overlooked scraps into practical pieces that catch the eye.
Over time I tried many ideas and kept the ones that felt honest and tactile. This list of Clever DIY Home Organization Crafts shares projects that have surprised me with how neat and cozy they make daily life feel.
Mason Jar Countertop Utensil Caddy with Rustic Charm

I have a soft spot for glass that clinks and wood that smells faintly of the shop. This mason jar caddy lives on my countertop and it brings a little farmhouse warmth.
Forks and wooden spoons nestle into cool, transparent glass while the wooden base adds a cozy anchor. When sunlight hits the jars early in the day there is a quiet sparkle that makes the whole kitchen feel friendlier.
It’s one of those simple things that somehow makes routine moments feel steadier and more pleasing.
Steps
- Gather three mason jars that are similar in size and a piece of reclaimed wood for the base.
- Arrange equal spacing for the jars on the board, mark their positions lightly, and secure each jar to the board with strong adhesive or metal jar clamps.
- Sand the edges of the wooden base until smooth and finish the wood with a clear coat or oil to enhance the grain.
- Place cooking utensils into the jars and set the caddy on the countertop where items are easily reached.
Floating spice jar ledge that saves counter space

There is a particular joy in opening a little jar and catching a scent that pulls a recipe into focus. A slim floating ledge lined with small spice jars turned my cluttered corner into an orderly strip of color and aroma.
The glass faces outward and labels peek like tiny signs. Hands move more confidently when the most-used spices are visible and accessible.
The ledge itself reads almost like a miniature herb garden, the jars catching the light and turning everyday cooking into a quiet, tactile ritual.
Steps
- Select a narrow wooden shelf that fits the spice jars and sand the surface for a smooth finish.
- Measure the wall space and mount brackets or hidden shelf supports to achieve a floating effect.
- Place identical small jars on the ledge and label the lids or fronts with legible tags.
- Arrange jars by frequency of use so the ones reached for most often sit within easy reach.
Repurposed cereal box drawer dividers for neat drawers
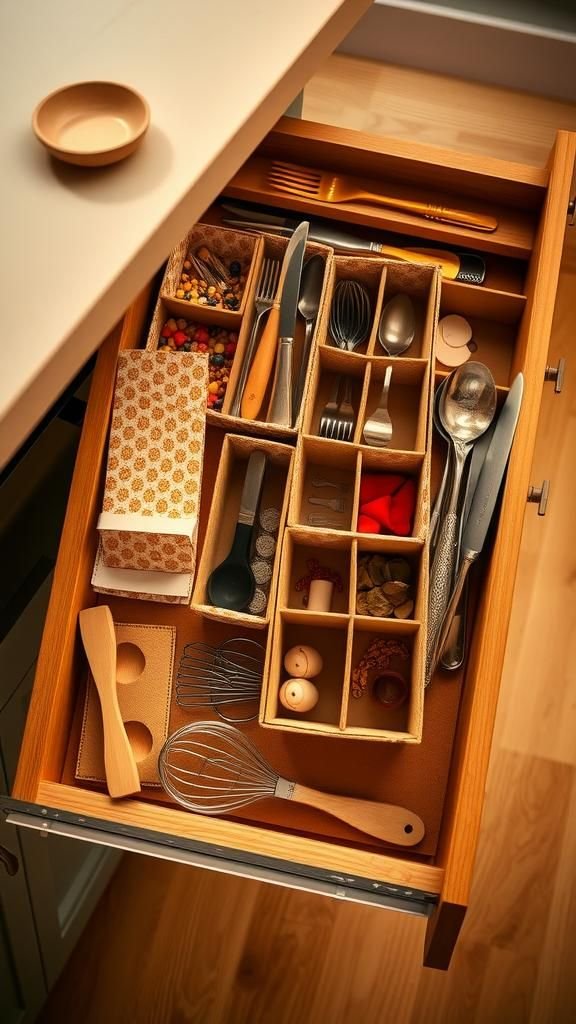
When I first tried repurposed cardboard in a drawer, I laughed at how instantly ordered everything felt. The thin walls create snug lanes where utensils, receipts, and odds and ends settle with a quiet logic.
The cardboard edges feel slightly papery under the fingertips and the patterned sides can peek through for a touch of personality. There’s a satisfying quiet that comes when a drawer opens and everything stays in place, like each item has chosen a tiny, tidy home.
Steps
- Gather empty cereal or similar cardboard boxes and measure the interior of the drawer to fit.
- Cut panels to the measured heights and lengths, then line them with decorative paper or fabric if desired.
- Insert the panels vertically and horizontally to form compartments that match the items intended for storage.
- Place small objects into their new sections and adjust divider positions for a snug fit.
Hanging fabric organizer turned craft supply station
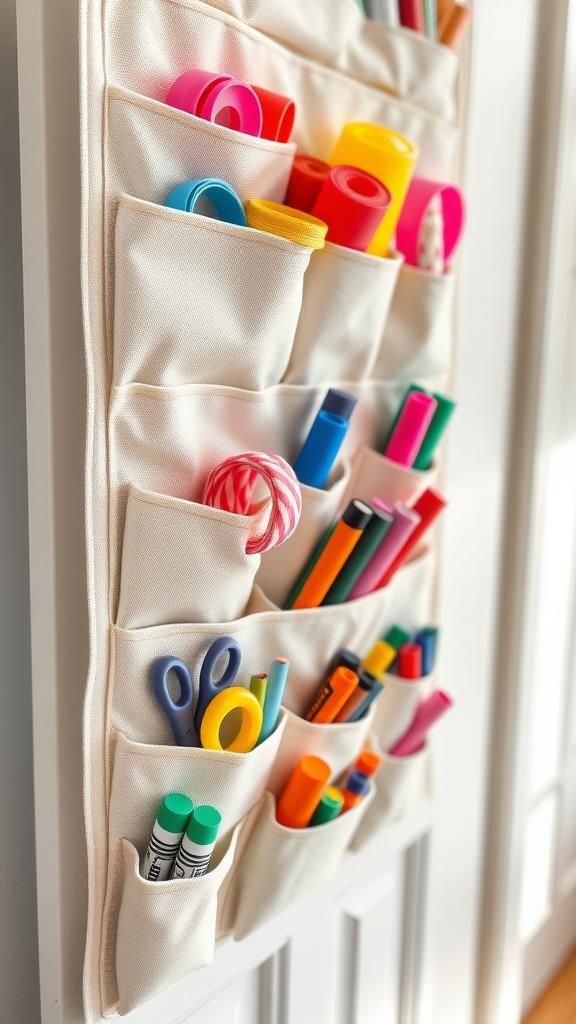
A soft organizer with pockets became my go-to spot for markers, ribbons, and scraps. The fabric pockets rustle when pulled and the colors of supplies peek like a patchwork quilt.
It hangs on the back of a door and changes the room’s silhouette, turning vertical space into a cheerful, layered display. There’s a little thrill when I slide a tool into its pocket and feel how neatly everything nestles.
It makes the room feel more playful and less overwhelmed by odds and ends.
Steps
- Choose a durable fabric organizer with multiple pockets and a sturdy hanging loop.
- Sort craft materials by type and tuck similar items into individual pockets for easy visibility.
- Hang the organizer on a door hook or wall peg at a comfortable height for frequent access.
- Periodically tidy pockets so only active supplies remain, keeping the organizer light and functional.
Pegboard command center with small baskets

A pegboard turned the wall above my desk from blank to lively. Small wire baskets and clips hold pens, tickets, and a few postcards, each item becoming part of an arranged scene.
The board feels tactile, with metal and wood meeting cloth and paper in a mix that is both functional and pleasantly chaotic. There’s a satisfying modularity when things get shuffled; each change rewrites the board’s mood.
The sound of hooks settling into place is oddly grounding, like a soft punctuation in the room’s rhythm.
Steps
- Mount a pegboard on a chosen wall area and paint it if a different color is desired.
- Select a combination of hooks, small baskets, and clips to accommodate the intended items.
- Arrange the accessories on the pegboard for an intuitive layout, grouping similar items together.
- Swap and rearrange components as needs evolve, keeping frequently used objects within easy reach.
Magnetic strip for corralling metal tools and scissors
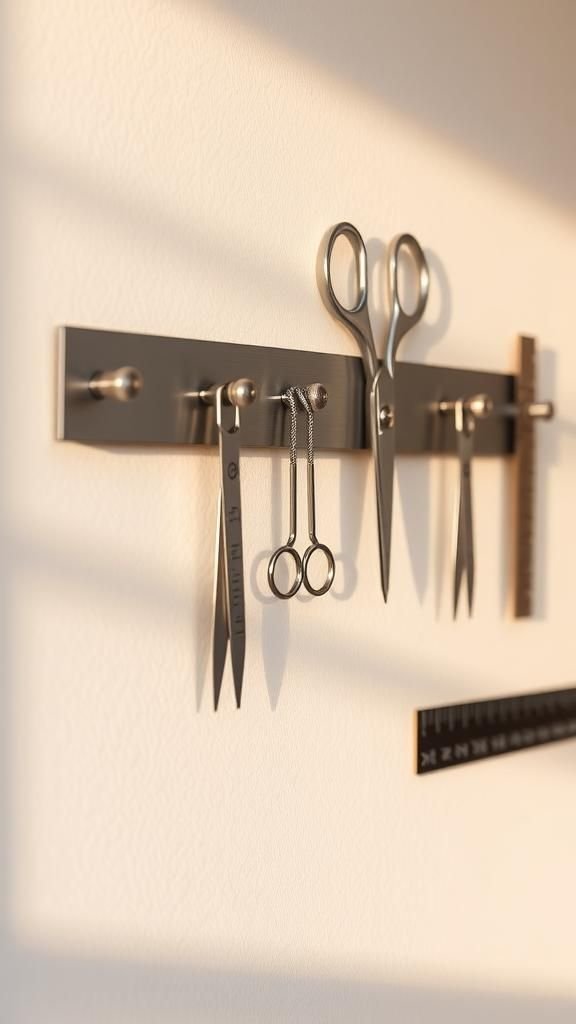
There’s a quiet confidence in seeing a row of metal tools aligned like little soldiers. A magnetic strip on the wall keeps scissors, shears, and metal rulers floating in a neat line.
The cool touch of metal against fingertips and the soft clack as items meet the strip have a practical rhythm. It cuts visual clutter by turning loose implements into a simple, visible collection.
The strip itself becomes a slim, efficient accent on the wall, tidy and unassuming in its presence.
Steps
- Choose a magnetic strip with enough strength to hold the range of metal tools intended for storage.
- Mount the strip on a wall at a height that is comfortable for reaching frequently used tools.
- Test placement with one or two tools and add the remaining items, arranging by size for balance.
- Periodically check the strip’s stability and adjust the layout as tools change over time.
Roll-away under-bed storage with labeled bins
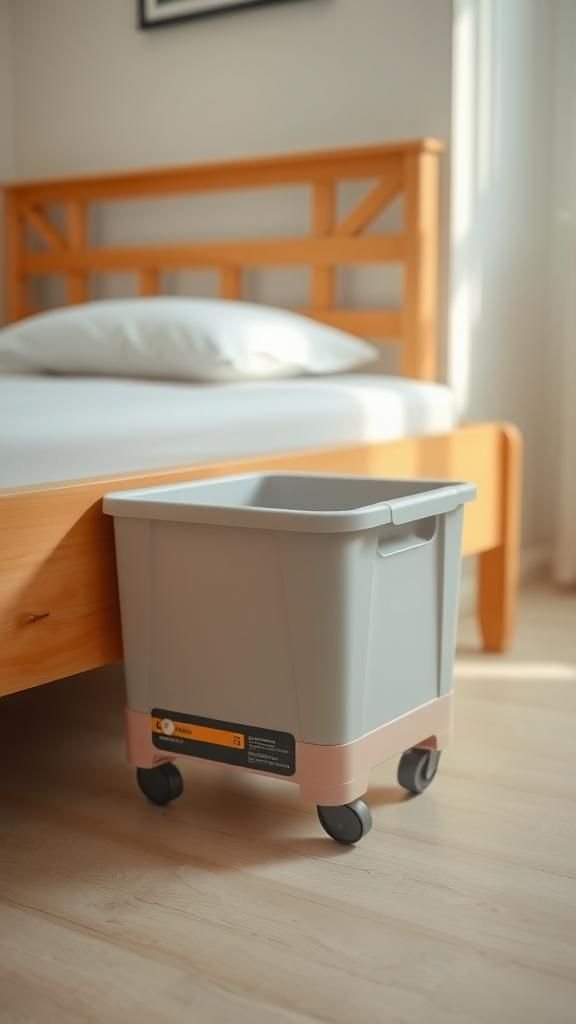
Sliding a low bin under the bed feels like tucking away a secret. The bins glide smoothly and offer a surprising amount of hidden space for linens, shoes, or seasonal items.
Labels at the front keep everything readable when pulled out, and the soft whisper of wheels on the floor is oddly satisfying. I often discover things I’d forgotten, each labeled box a little time capsule.
It’s a quiet solution that keeps the room open and the floor pleasantly empty, letting larger items breathe.
Steps
- Measure the space under the bed to select low-profile rolling bins that will fit comfortably.
- Assemble or prepare bins with reinforced bottoms to handle the stored items’ weight.
- Slide bins into place and attach labels at the front to indicate contents for easy retrieval.
- Pull bins out occasionally to air stored textiles and rotate items as needed.
Vintage frame turned jewelry display and organizer
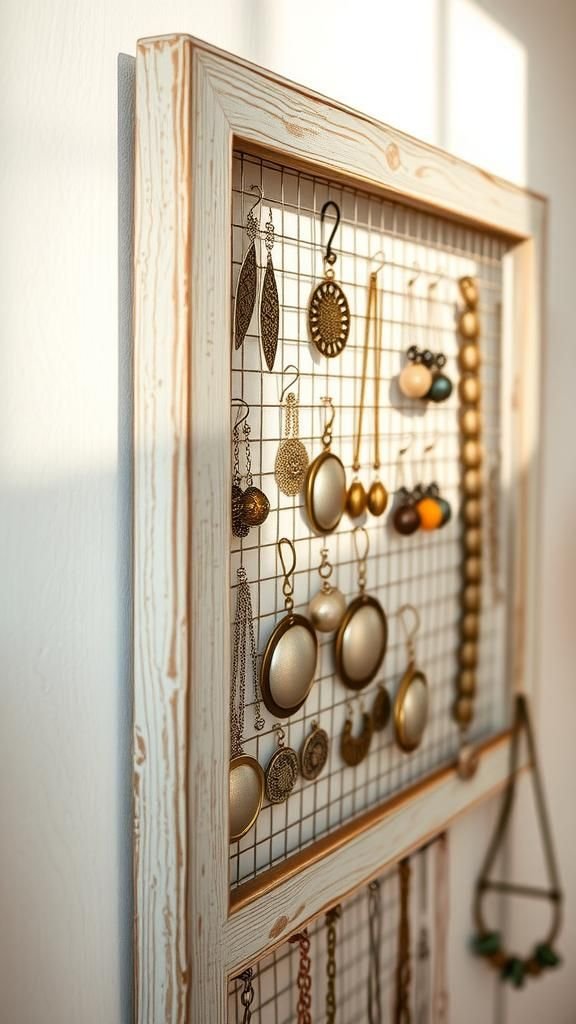
An old frame found at a flea market became a cherished corner of my dressing area. Inside the frame a mesh panel holds earrings and chains like tiny artworks.
The frame’s patina softens the gleam of metal and beads, creating a quiet contrast between old wood and shiny trinkets. The visual rhythm of earrings hanging in a row is comforting in the morning rush, and the faint scent of aged wood brings a slow, domestic calm.
It dresses up the wall while keeping cherished pieces within easy reach.
Steps
- Select a vintage or decorative frame and fit a stretched mesh or wire backing to its inner edges.
- Secure the mesh firmly so the jewelry can hang without shifting or slipping.
- Hang necklaces, earrings, and bracelets on the mesh, spacing pieces to avoid tangling.
- Mount the frame on the wall at a height that is convenient for dressing.
Curtain rod scarf hanger that doubles as decor
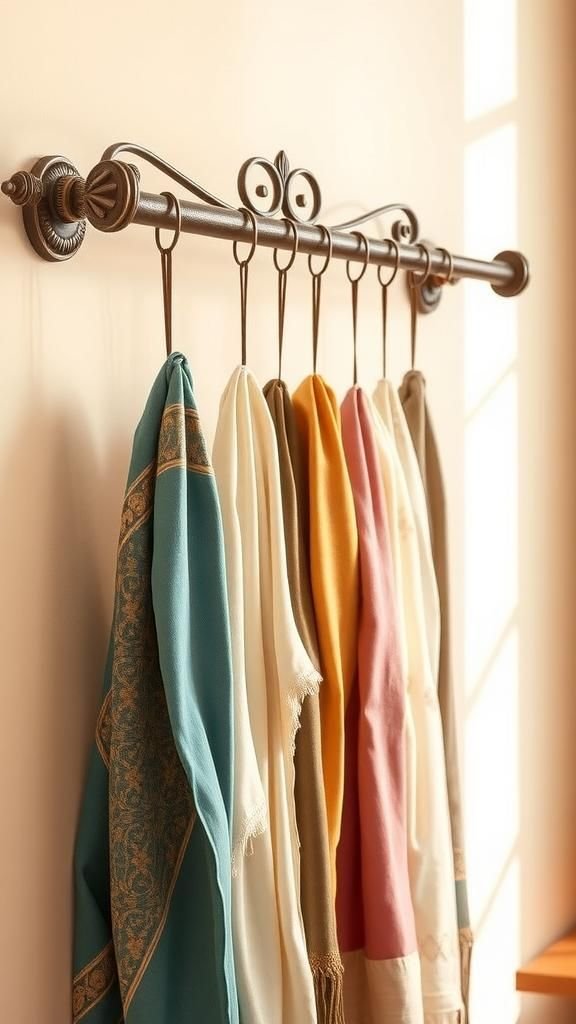
A simple curtain rod became an elegant display of scarves that feels like a rotating art piece. Silk and cotton drape and catch the light differently, creating a tapestry of textures across the wall.
The fabrics whisper against one another and the colors lend an easy, wearable palette to the room. Pulling a scarf down feels like choosing an accessory from a small boutique, and the rod itself adds a horizontal line that calms the wall.
It’s a practical touch that also acts as quiet decoration.
Steps
- Choose a lightweight curtain rod that complements the room’s decor and mount it securely between brackets.
- Fold or drape scarves evenly along the rod so colors and textures are visible.
- Slide scarves gently to rearrange their order as seasonal preferences change.
- Ensure the rod remains level and tighten brackets if any sagging appears.
Over-the-door pocket organizer for cleaning supplies
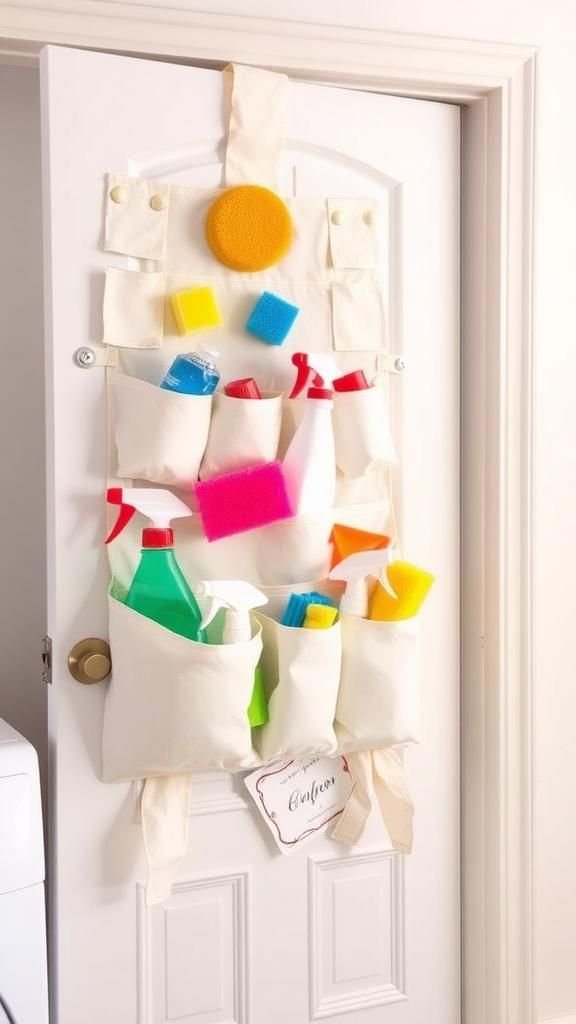
An over-the-door pocket organizer transformed a closet back into a tidy hub. Bottles sit upright, sponges breathe, and little sprays peep from clear pockets.
The fabric rustles as the door opens and the arrangement makes errands feel smaller and easier. The organizer’s pockets act like a series of tiny shelves, each holding a single kind of item so nothing tumbles.
It brings a tiny, ordered theater to an otherwise chaotic corner and saves floor and shelf space in a way that feels reliably practical.
Steps
- Select a heavy-duty over-the-door organizer with reinforced pockets suitable for cleaning items.
- Hang the organizer over a closet or utility room door and distribute supplies into pockets by type.
- Place heavier bottles in the lower pockets and lighter items higher up for balance.
- Check the organizer periodically and replace any containers that begin to leak or bulge.
Under-sink pull-out shelf with smooth casters
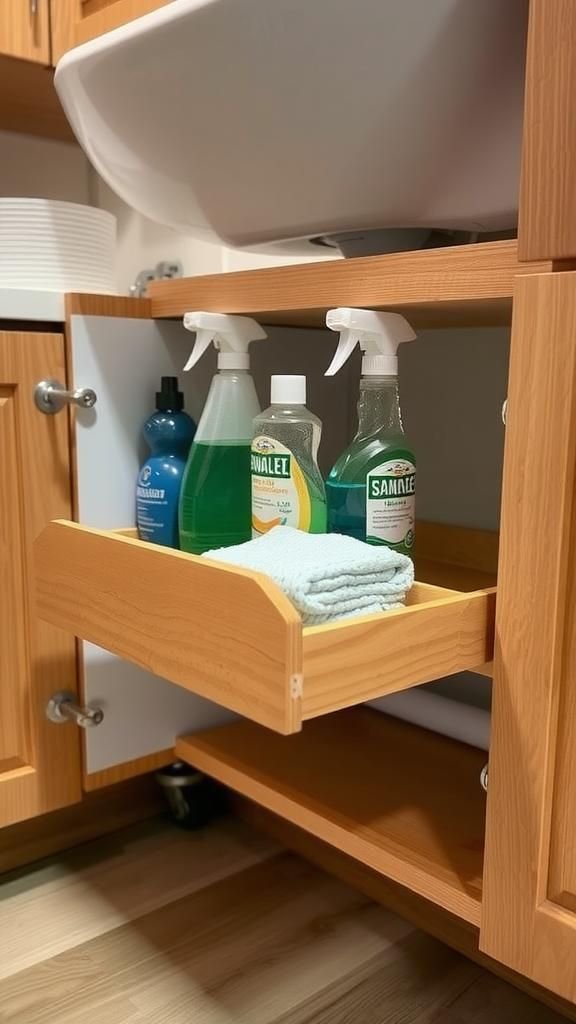
Opening the cabinet to a smooth slide of a pull-out shelf feels like revealing a tiny drawer of possibility. Bottles and cleaning cloths glide forward without the usual crouch-and-search routine.
The shelf’s edges carry faint scuffs from repeated use, which somehow adds character to the otherwise neat arrangement. The motion is quiet and practical, and the sight of everything visible at once brings a modest relief.
It makes the under-sink area feel less forbidding and more like a useful extension of the work surface above.
Steps
- Measure the cabinet interior and choose a pull-out shelf with casters that will fit the space.
- Install the shelf according to the manufacturer’s guidelines, ensuring smooth caster movement.
- Organize bottles and cloths on the shelf with heavier items towards the back for stability.
- Slide the shelf in and out to test motion and make small adjustments for alignment.
Modular wooden crate cubes stacked into shelving
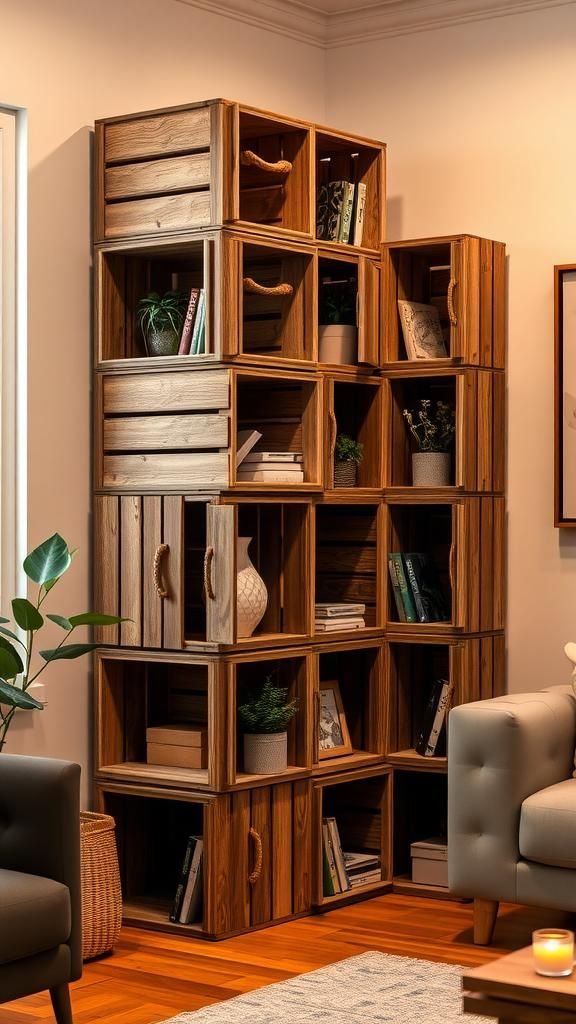
Stacked wooden crates lend a warm, handcrafted feel to a hallway or living room. The grain of the wood and the rough edges create a tactile contrast with textiles and paperbacks.
Each crate acts like a small room within a room, housing plants, magazines, and folded throws. The arrangement has a casual, slightly lived-in rhythm that invites change.
I find myself rearranging stacks according to mood, and the sound of crates repositioning adds a small, satisfying thud to the afternoon routine.
Steps
- Source wooden crates that are similar in size and sand them lightly for smoother edges.
- Stack the crates in a stable configuration, securing them with brackets or screws if a permanent arrangement is desired.
- Add felt pads to the bottoms to protect floors and place items like books, plants, or baskets inside the cubes.
- Reconfigure the stack as tastes or needs shift, creating open and closed storage zones.
Chalkboard-labeled jars for pantry calm and charm

I enjoy the tactile act of writing on a small chalk label and watching pantry shelves take on a tidy rhythm. Dark labels on clear jars create a rhythm of contrast and the chalk dust lends an old-school warmth.
Grains and legumes sit like little landscapes behind glass, and the labels make the whole shelf feel curated. When a jar is refilled there is a small pleasure in wiping the label clean and rewriting what’s inside.
The result is a pantry that looks composed and quietly welcoming.
Steps
- Select clear glass jars with smooth surfaces and chalkboard labels or chalk paint applied to small areas.
- Fill jars with pantry staples, leaving enough headroom for easy scooping or pouring.
- Write contents on the labels with a chalk marker or regular chalk, making the text legible and centered.
- Refill jars when levels run low and erase and update labels as contents change.
PVC pipe cord and cable organizer for tidy tech
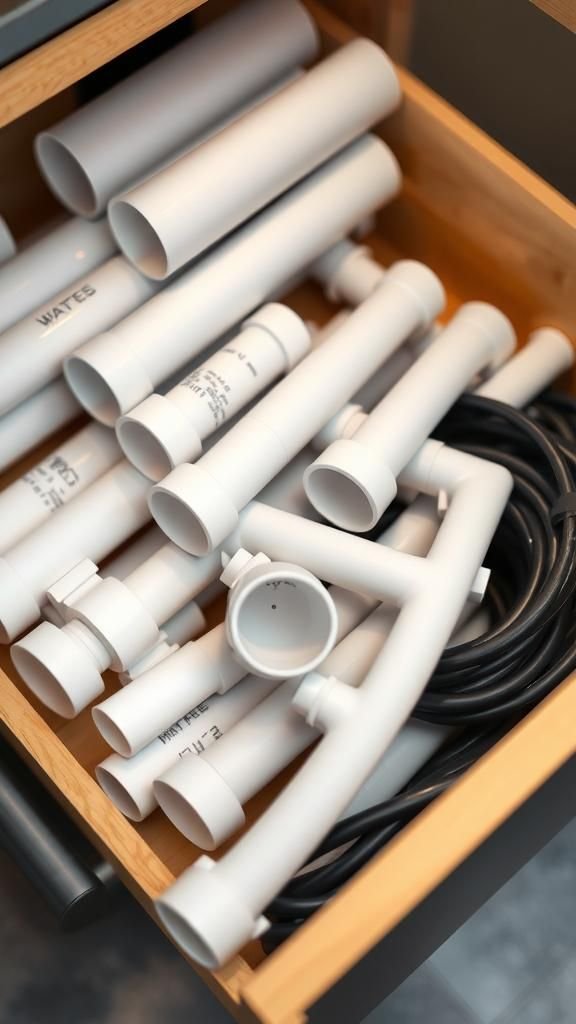
Seeing cords wrangled into neat loops inside short lengths of PVC brings a small, mechanical satisfaction. Each pipe section feels cool and solid in the hand and the rounded edges protect cables from fraying.
Labeled tubes sit side by side in a drawer, their smooth plastic surfaces contrasting with braided cables. The result is a tidy drawer where chargers and cords no longer tangle, and the quiet click of a plug slipping into its sleeve is oddly comforting.
It turns chaos into calm through simple containment.
Steps
- Cut sections of PVC pipe to short, consistent lengths and sand the edges for safety.
- Label each pipe section with the type of cable or charger intended to be stored inside.
- Place coiled cables into individual pipe sections and arrange the tubes neatly in a drawer or box.
- Replace or re-label pipes when cable types change or new devices are added.
Felt drawer liners that soften and protect silverware
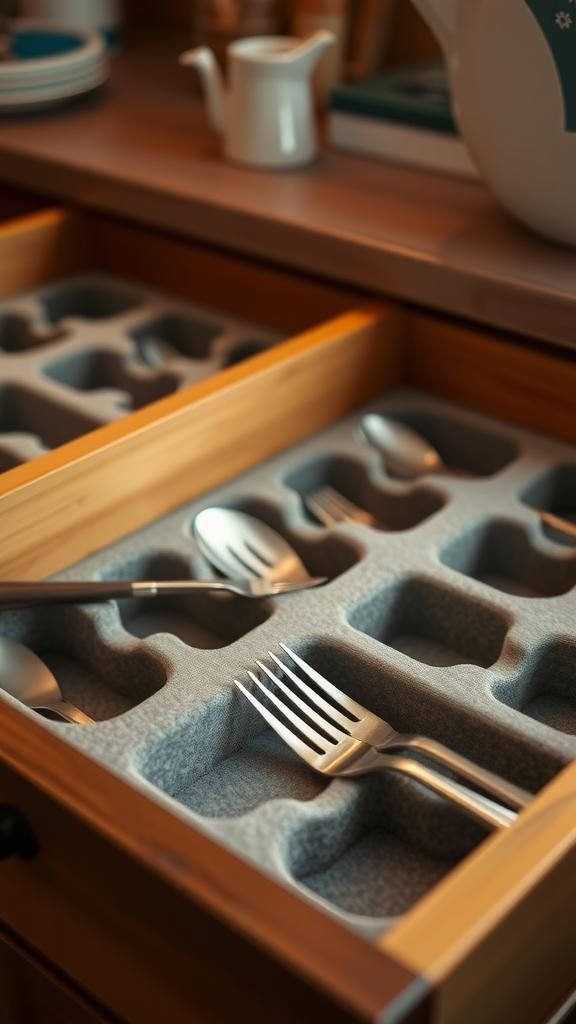
Sliding fingers along a felt-lined drawer offers a small, tactile pleasure while protecting flatware from clinking. The felt muffles movement and has a soft, muted color that calms the interior space.
Individual slots feel cushioned and the quiet that comes when the drawer closes is a gentle punctuation to the midday bustle. The material keeps little scratches from appearing and makes the everyday act of reaching for a fork feel a touch more considered.
It’s a subtle upgrade that makes the drawer feel intentional and cared for.
Steps
- Measure the interior dimensions of the drawer and cut felt to fit snugly along the base.
- Create partitions by folding or layering felt pieces to form soft dividers where needed.
- Place flatware and utensils into the cushioned sections, adjusting divider positions for comfortable spacing.
- Replace felt liners when they become worn or accumulate stains to keep the drawer fresh.
Under-shelf hanging basket for extra storage surprise
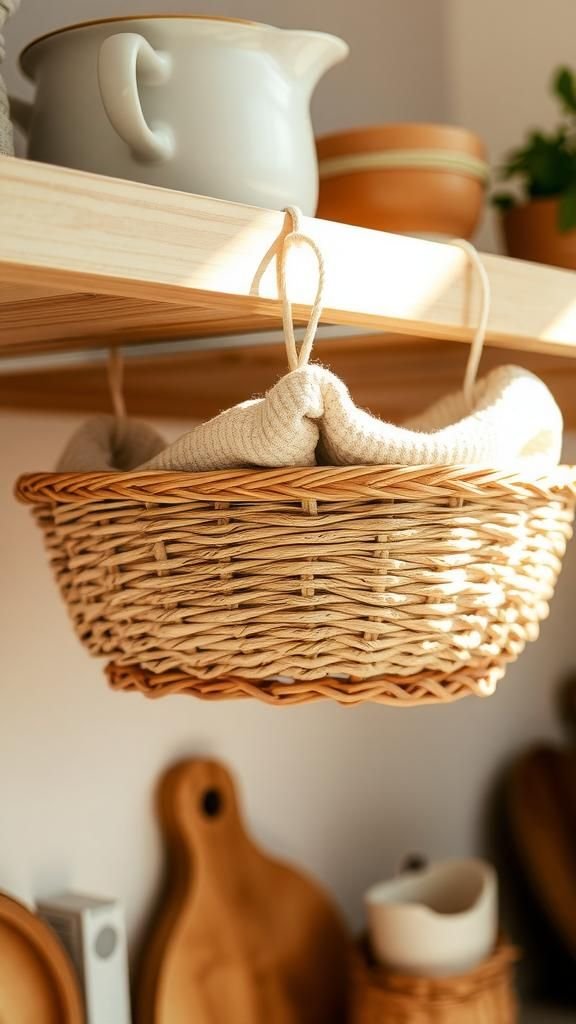
Slipping a shallow basket under a shelf reveals a clever secret compartment that warm hands seem to find easily. The basket swings slightly when accessed and offers a cozy, hammock-like hold for light items.
Soft fabrics and paper edges touch in a gentle jumble inside, and the underside of the shelf becomes a useful plane rather than wasted space. I love how it makes use of an overlooked area and how small things feel less scattered when tucked into that suspended nook.
Steps
- Choose an under-shelf hanging basket that fits the shelf depth and can bear the intended load.
- Slide the basket’s hooks over the shelf edge and press gently to secure its position.
- Place lightweight items such as dish towels, napkins, or recipes inside the basket for easy access.
- Check the basket periodically to ensure it remains firmly seated and redistribute contents as needed.
Wine rack repurposed into slanted shoe storage

Turning a wine rack on its side created a slanted row of little cradles perfect for shoes. The curves that once hugged bottles now support heels and sneakers, the wood hugging toes in a tidy arrangement.
Each pair sits at a slight angle so the room reads as a neat display rather than a pile. The smell of wood mingles with fabric and rubber in a small, domestic chorus.
It changed a closet from chaotic to composed with an unexpectedly elegant twist.
Steps
- Find a sturdy wine rack that can sit stably on its side and clean it thoroughly.
- Position the rack in the desired closet or entry area and slide shoes into each cradle at a slight angle.
- Adjust spacing between racks if multiple units are used to create larger storage rows.
- Reconfigure placement as shoe collections evolve or seasonal footwear changes.
Clipboard wall file organizer for mail and papers
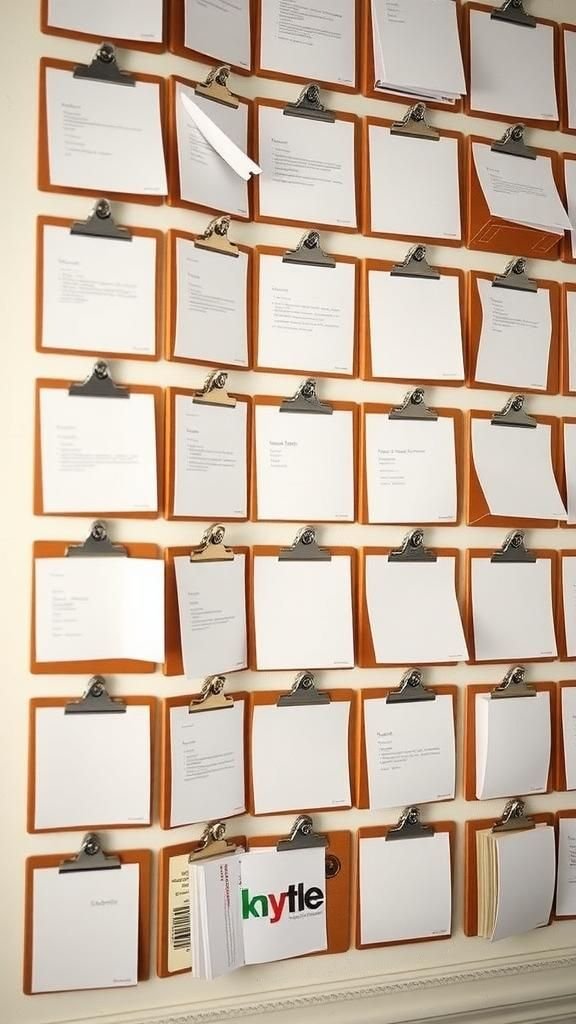
Clipboards mounted in a small grid created a casual filing wall that feels deliberately imperfect. Papers hang with a little flap at the bottom, and the sound of the clip closing becomes a small, functional note in the day.
The boards wear smudges and small notes accumulate, which lends an honest personality to the wall. I enjoy the way the setup invites quick decisions: a single glance reveals what needs attention and what can wait.
It turns paper into a visible, manageable layer instead of an anonymous pile.
Steps
- Select a set of clipboards and mount them on the wall in a grid pattern using screws or strong picture hangers.
- Label each clipboard header for categories like incoming, bills, invitations, or recipes.
- Clip papers and envelopes to the boards as they arrive, keeping the most urgent items in easy view.
- Periodically clear each clipboard to archive or discard older papers and maintain clarity.
Upcycled tin can desk pen holder with patterned wrap
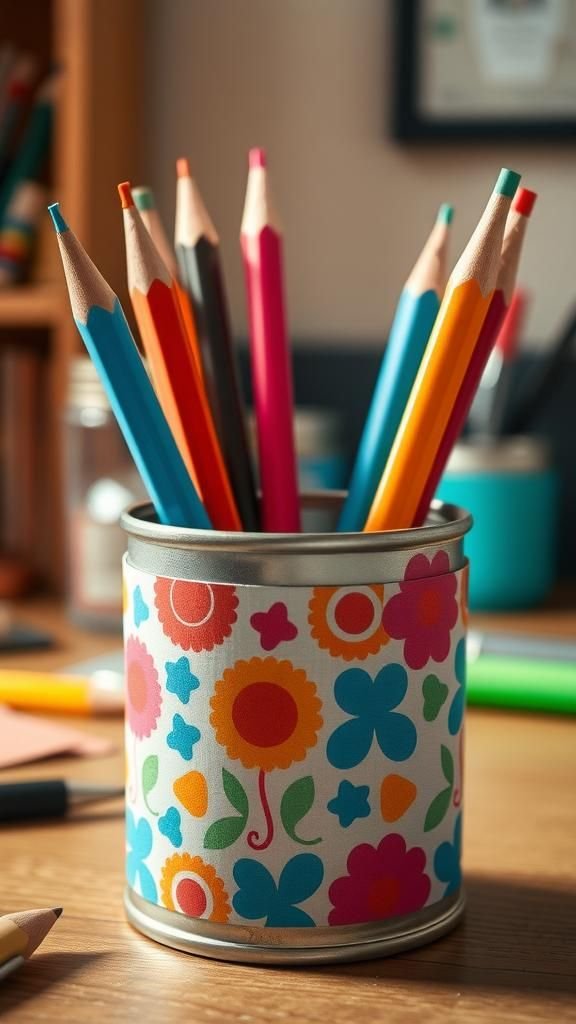
A tin can wrapped in a cheerful paper pattern brightened my desk and gathered stray pens into a happy cluster. The metallic rim catches light while the outer paper feels soft under the fingertips.
It’s a small object but it changes the visual rhythm of the workspace, turning scattered pens into a little beacon of color. There’s a nostalgic pleasure in repurposing something everyday; the can’s faint crinkle and the paper’s seam become part of the desk’s quieter textures.
Steps
- Clean a used tin can thoroughly and remove any sharp edges around the rim.
- Wrap the can with decorative paper or fabric and secure the ends with adhesive or double-sided tape.
- Optionally add a protective varnish or clear coat to the exterior wrap for durability.
- Place pens, pencils, and small tools into the holder and keep it near the workspace for convenience.
Lidded basket nesting shelf for quick visual calm

A group of lidded baskets stacked on a shelf created a quiet, uniform edge that hides the jumble inside. Rattan and woven fibers add a natural rhythm, and lifting a lid releases a soft scent of stored textiles.
The lids sit with a gentle weight and the baskets’ woven patterns cast little shadows across the shelf. It’s an approach that makes the room appear pulled together at a glance, and there is something soothing about the predictability of shapes and the gentle hush of covers meeting their bases.
Steps
- Select baskets with lids that fit snugly and coordinate in color and texture for a cohesive look.
- Place baskets on a shelf, arranging them so the largest sit at the bottom and smaller ones nest on top if desired.
- Fill baskets with grouped items, placing frequently accessed things in the most reachable containers.
- Keep lids closed to maintain a tidy appearance and rotate contents when needed.
Pegboard spice rail inside a cabinet door
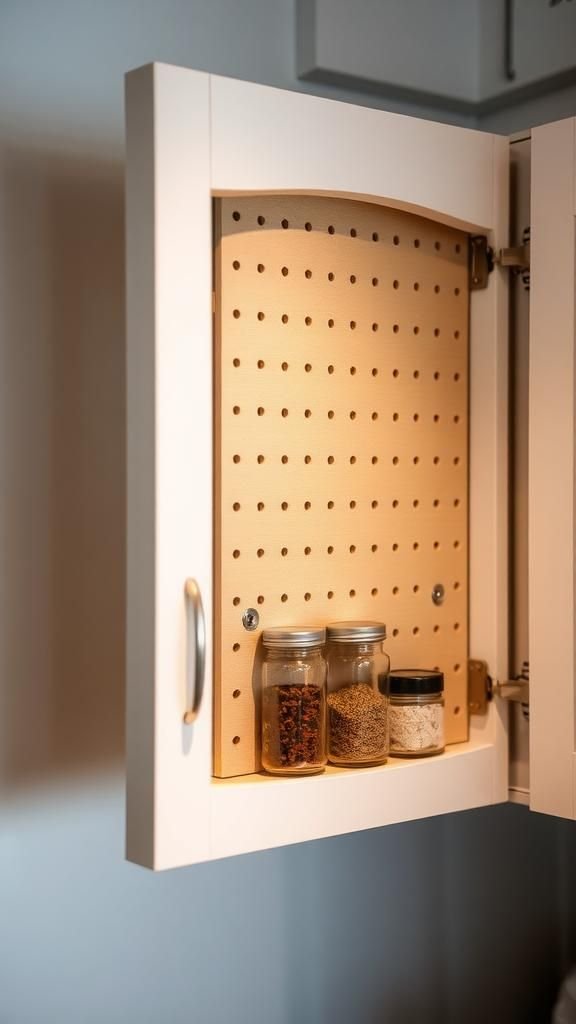
Mounting a slim pegboard inside a cabinet door gave tiny jars a private stage. When the door swings open, a neat row of spices is revealed like a chorus line, each jar catching a pinprick of light.
The cabinet interior feels surprisingly tidy and the small clinks of glass against pegs are oddly musical. The door transforms from a plain barrier into a useful face that organizes small items in tight spaces.
It’s a small change with a calm, pleasing effect.
Steps
- Cut a thin pegboard panel to fit the inside of the cabinet door and finish edges as needed.
- Attach the pegboard to the door using screws or strong adhesive, ensuring it opens freely.
- Add small pegs or shelves and place spice jars or other small containers on them.
- Adjust peg positions to balance weight and accessibility inside the cabinet door space.