Burlap project ideas bring cozy texture, natural charm, and relaxed style to everyday decor. From burlap DIY projects that refresh a room to burlap handmade ideas for gifting, the fabric’s earthy weave adds warmth without fuss.
I started exploring burlap project ideas while decorating a tiny rental, and the results felt collected and personal.
These burlap project ideas suit farmhouse corners, boho nooks, wedding tables, and holiday vignettes. Burlap DIY projects can highlight reclaimed wood, glass jars, or greenery, pairing rugged fiber with softer finishes.
Whether the plan leans neutral or colorful, burlap handmade ideas invite a touch of nostalgia and calm across seasons.
Rustic Burlap Wreath With Seasonal Greenery

A burlap wreath introduces a welcoming, down‑to‑earth accent for doors, mantels, or gallery walls. The coarse weave contrasts beautifully with glossy leaves, tiny pinecones, dried oranges, or cotton boll stems.
Neutral ribbon or twine balances the texture, while a touch of plaid or velvet gives holiday sparkle. Natural, black‑dyed, or ivory‑washed burlap shifts the mood from farmhouse to refined cottage.
Mounted alone or paired with a chalkboard sign, it suits housewarmings and hostess gifts. Displayed on a white door, the fibers stand out; against brick, the wreath reads cozy and timeless.
Steps
- Wrap a wire wreath form with burlap ribbon, securing the starting end with hot glue.
- Layer eucalyptus, dried citrus, or pine stems along one side and glue in clusters.
- Tie a ribbon bow at the base and tuck in small accents like berries or mini pinecones.
- Add a loop of twine at the back for hanging and fluff the burlap folds.
Stenciled Burlap Table Runner With Farmhouse Flair

A burlap runner grounds a dining table with raw texture and relaxed charm. Stenciled motifs like laurel wreaths, trellis, or grain‑sack stripes nod to vintage feed sacks while leaving plenty of negative space for ceramics and greenery.
Edges can be fringed for a casual finish or hemmed for a cleaner line. Natural tan highlights wood grains; charcoal or white paint details elevate modern flatware and stoneware.
Lovely beneath candles and small vases, it packs flat and travels well for potlucks. Wrapped around a bottle of olive oil, it becomes a thoughtful host gift.
Steps
- Cut burlap to table length with a few inches of overhang and finish edges by hemming or fraying.
- Position a stencil and dab fabric paint through with a foam pouncer.
- Repeat the pattern along the runner and allow to dry fully.
- Heat‑set the paint if recommended by the brand.
Mason Jar Burlap Wraps For Cozy Centerpieces
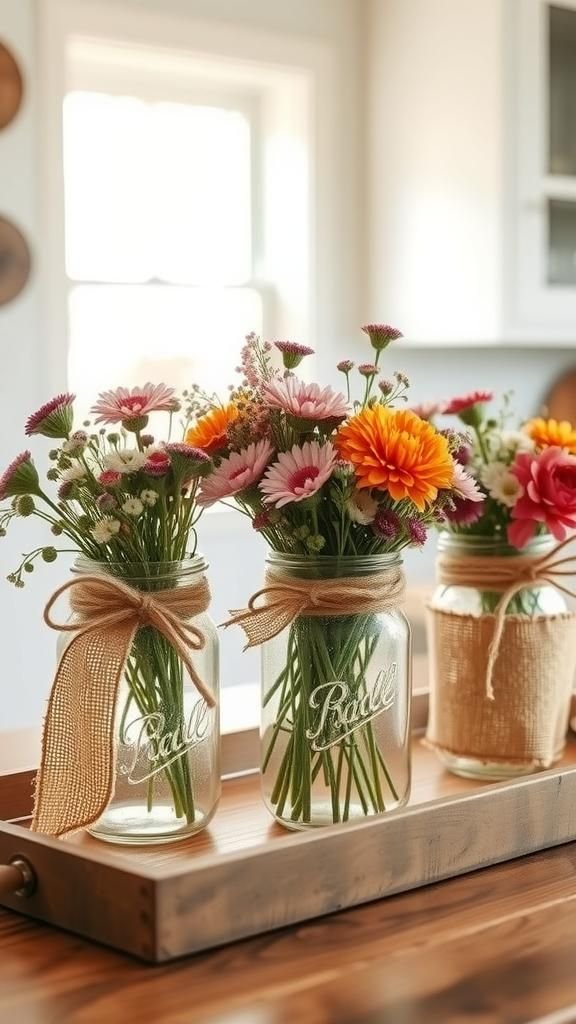
Glass jars wrapped in burlap feel homespun yet chic, especially when paired with lace, jute twine, or small wooden tags. The juxtaposition of transparent glass and coarse fiber suits wildflowers, LED tea lights, or kitchen utensil storage.
Neutral burlap highlights seasonal accents like mini pumpkins in autumn or cherry blossoms in spring. Dyed burlap brings subtle color without losing the rustic vibe.
Tied in a trio, the jars suit coffee tables, patios, or mantel displays. Bundled with a few stems, one jar wrap makes a charming teacher or neighbor gift.
Steps
- Measure burlap around the jar and cut a rectangle with slight overlap.
- Hot glue the ends at the jar’s back, smoothing the wrap.
- Embellish with lace, twine, or a wood tag and add florals or a candle.
- Repeat for a set of matching or coordinating jars.
Hand‑Lettered Burlap Banner For Mantels And Parties

A burlap banner strings together small pennants that frame mantels, stair rails, and dessert tables with wholesome charm. Letters can be painted, iron‑on, or appliquéd in felt for dimension.
Triangular or swallowtail flags feel festive, while scalloped edges lean romantic. Natural tan with white lettering reads classic; black lettering against bleached burlap looks graphic.
Seasonal phrases, names, or simple hearts work for showers and birthdays alike. Presented in a keepsake box, the banner becomes an event memento.
Draped around a mirror, it adds playful texture to a hallway or nursery.
Steps
- Cut pennant shapes from burlap and finish edges with fray check or zigzag stitching.
- Apply stenciled letters with fabric paint or iron‑on transfers.
- Punch or stitch top channels and thread jute twine through.
- Space the pennants evenly and knot ends for hanging.
Foldable Burlap Storage Bins With Leather Tabs

Structured burlap bins bring earthy texture to shelves while keeping throws, toys, or yarn corralled. A lining in ticking stripe or canvas adds stability and a subtle pattern story.
Leather or faux leather tabs on each side add a refined contrast and make the bins feel boutique. Natural tan suits Scandinavian palettes, while charcoal or navy‑dyed burlap sharpens a modern room.
When empty, the bins fold flat, perfect for small spaces. Wrapped with a ribbon, one bin filled with baking supplies or spa goodies works as a thoughtful housewarming present.
Steps
- Cut burlap and lining pieces for front, back, sides, and base.
- Sew lining and burlap panels, joining edges to form a box shape.
- Insert interfacing for structure and stitch leather tabs at the sides.
- Turn right side out and topstitch the rim for a crisp finish.
Appliquéd Burlap Pillow Covers With Cozy Texture

Burlap pillow covers create a tactile counterpoint to smooth linen or velvet on sofas and benches. Appliqué motifs like hearts, stars, monograms, or botanical silhouettes add personality without overwhelming a space.
Edges may be piped in ticking stripe, velvet, or faux suede for contrast. Natural tan feels versatile; washed gray or indigo burlap leans coastal and calm.
Presented with a lavender sachet, a pair of pillows makes a thoughtful gift. On a porch swing or window seat, the woven texture catches the light and invites a relaxed afternoon read.
Steps
- Cut burlap panels and a backing fabric with envelope overlap.
- Stitch appliqué shapes onto the front panel with a tight zigzag.
- Sew the cover pieces together and finish raw edges.
- Turn right side out and insert a pillow form.
Layered Burlap Wall Art On Stretched Canvas

Layered burlap adds dimensional interest to simple canvases, sparking a gallery‑worthy piece without fuss. Overlapping strips form chevrons, sunbursts, or abstract bands that play with shadow and depth.
A neutral palette blends into farmhouse and coastal settings, while a splash of metallic leaf at the edges elevates the look. Pairing the canvas with weathered frames steadies the rustic mood.
Hung over a console with candles and books, the textural surface becomes an easy conversation starter. Wrapped in kraft paper with twine, it makes a thoughtful birthday or host present.
Steps
- Paint the canvas background if desired and let dry.
- Cut burlap strips and glue them in overlapping patterns on the canvas.
- Add subtle metallic accents along select edges and seal if needed.
- Mount a sawtooth hanger on the back for display.
Burlap Lampshade Refresh With Lace And Twine
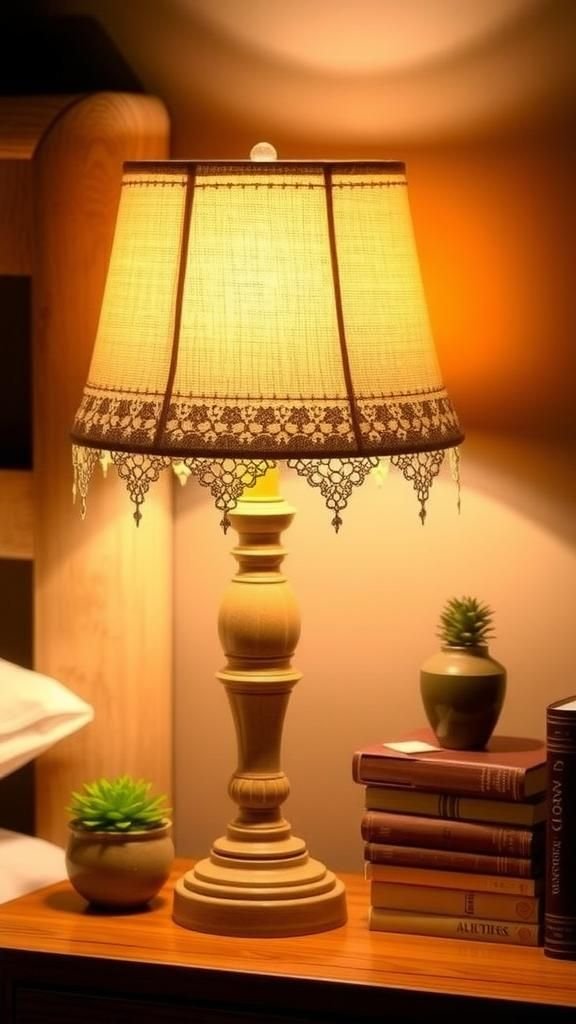
A burlap lampshade warms a room with diffused light and organic grain, giving a table lamp or floor lamp a lived‑in feel. Lace edging or twine banding adds delicate detail, while a simple monogram medallion introduces a personal note.
Natural burlap paired with a matte black base feels crisp; ivory burlap with brass reads vintage‑inspired. When illuminated, the weave creates a soft glow that flatters nearby textures.
Packaged with a small bulb and ribbon, it becomes a thoughtful dorm or first‑home present.
Steps
- Remove the old shade covering and measure the frame.
- Cut a burlap panel to fit and glue it around the frame, smoothing seams.
- Add lace trim or twine around the top and bottom rims.
- Let adhesives cure and reinstall the shade on the lamp.
Burlap Utensil Pockets For Casual Entertaining

Utensil pockets sewn from burlap and lined with cotton keep flatware and napkins tidy at picnics and buffets. Grain‑sack stripes or simple monograms add charm, while frayed edges give a relaxed vibe.
Natural tones flatter wood boards, enamelware, and linen napkins. A palette of muted pastels suits showers and brunches; navy and red feel summery and bold.
Rolled together with ribbon, a set becomes a thoughtful hostess or camping gift. Displayed in a basket by the plates, the pockets make self‑serve tables look styled yet effortless.
Steps
- Cut burlap rectangles and coordinating cotton lining.
- Sew three sides, turn right side out, and press flat.
- Topstitch the opening and create a pocket seam.
- Stencil stripes or a monogram and let dry.
Drawstring Burlap Gift Bags With Stamped Motifs

Small burlap drawstring bags feel charming for favors, jewelry, or soaps. Hand‑stamped motifs like snowflakes, olive branches, or tiny stars create a collected look.
Cotton lining keeps delicate items protected, while satin ribbon, twine, or velvet cords shift the mood from rustic to romantic. Natural tan presents an earthy vibe; whitewashed burlap looks light and airy.
Grouped in a wooden crate, the bags become a sweet holiday display. Filled with treats and a handwritten tag, one bag turns a simple present into something memorable.
Steps
- Cut two burlap rectangles and stitch along the sides and bottom.
- Fold a casing at the top and sew, leaving openings for cord.
- Thread ribbon or twine through and knot the ends.
- Stamp motifs with fabric ink and let dry.
Cozy Burlap Pot Sleeves For Houseplants

Burlap sleeves soften terracotta and plastic planters, adding a farmhouse layer to shelves and sills. A cuff in ticking stripe or linen frames leafy greens with a gentle pattern.
Neutral tan suits pothos and snake plants, while charcoal burlap dramatically sets off silvery eucalyptus. Waterproof liners keep surfaces safe.
Grouped by height, the sleeves create an easy vignette on a console or kitchen window. Paired with a propagated cutting, one sleeve makes a thoughtful apartment‑warming gift.
Steps
- Measure the pot and cut burlap to wrap around with overlap.
- Sew a simple cylinder and add a lining if desired.
- Turn down a cuff and slide over the planter.
- Tuck a plastic saucer inside for moisture protection.
Framed Burlap Memo Board With Ribbon Grid
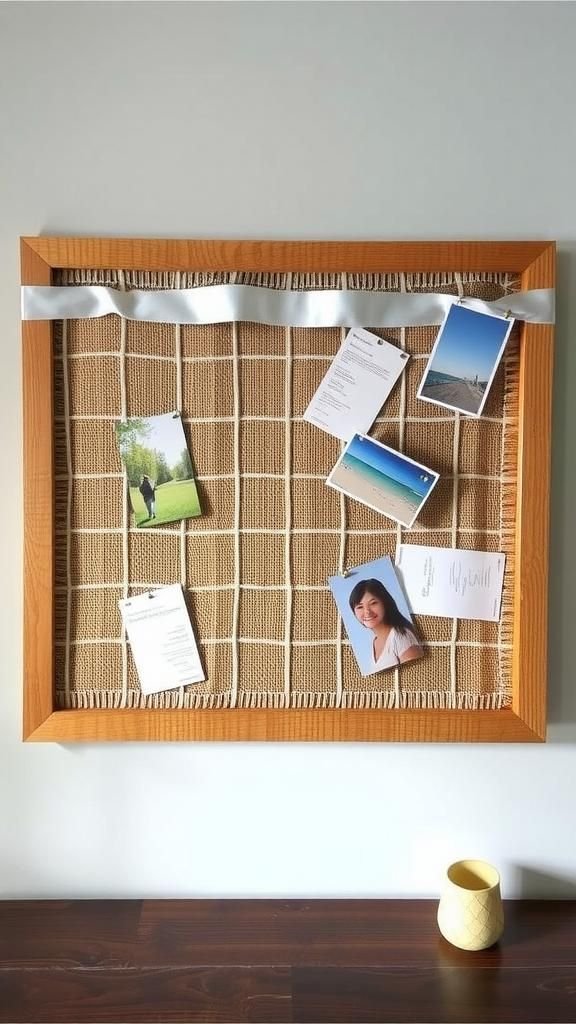
A memo board covered in burlap creates a home for notes, postcards, and inspiration clippings. A ribbon grid adds structure and a gentle graphic element, while upholstery tacks bring subtle shine.
Natural burlap inside a white or distressed wood frame reads farmhouse chic; black frame with gray burlap leans modern. Pins, mini clothespins, and tags complete the look.
Hung near a desk or in the kitchen, it organizes papers while doubling as decor. Wrapped with stationery and fun pushpins, it becomes a thoughtful student gift.
Steps
- Stretch burlap over cork or foam board and secure at the back.
- Lay ribbons in a crisscross pattern and tack at intersections.
- Place the covered panel inside a frame and secure it.
- Add pins and hang on the wall.
Personalized Burlap Christmas Stockings With Trim

Burlap stockings bring a woodland feel to holiday mantels. Cuffs in plaid flannel, velvet, or faux fur shift the vibe from playful to luxe.
Embroidered names or felt letters personalize each stocking, while small tassels, bells, or lace add whimsy. Natural tan pairs beautifully with greenery and brass candlesticks.
For a coordinated scene, mix solids with subtle prints and alternate cuff fabrics. Presented with cocoa mix and a tiny ornament, a stocking doubles as a heartfelt seasonal gift.
Steps
- Trace and cut stocking shapes from burlap and lining fabric.
- Sew fronts to backs, leaving the top open, and turn right side out.
- Add a cuff, stitch a hanging loop, and topstitch the edge.
- Embellish with letters, trim, or tassels.
Plush Burlap Pumpkins With Twine Stems

Soft burlap pumpkins add harvest charm to shelves and centerpieces without feeling fussy. Stuffed forms create gentle ridges tied with twine or yarn, while cinnamon sticks or driftwood pieces become stems.
Natural tan, burnt orange, and muted sage build a cohesive fall palette. A touch of lace or ticking stripe ribbon adds sweetness.
Grouped on a wooden tray with leaves and acorns, the pumpkins set a cozy seasonal mood. Wrapped in tissue, a trio becomes a thoughtful hostess present for autumn gatherings.
Steps
- Cut circles from burlap and stitch a running stitch around the edge.
- Pull the thread to gather, stuff with fiberfill, and cinch closed.
- Wrap twine around sections to form ridges and tie securely.
- Insert a cinnamon stick stem and add a ribbon bow if desired.
Burlap‑Covered Notebooks With Leather Labels

Covering notebooks in burlap gives stationery a tactile, studio‑ready feel. A small leather or faux leather label at the corner adds polish, while contrasting endpapers bring a pop of color.
Natural tan burlap looks classic against kraft pages; charcoal burlap with white thread suits monochrome lovers. Bundled with a pen and twine, a set becomes a thoughtful gift for writers and planners.
Displayed on open shelving beside ceramic jars and plants, the notebooks read as decor as much as daily tools.
Steps
- Measure the notebook covers and cut burlap slightly larger.
- Glue burlap to the exterior, folding excess inside and smoothing.
- Add a leather label with rivets or glue at a corner.
- Press under heavy books until fully set.
Ribbon‑Style Burlap Flowers For Gift Toppers

Burlap flowers feel charming on wrapped presents, wreaths, or place settings. Layers of ribbon or cut strips form petals with gentle fray that adds character.
Centers finished with buttons, pearls, or wooden beads create a vintage touch. Natural tan reads timeless, while dyed ribbons in blush, sage, or indigo lend variety.
A cluster on a gift box turns simple paper into a keepsake. Stored in a small tin, the flowers become a handy stash for future decorating moments.
Steps
- Cut burlap ribbon into petal lengths and notch the ends.
- Form loops and glue them around a felt circle base.
- Add a button, bead, or pearl center and let dry.
- Layer multiple sizes for fuller blooms.
Farmhouse Burlap Coasters With Cork Backing

Burlap coasters protect surfaces while adding woven texture to coffee tables and desks. A cork backing keeps them stable and quiet, and stenciled stripes or tiny monograms personalize the set.
Natural tan balances ceramic mugs and wooden trays; gray burlap complements sleek metal accents. Tied with twine and a small tag, a set becomes a thoughtful host or teacher present.
Stacked in a small basket by the kettle, the coasters feel inviting and ready for conversation.
Steps
- Cut cork circles or squares and matching burlap pieces.
- Glue burlap to cork and trim the edges neatly.
- Stencil simple stripes or letters and let dry.
- Seal lightly if moisture protection is desired.
Burlap‑Wrapped Photo Frames With Wood Accents

Photo frames wrapped in burlap strike an appealing balance between organic fiber and polished wood. A skinny molding or bead trim adds structure, while small metal corners hint at vintage trunks.
Natural tan frames elevate black‑and‑white prints; bleached burlap brightens color photographs. Displayed on a mantel, they pair well with greenery and candlelight.
Paired with a printed family photo, one frame becomes an easy, heartfelt gift for grandparents or newlyweds. Grouped in odd numbers, the frames create a layered vignette on shelves or entry tables.
Steps
- Remove glass and backing from the frame.
- Wrap burlap around the frame front and secure at the back with glue.
- Add wood trim or metal corner brackets for detail.
- Reassemble the frame and insert a favorite photo.
Wine Bottle Burlap Bags With Chalkboard Tags

Burlap bottle bags turn a simple wine gift into something charming and reusable. A drawstring or ribbon closure suits both casual picnics and formal dinners.
Chalkboard tags or slate charms let a short note or vintage name travel with the bottle. Natural tan pairs with most labels; black‑dyed burlap feels sleek and modern.
Presented with a sprig of rosemary, the bag sets a gracious tone. Lined with cotton, it slides on easily and protects the bottle from clinks in transit.
Steps
- Sew a burlap tube with a flat base to fit a wine bottle.
- Add a cotton lining for smoothness and durability.
- Create a drawstring channel and thread ribbon or twine.
- Tie on a small chalkboard tag with a message.
Embroidered Burlap Hoop Art With Floral Sprigs

An embroidery hoop turns burlap into wall‑ready art that celebrates texture and thread. Simple florals, initials, or geometric outlines stand out against the open weave, inviting shadow play.
A narrow hoop in pine looks airy; a stained hoop feels richer. Natural, ivory, or gray burlap shifts the mood from rustic cottage to minimal loft.
Leaning on a bookshelf or hung in a gallery cluster, the hoop reads handmade and heartfelt. Wrapped with embroidery floss and pins, it makes a thoughtful gift for creative friends.
Steps
- Stretch burlap in an embroidery hoop and tighten the screw.
- Sketch a simple design and stitch with contrasting floss.
- Trim excess fabric at the back and finish with felt.
- Add a ribbon loop and hang on a small hook.
Burlap Chair Sashes With Bow Or Knot Finish

Chair sashes in burlap upgrade dining setups for weddings, showers, or cozy dinners at home. A wide band across the back ends in a bow, knot, or layered rosette.
Lace overlays soften the look, while greenery sprigs tucked at the center add freshness. Natural tan coordinates with white dishes and neutral linens; dyed hues highlight theme colors without overpowering the room.
Packed flat, the sashes travel well and store neatly. Gifted to a newlywed couple, a set becomes a ready‑to‑go entertaining accent.
Steps
- Cut wide burlap bands long enough to wrap around chair backs.
- Hem or fray the long edges for the desired finish.
- Wrap around the chair and tie in a bow or knot.
- Tuck in lace or greenery for extra detail.