Ever since I tried my first Beeswax Candle Tutorials, I’ve been hooked on the soothing glow and natural fragrance that beeswax candle tutorials bring into my home. There’s something so satisfying about melting pure beeswax, pouring it into molds, and watching those beeswax candle tutorials transform simple ingredients into golden treasures.
Whether I’m looking for simple beeswax candle tutorials, rolled beeswax candle tutorials, or festive beeswax candle tutorials, it always sparks creativity and fills my space with warmth.
Friends keep asking me how I learned so many beeswax candle tutorials, so I love sharing all my favorite beeswax candle tutorials in one place. From pillar beeswax candle tutorials to taper beeswax candle tutorials, and even colored beeswax candle tutorials, there’s no end to the beautiful things you can make.
Beeswax Pillar Candles

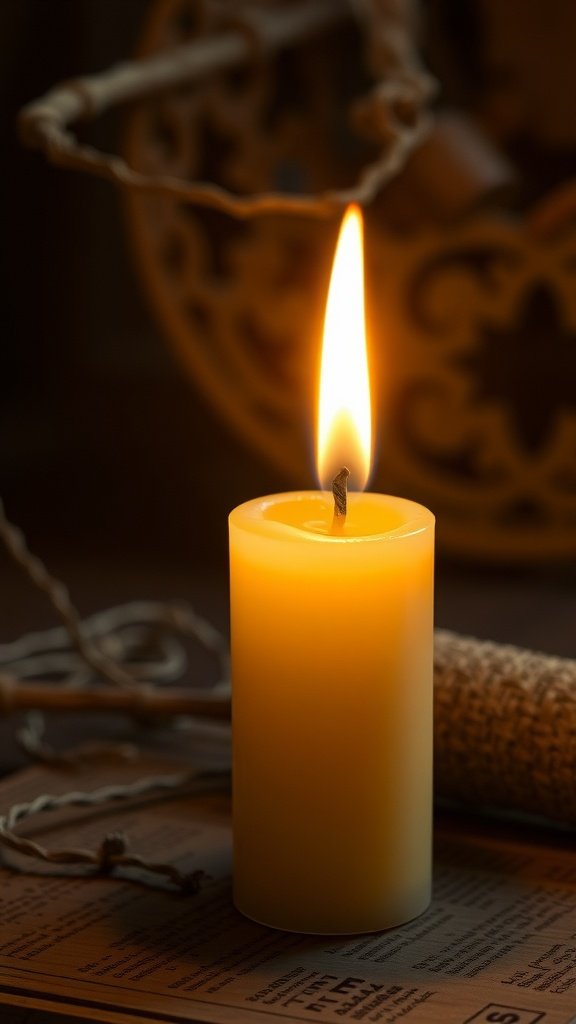
Beeswax pillar candles are a fantastic way to bring warmth and a natural touch to your space. The image shows a beautifully crafted beeswax candle, glowing softly with a warm flame. Its rich golden hue and smooth texture highlight the natural beauty of beeswax.
Making your own beeswax pillar candles is simple and rewarding. Start by gathering your materials: beeswax sheets, a wick, and a mold. You can find beeswax sheets at craft stores or online. Choose a mold that suits your style, whether it’s a classic cylindrical shape or something more unique.
Begin by cutting the beeswax sheets to fit your mold. If you’re using a wick, make sure it’s the right length for your candle. Next, gently heat the beeswax to make it pliable. You can do this using a double boiler or a warm oven. Once it’s soft, press the beeswax into the mold, ensuring it’s packed tightly.
After filling the mold, insert the wick into the center, making sure it stands straight. Allow the candle to cool completely before removing it from the mold. This usually takes a few hours. Once it’s set, trim the wick to about half an inch above the candle surface.
Lighting your beeswax pillar candle not only creates a cozy atmosphere but also releases a subtle honey scent. These candles burn longer and cleaner than paraffin candles, making them a great choice for eco-conscious crafters. Enjoy the glow and the natural fragrance of your handmade creation!
Layered Beeswax Candles
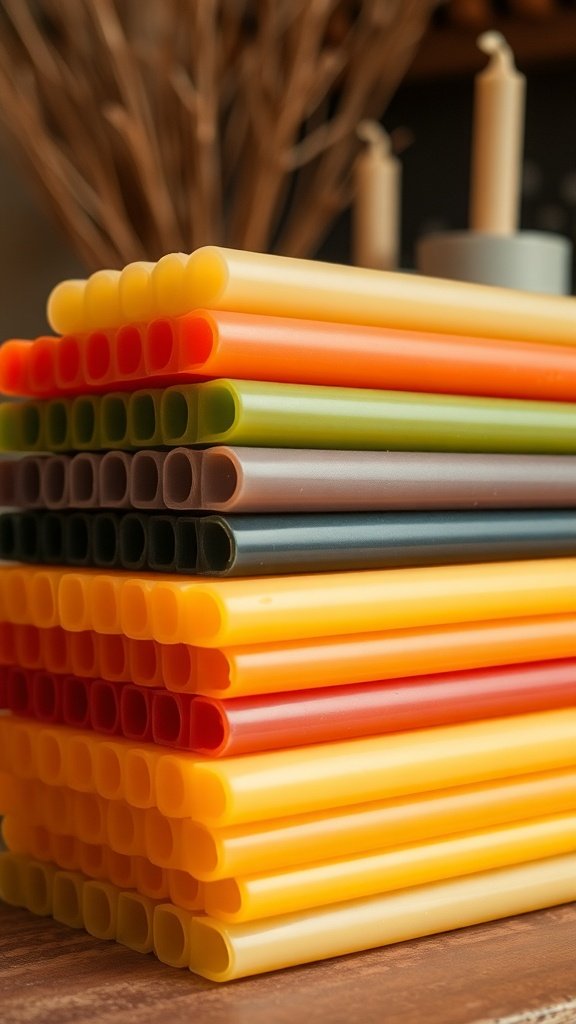
Layered beeswax candles are a fun and creative way to add color and texture to your home decor. The image shows a vibrant stack of beeswax sheets in various colors, ready to be transformed into beautiful candles. These sheets can be rolled and layered to create unique designs.
To make your own layered beeswax candles, you’ll need beeswax sheets, a candle wick, and a few simple tools. Start by cutting the sheets into your desired sizes. You can mix and match colors for a stunning effect.
Next, lay one sheet flat and place the wick at one edge. Roll the sheet tightly around the wick. Once you have your first layer, you can add another color on top. Just make sure to press the layers together gently to ensure they stick.
Continue this process until you reach your desired height. Trim the wick to about half an inch above the candle. Finally, let your candle cool completely before lighting it up. Enjoy the warm glow and sweet honey scent that beeswax candles provide!
Beeswax Candle Dipping

Dipping beeswax candles is a fun and rewarding process. The image shows a hand gently lifting warm, melted beeswax from a container. This is the perfect moment to create beautiful candles.
To start, gather your materials. You’ll need beeswax, a double boiler, a dipping tool (like a wooden stick), and a heat-resistant container. Make sure your workspace is clean and organized.
First, melt the beeswax in the double boiler. Keep the heat low to avoid burning the wax. Once it’s fully melted, dip your tool into the wax, allowing it to coat evenly.
Next, lift the tool out and let the excess wax drip back into the container. You can dip it multiple times to build up layers. Each dip adds more texture and thickness to your candle.
After dipping, hang your candles to cool. This will help them maintain their shape. Once they are fully set, you can trim the ends and enjoy your handmade beeswax candles!
Beeswax Votive Candles

Beeswax votive candles are a delightful way to add warmth and charm to any space. The image shows a collection of beautifully crafted votive candles, each glowing softly. Their unique designs and flickering flames create a cozy atmosphere.
Making your own beeswax votive candles is simple and rewarding. Start by gathering your materials: beeswax sheets, a wick, and a mold. You can find beeswax sheets at craft stores or online. Choose a mold that suits your style, whether it’s a classic shape or something more unique.
Next, cut the beeswax sheets into rectangles that fit your mold. Heat the sheets slightly to make them more pliable. Then, place the wick in the center of the mold and carefully wrap the beeswax around it, pressing firmly to ensure it holds its shape.
Once your mold is filled, let it cool completely. After it has set, gently remove the candle from the mold. Trim the wick to your desired length, and your beeswax votive candle is ready to light!
These candles not only look great but also provide a natural, sweet scent when burned. They are perfect for creating a relaxing environment or for gifting to friends and family.
Basic Beeswax Candle Making

Making beeswax candles is a fun and rewarding project. The image shows all the essentials you’ll need to get started. You can see various tools and materials laid out, making it easy to follow along.
First, gather your beeswax sheets or blocks, wicks, and any molds you want to use. The bright yellow color of the beeswax adds a cheerful touch to your candles.
Start by cutting the beeswax into manageable pieces. If you’re using sheets, you can roll them around the wick for a simple candle. For molds, melt the beeswax in a double boiler until it’s fully liquid.
Next, prepare your wick by securing it at the bottom of the mold. Pour the melted beeswax into the mold, making sure the wick stays centered. Allow it to cool completely before removing it from the mold.
Finally, trim the wick to about half an inch above the candle. Your homemade beeswax candle is now ready to light up your space!
Scented Beeswax Candles
Scented beeswax candles are a delightful way to fill your space with warmth and fragrance. The image shows a beautifully crafted beeswax candle surrounded by vibrant flowers, creating a cozy atmosphere. The soft glow of the flame adds a touch of magic, making it perfect for relaxation or special occasions.
Making your own scented beeswax candles is simple and fun. Start with high-quality beeswax, which has a natural honey scent. You can enhance this with essential oils for a personalized touch. Popular choices include lavender, eucalyptus, or citrus.
Here’s how to make your own:
- Gather your materials:You’ll need beeswax, a wick, essential oils, a double boiler, and a container for your candle.
- Prepare the wax:Melt the beeswax in a double boiler over low heat. Stir occasionally until fully melted.
- Add fragrance:Once melted, remove from heat and mix in your chosen essential oils. A good rule is about 1 ounce of oil per pound of wax.
- Attach the wick:Secure the wick to the bottom of your container using a bit of melted wax.
- Pour the wax:Carefully pour the melted wax into the container, leaving a little space at the top.
- Let it cool:Allow the candle to sit undisturbed until fully set, which can take a few hours.
- Trim the wick:Once cooled, trim the wick to about 1/4 inch above the wax.
Your scented beeswax candle is now ready to light! Enjoy the natural glow and lovely aroma it brings to your home.
Decorative Beeswax Candle Molds

Beeswax candles are not just functional; they can also be stunning decorative pieces. The image shows a variety of beautifully molded beeswax candles, showcasing intricate designs and vibrant colors. These candles can add a warm glow to any space, making them perfect for home decor or special occasions.
To create your own decorative beeswax candles, start by gathering your materials. You’ll need beeswax sheets, a wick, and a mold of your choice. Popular molds include floral shapes, pillars, or even unique designs that reflect your style.
Begin by cutting the beeswax sheets to the size needed for your mold. If you’re using a floral mold, ensure the sheet is large enough to cover all the details. Next, warm the beeswax slightly to make it pliable. This can be done using a hairdryer or by placing it in a warm area.
Once your beeswax is ready, carefully press it into the mold, ensuring that it fills all the corners and captures the design. Insert the wick into the center before the wax cools completely. Allow the candle to set for a few hours. Once hardened, gently remove it from the mold.
For added flair, consider decorating your candles with natural elements like dried flowers or herbs. Simply press them into the surface of the candle before it fully hardens. This will give your candles a unique touch that reflects your creativity.
Beeswax Candle Tarts

Beeswax candle tarts are a fun and creative way to enjoy the warm glow and sweet scent of beeswax. These little beauties come in various colors and shapes, making them perfect for any occasion. The image shows a lovely assortment of colorful tarts, each with a wick ready to light up your space.
Making beeswax candle tarts is simple and rewarding. You’ll need beeswax, a double boiler, tart molds, and wicks. Start by melting the beeswax in the double boiler. Once melted, you can add essential oils for fragrance. Pour the mixture into the molds, insert the wicks, and let them cool. In no time, you’ll have delightful tarts to use in your home or give as gifts!
These tarts can be used in a tart warmer or simply placed in a bowl for decoration. They add a cozy touch to any room while providing a natural, soothing scent. Plus, they’re a great way to use leftover beeswax from other projects.
Beeswax Candle Making Workshops
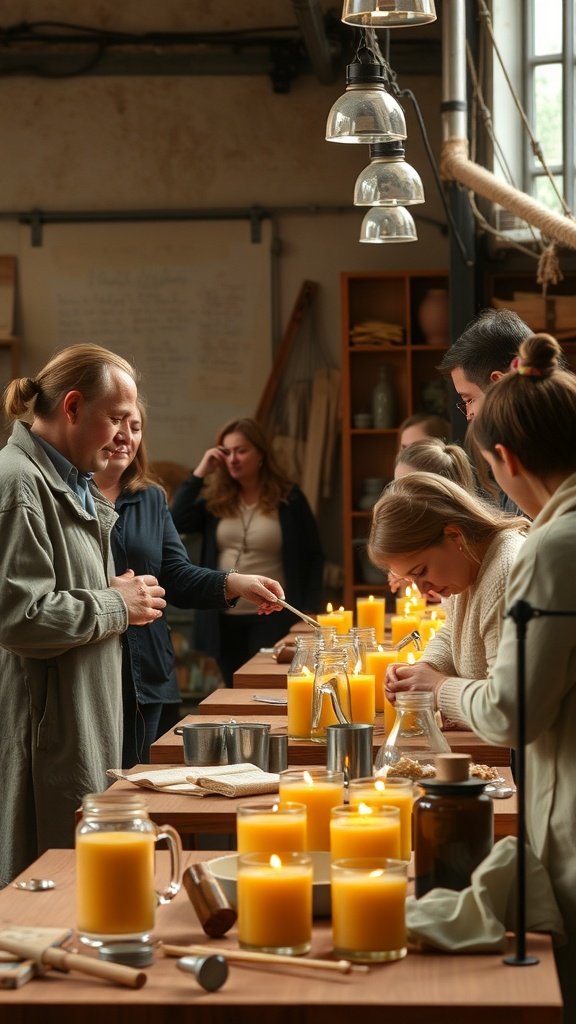
Beeswax candle making workshops are a fantastic way to learn the art of crafting beautiful candles. In these hands-on sessions, participants gather around tables filled with supplies, ready to create their own unique pieces. The atmosphere is warm and inviting, with the soft glow of lit candles creating a cozy vibe.
During the workshop, an instructor guides everyone through the process. First, you’ll melt the beeswax in a double boiler. This step is crucial, as it ensures the wax is at the right temperature for pouring. Next, you’ll add any desired scents or colors to personalize your candles.
Once the wax is ready, it’s time to pour! Participants carefully fill their molds or jars, watching as the golden liquid transforms into solid candles. After allowing them to cool, you can trim the wicks and admire your handiwork. These workshops not only teach you a new skill but also provide a fun way to connect with others who share your interest in candle making.
Beeswax Tea Light Candles

Beeswax tea light candles are a delightful way to add warmth and charm to any space. They are small, portable, and perfect for creating a cozy atmosphere. The image shows several glowing tea lights, each with a soft, flickering flame. The warm light contrasts beautifully with the soft background, making it an inviting sight.
Making your own beeswax tea light candles is simple and fun. You’ll need beeswax sheets, a wick, and a tea light mold. Start by cutting the beeswax sheets into rectangles that fit your mold. Then, place the wick in the center of the mold and pour melted beeswax around it. Allow it to cool completely before removing it from the mold.
Once you have your candles ready, you can arrange them on a table or use them for special occasions. They burn cleanly and emit a subtle honey scent, enhancing the overall experience. Enjoy the soothing glow and the natural benefits of beeswax in your home!
Beeswax Candle Making for Kids

Making beeswax candles is a fun and creative activity for kids. In the image, two children are happily engaged in the process. They are surrounded by colorful materials and lit candles, creating a warm and inviting atmosphere.
To start, gather your supplies. You will need beeswax sheets, a wick, scissors, and a heat source like a hairdryer or a warm oven. Make sure to supervise the kids closely during this part.
Begin by cutting the beeswax sheets into desired sizes. Kids can choose different colors and shapes to make their candles unique. Next, place the wick at one end of the beeswax sheet. Roll the sheet tightly around the wick. This is where kids can really get involved, as they can press and shape the wax as they roll.
Once the candle is rolled, trim any excess wick. If you want to add a personal touch, kids can decorate their candles with stickers or markers. Finally, place the candles in a safe spot to cool. It’s exciting to see their creations come to life!
Beeswax Candle with Natural Dyes

Creating beeswax candles with natural dyes is a fun and rewarding project. The vibrant colors in the image showcase how beautiful these candles can be. Each candle has its unique hue, thanks to the natural dyes used. This not only makes them visually appealing but also adds a personal touch to your candle-making.
To get started, gather your materials. You’ll need beeswax sheets, natural dyes (like beet juice for red, turmeric for yellow, or spirulina for green), a double boiler, and a mold for shaping your candles. Make sure to have a wick ready for each candle.
Begin by melting the beeswax in the double boiler. Once it’s fully melted, divide the wax into separate containers for each color you want to create. Add your natural dyes to the melted wax, mixing until you achieve your desired shade. Remember, the color may look different once the wax hardens, so test a small amount first.
Next, pour the colored wax into your molds, placing the wick in the center. Allow the candles to cool completely before removing them from the molds. Trim the wicks to your preferred length, and your colorful beeswax candles are ready to light up any space!
Beeswax Candle Gift Sets
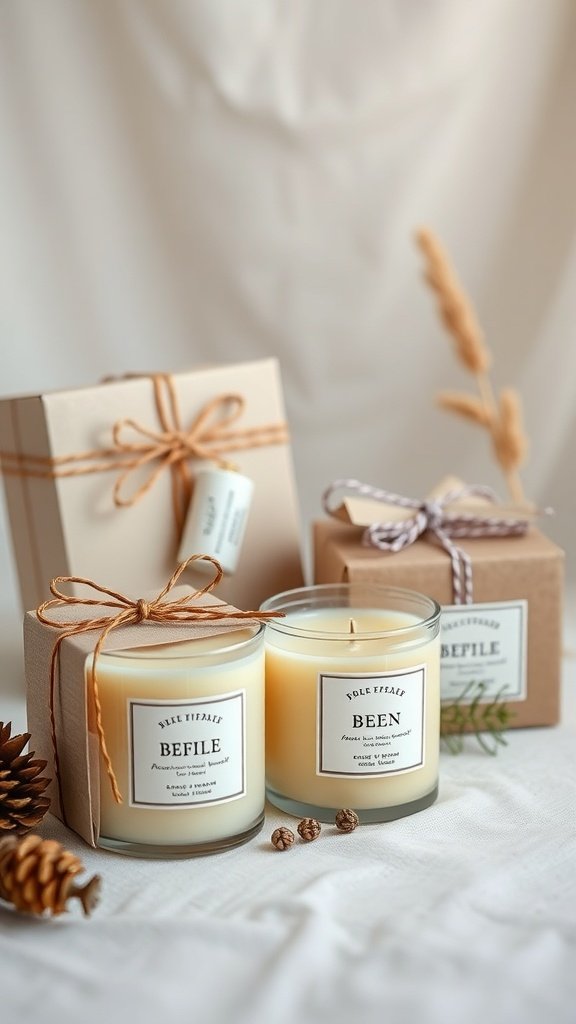
Beeswax candle gift sets make for thoughtful and charming presents. The image showcases beautifully packaged candles, each with a unique label. These candles are not just pretty; they also offer a warm, natural glow and a delightful honey scent.
Creating your own beeswax candle gift set is simple and fun. Start by gathering materials like beeswax sheets, wicks, and essential oils for fragrance. You can even personalize the candles by choosing different shapes or colors.
To make a basic beeswax candle, cut the beeswax sheet to your desired size. Place the wick at one end and roll it tightly. Make sure the wick is centered as you roll. Once you reach the end, pinch the bottom to secure it. You can also add a few drops of essential oil to enhance the scent.
Next, package your candles in decorative boxes or bags. Add a personal touch with a handwritten note or a small tag. This makes the gift feel extra special. Consider including a few pinecones or dried flowers in the package for a rustic look.
These gift sets are perfect for any occasion, whether it’s a birthday, holiday, or just to say thank you. They show you care and are a lovely way to share the beauty of handmade candles.
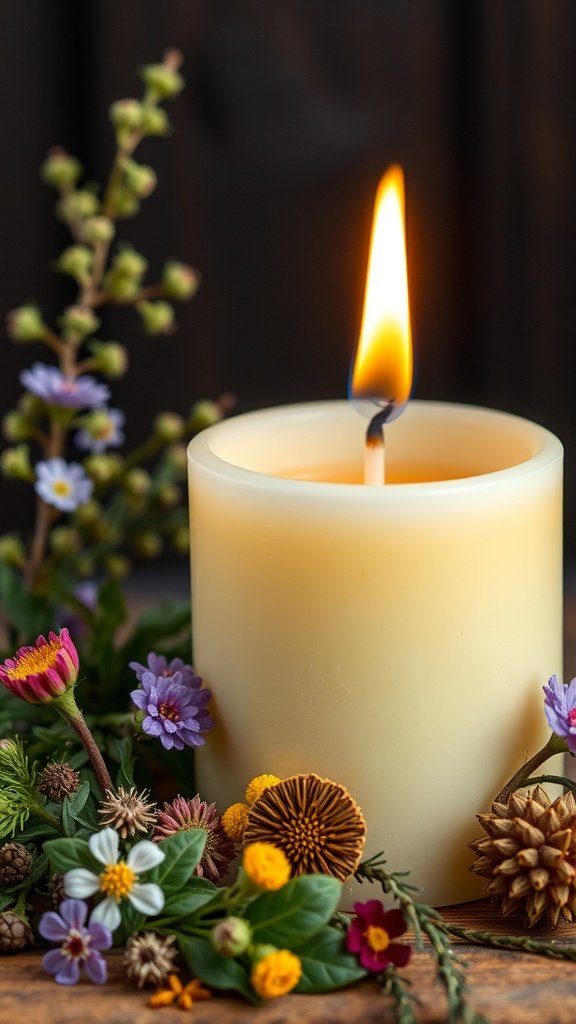
Beeswax Candle with Embedded Botanicals

Creating a beeswax candle with embedded botanicals is a delightful way to add a personal touch to your home decor. The image shows a beautifully crafted candle, glowing softly with a flame, surrounded by colorful dried flowers and herbs. This not only enhances the visual appeal but also infuses your space with natural scents.
To make your own, start by gathering your materials. You will need beeswax, a candle wick, a heat source, and your choice of dried flowers or herbs. Popular options include lavender, chamomile, and rose petals, which add both beauty and fragrance.
Begin by melting the beeswax in a double boiler. Once it’s fully melted, carefully pour a small amount into your container to create a base layer. Before it sets, arrange your botanicals in the wax. You can place them directly in the wax or press them against the sides of the container for a stunning effect.
After positioning the botanicals, pour more melted beeswax to fill the container. Make sure the wick is centered and secure. Allow the candle to cool completely before trimming the wick to about half an inch. Light it up and enjoy the warm glow and lovely aroma!
Beeswax Candle with Wooden Wicks
Creating a beeswax candle with a wooden wick is a fun and rewarding project. The image shows a glowing beeswax candle, highlighting its warm, inviting color. The wooden wick adds a unique touch, giving off a soft crackling sound when lit, similar to a fireplace.
To make your own beeswax candle, you’ll need a few simple ingredients: beeswax pellets, a wooden wick, a candle container, and a double boiler. Start by melting the beeswax in the double boiler until it’s fully liquid. Make sure to stir occasionally for even melting.
Once melted, carefully pour the beeswax into your container, leaving some space at the top. Place the wooden wick in the center while the wax is still warm to ensure it stays in place. Allow the candle to cool completely, which may take a few hours.
After cooling, trim the wooden wick to about 1/4 inch above the wax. Now your beeswax candle is ready to light! Enjoy the natural honey scent and the cozy atmosphere it creates.
Beeswax Birthday Candles

Beeswax birthday candles are a delightful way to add a natural touch to your celebrations. These candles not only look charming but also burn cleanly, making them a healthier choice for your special day.
In the image, you can see a colorful birthday cake adorned with vibrant decorations and four glowing beeswax candles. The candles are twisted, showcasing their unique texture, and they emit a warm, inviting light. This scene captures the joy and festivity of a birthday celebration.
Making your own beeswax birthday candles is simple and fun! Here’s how:
Ingredients:
- Beeswax sheets
- Wick
- Scissors
- Ruler
Steps:
- Start by measuring and cutting the beeswax sheets into rectangles. A good size for birthday candles is about 1 inch wide and 6 inches long.
- Place the wick at one end of the beeswax sheet, leaving a little extra wick at the top for lighting.
- Carefully roll the beeswax around the wick, making sure it’s tight and even.
- Once rolled, trim the wick to your desired length, typically about half an inch above the candle.
- Repeat the process for as many candles as you need, and then place them on your cake!
These homemade beeswax candles will not only brighten up your cake but also fill the room with a subtle, sweet aroma. Enjoy the celebration!
Beeswax Candle for Aromatherapy

Creating a beeswax candle for aromatherapy is a delightful way to enhance your space. The image shows a warm, glowing beeswax candle surrounded by beautiful flowers and essential oils. This setup not only looks inviting but also promotes relaxation and well-being.
To make your own beeswax candle, you’ll need beeswax, a wick, and your favorite essential oils. Start by melting the beeswax in a double boiler. Once melted, add a few drops of essential oil to infuse the candle with a soothing scent. Lavender and eucalyptus are popular choices for relaxation.
Next, prepare your wick by securing it to the bottom of your container. Pour the melted beeswax into the container, making sure the wick stays centered. Allow it to cool and harden completely. Trim the wick to about a quarter inch above the wax. Light your candle and enjoy the calming aroma filling your space.
This simple process not only gives you a beautiful candle but also allows you to customize scents that suit your mood. Whether you want to unwind after a long day or create a cozy atmosphere, a beeswax candle can do just that.
Beeswax Candle with Personalization
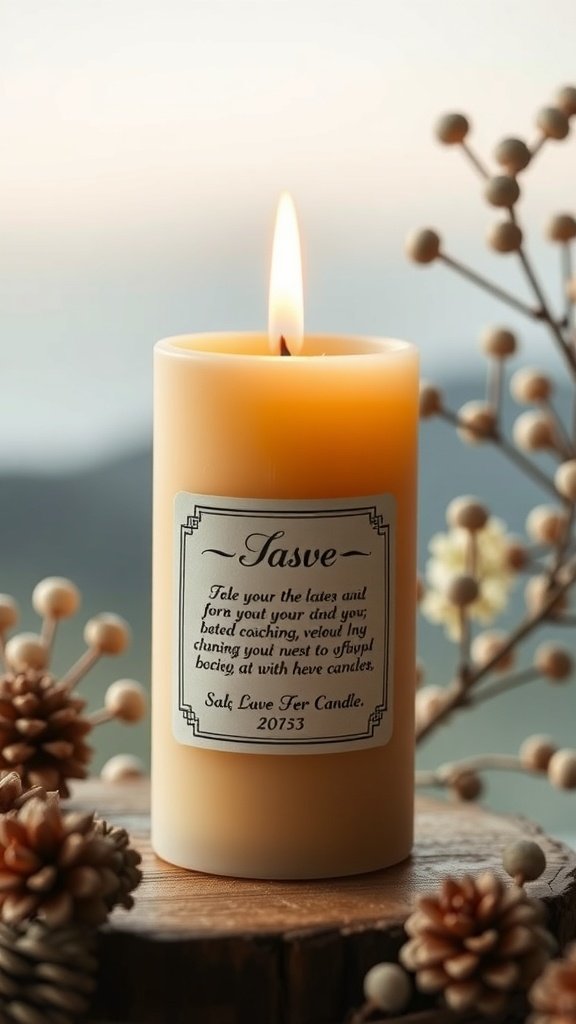
Creating a personalized beeswax candle is a fun and rewarding project. The image shows a beautifully crafted candle with a warm glow, surrounded by natural elements like pine cones. This candle not only serves as a source of light but also as a unique piece of decor.
To make your own personalized beeswax candle, start by gathering your materials. You will need beeswax sheets, a wick, and any decorative items you want to add, like dried flowers or special labels. You can also use essential oils for a delightful scent.
Begin by cutting the beeswax sheets to your desired size. Place the wick in the center and roll the sheet tightly around it. Make sure to press firmly to ensure it holds its shape. If you want to add a personal touch, consider writing a message or using stickers on a label to attach to the candle.
Once your candle is rolled, trim the wick to about half an inch above the top. Allow the candle to cool completely before lighting it. This candle will not only brighten your space but also make a thoughtful gift for friends and family.
Beeswax Candle Safety Precautions

Making beeswax candles can be a fun and rewarding experience. However, safety should always come first. The image shows a checklist that highlights important safety tips to keep in mind while crafting your candles.
First, ensure that your workspace is clean and organized. This helps prevent accidents. The checklist reminds us to check the condition of your candle-making supplies. Damaged materials can lead to mishaps.
Next, pay attention to the temperature of the wax. Beeswax can get quite hot, so using a thermometer is a smart move. This will help you avoid burns. The checklist suggests being cautious with the packaging and materials you use, ensuring they are safe for candle-making.
Another key point is to monitor the wick. A well-trimmed wick helps control the flame and reduces soot. The checklist also emphasizes the importance of keeping flammable materials away from your workspace.
Finally, always supervise your candles while they burn. Never leave them unattended. This is crucial for safety. Following these steps will help you enjoy the process of making beeswax candles while keeping your space safe.
Beeswax Candle Seasonal Themes
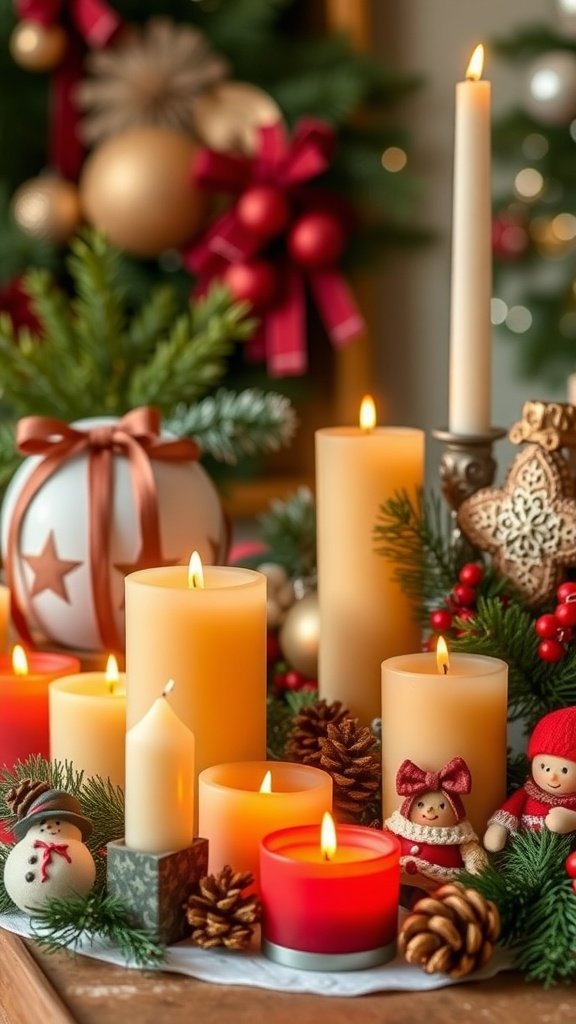
Beeswax candles are perfect for creating a cozy atmosphere during any season. The image shows a beautiful arrangement of beeswax candles surrounded by festive decorations. The warm glow of the candles adds a touch of magic to the holiday season.
For winter, consider making candles in festive shapes like snowflakes or Christmas trees. Use cookie cutters to shape the beeswax, then melt and pour it into molds. Add essential oils like pine or cinnamon for a seasonal scent.
As spring approaches, try pastel colors. You can mix natural dyes with the beeswax to create soft shades. Use flower molds or create layered candles with different colors. Scents like lavender or lemon will bring a fresh feel to your space.
In summer, think about bright colors and fruity scents. Use citrus essential oils and vibrant dyes. You can make small votive candles to use during outdoor gatherings. Adding dried flowers or herbs can enhance the look and aroma.
For fall, opt for earthy tones and warm scents like pumpkin spice or apple cider. Create candles in pumpkin shapes or use autumn leaves as decorations. These will not only look great but also fill your home with comforting fragrances.
Beeswax Candle Care Tips

Beeswax candles are a wonderful addition to any home. They not only provide light but also create a warm and inviting atmosphere. To keep your beeswax candles looking and performing their best, here are some handy care tips.
First, always trim the wick before lighting. A shorter wick helps prevent excessive smoke and keeps the flame steady. Aim for about 1/4 inch in length. This small step can make a big difference in how your candle burns.
Next, avoid placing your candles in direct sunlight or near heat sources. Beeswax can soften and lose its shape if exposed to high temperatures. Store them in a cool, dry place to maintain their integrity.
When burning your beeswax candle, let it burn long enough for the wax to melt evenly across the top. This helps prevent tunneling, where the candle burns down the center, leaving wax on the sides. A good rule of thumb is to burn it for one hour for every inch in diameter.
Lastly, if you notice any dust or debris on your candles, gently wipe them with a soft, dry cloth. This keeps them looking fresh and clean. Following these simple tips will help you enjoy your beeswax candles for longer!